Category Archives: dessert

Thursday, November 21, 2013

3-Ingredient Creamy Raw “Caramel” (SCD, GAPS, Paleo)

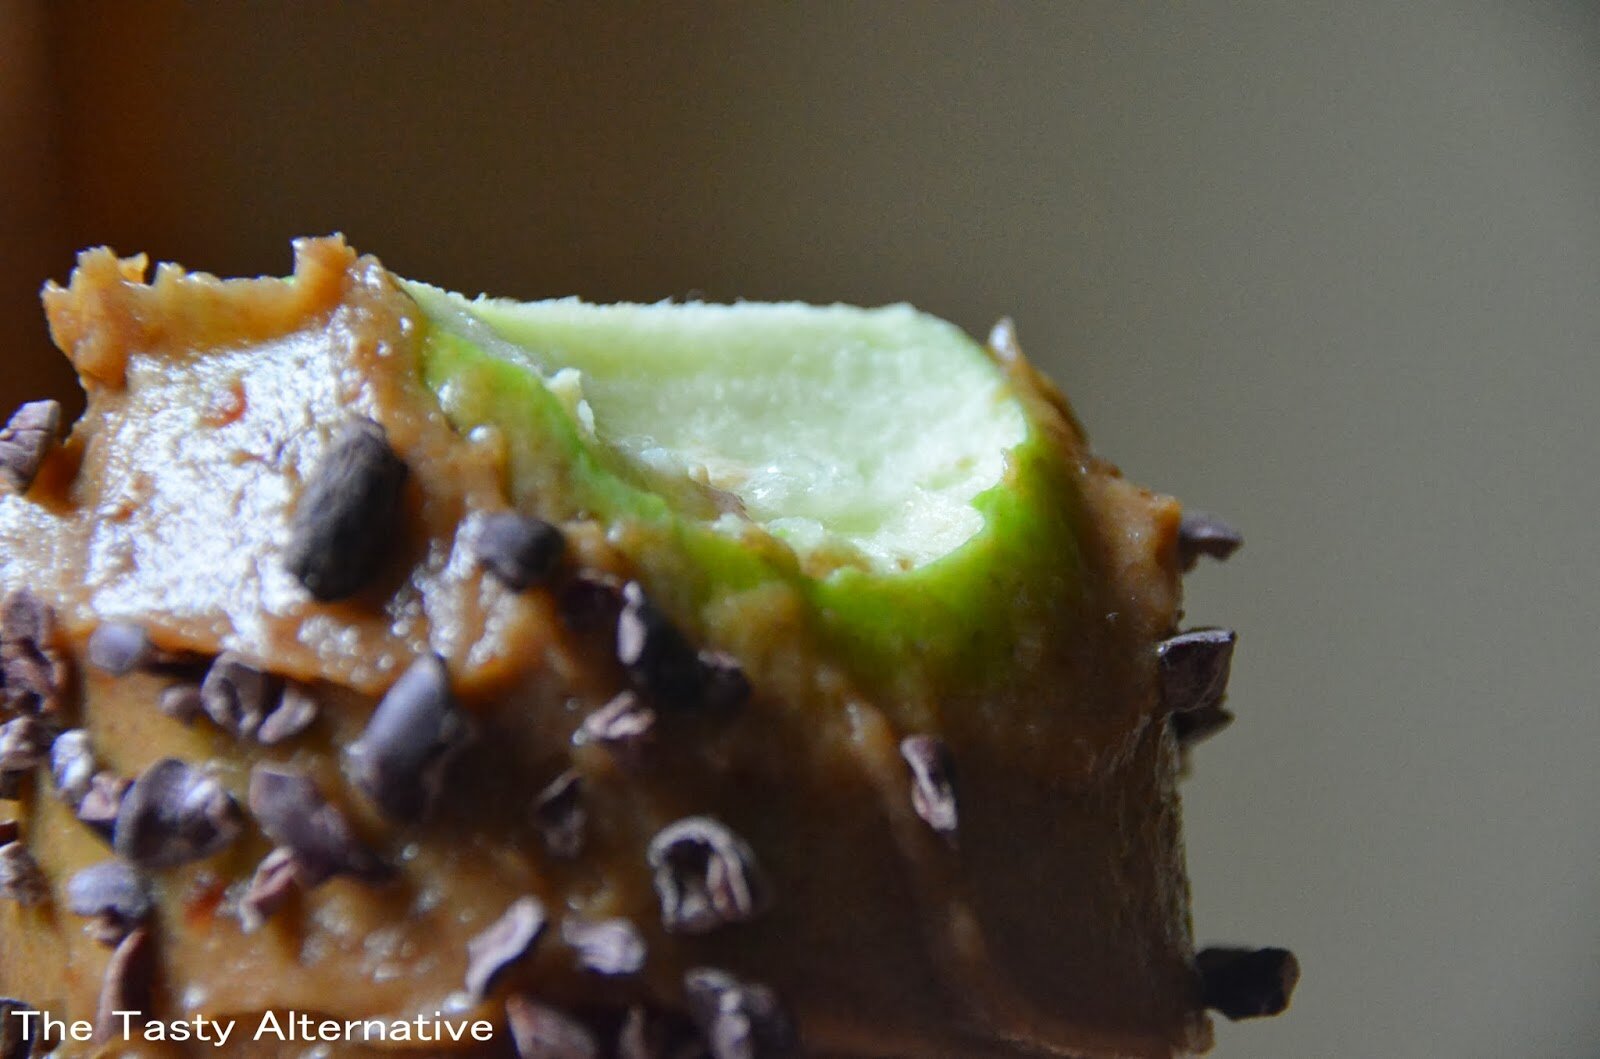
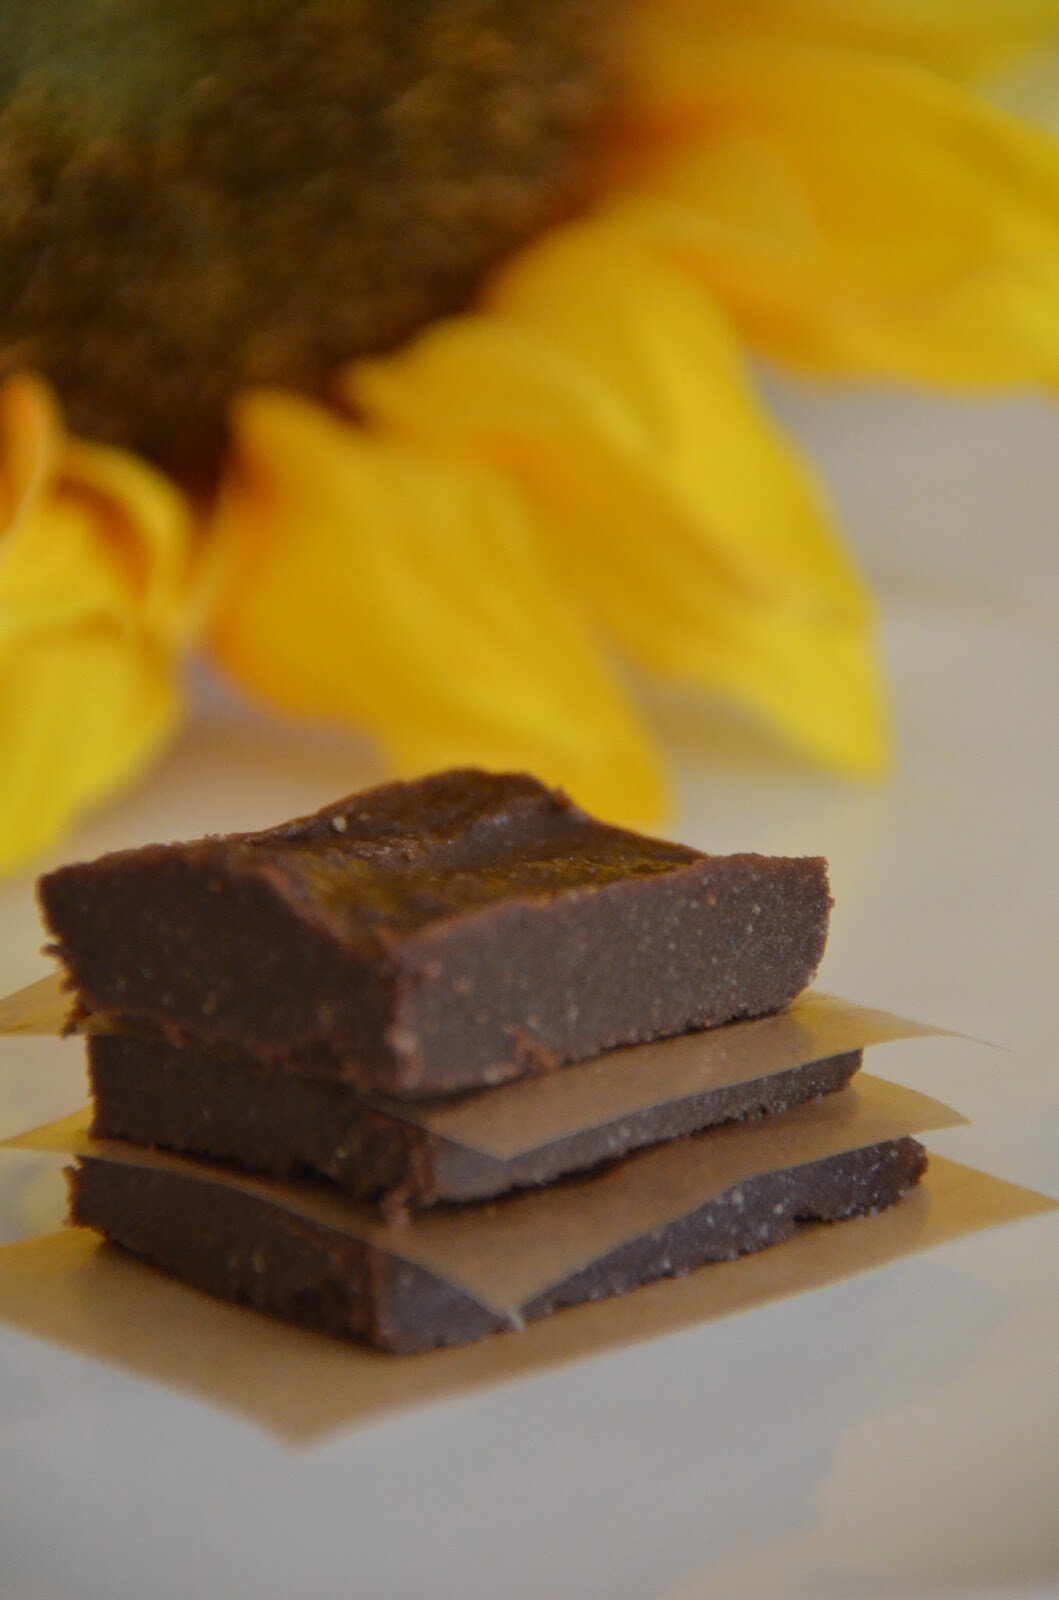
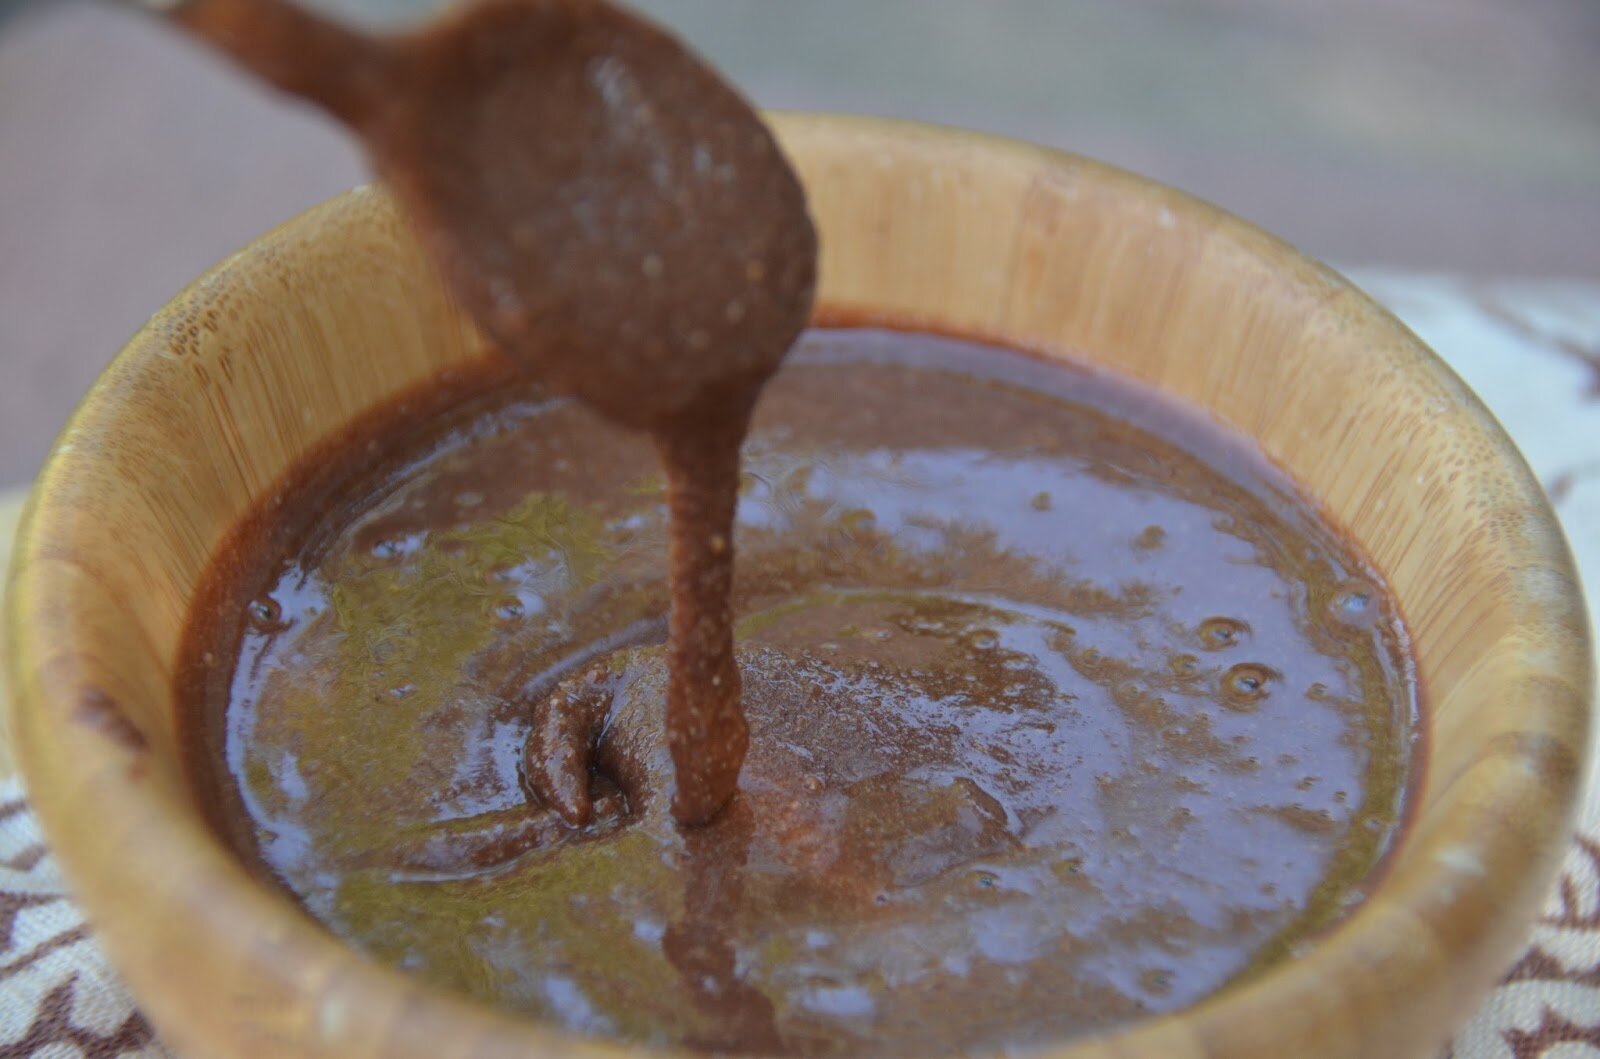
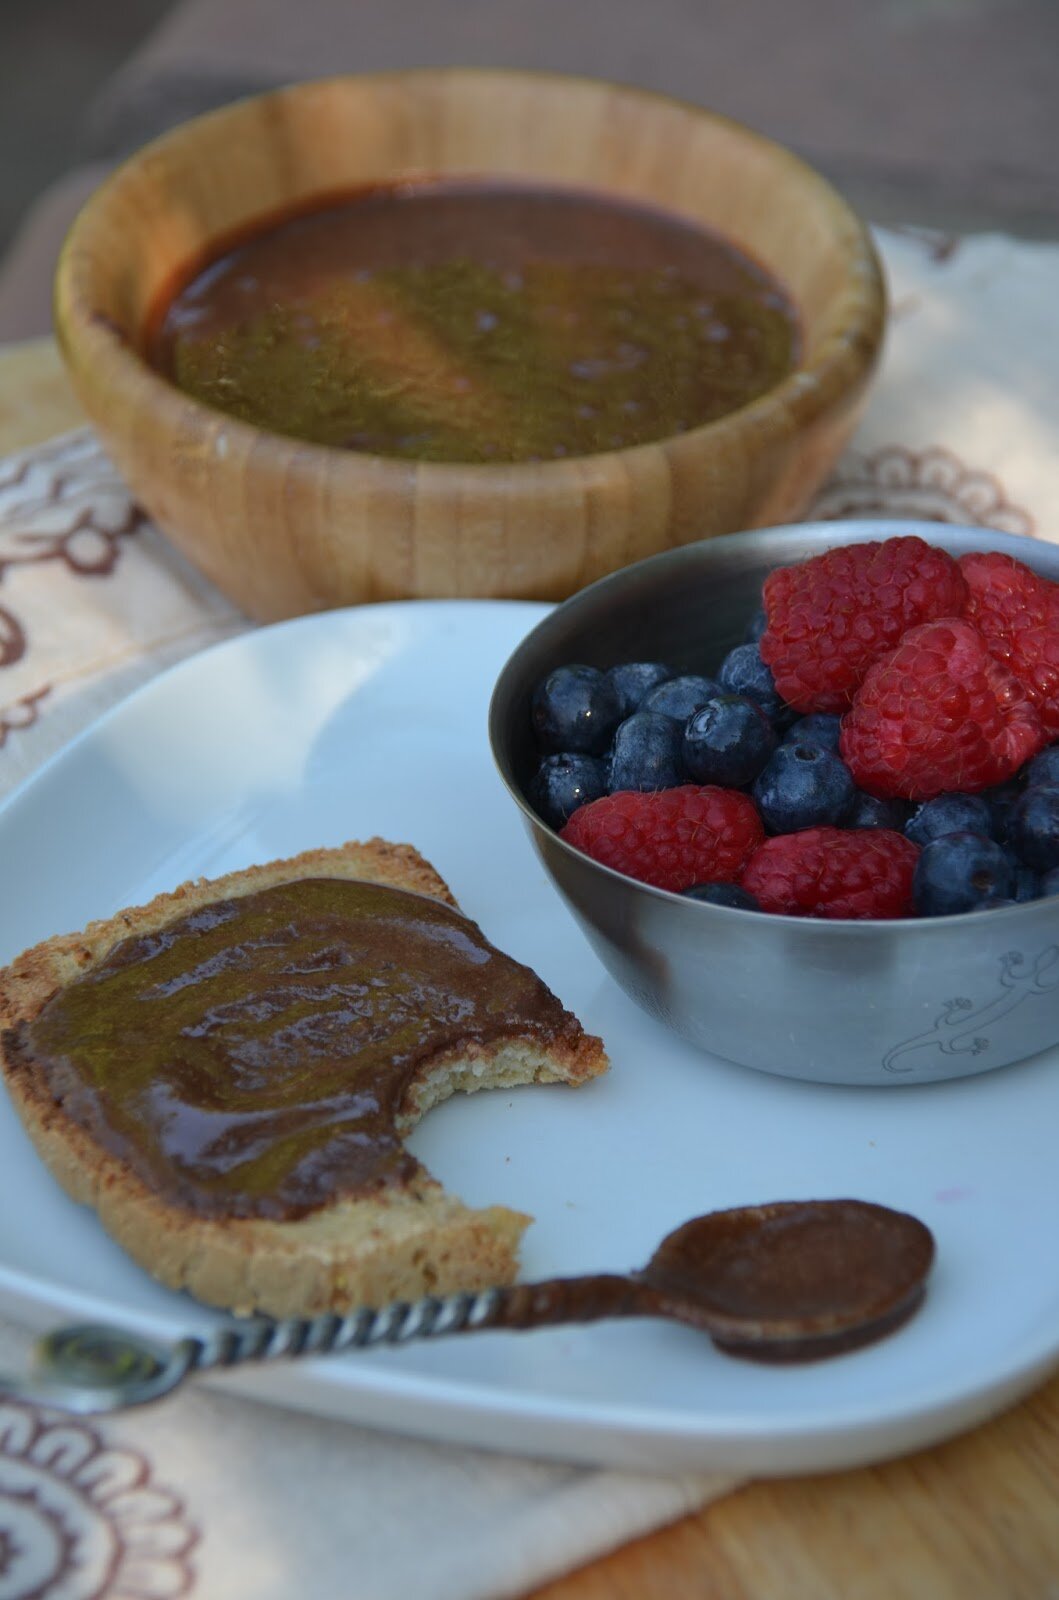
One of my more popular posts and perhaps one of my favorite recipes is my raw “caramel” sauce.  I make it quite frequently and practically drink the stuff.  I’ve been experimenting with the original recipe in hopes to make a thicker version that would mimic actual caramel so I could spread it or use it in chocolate.  Well, with very little effort I made it work just by adding more dates and excluding some of the liquid ingredients.  Let me first say that the cashew butter is a must in this recipe. You can make your own or buy the super expensive (albeit super delicious) store brand.  Either way, cashew is the way to go.  This “caramel” is thick, creamy, and delicious.  And it remedies my husband’s sweet tooth like nobody’s business.  Great for kids too – check out how fun and easy it is to spread on tart apples.  I hope you’ll give this a try.  It’s a delightful raw treat.  
Creamy Raw Caramel
 
Ingredients:
-2 cups of Medjool dates – 24 dates (make sure they are fresh and soft)
-1/2 cup cashew butter*
-2 tablespoons honey*
-2 teaspoons vanilla (optional)
 
How To:
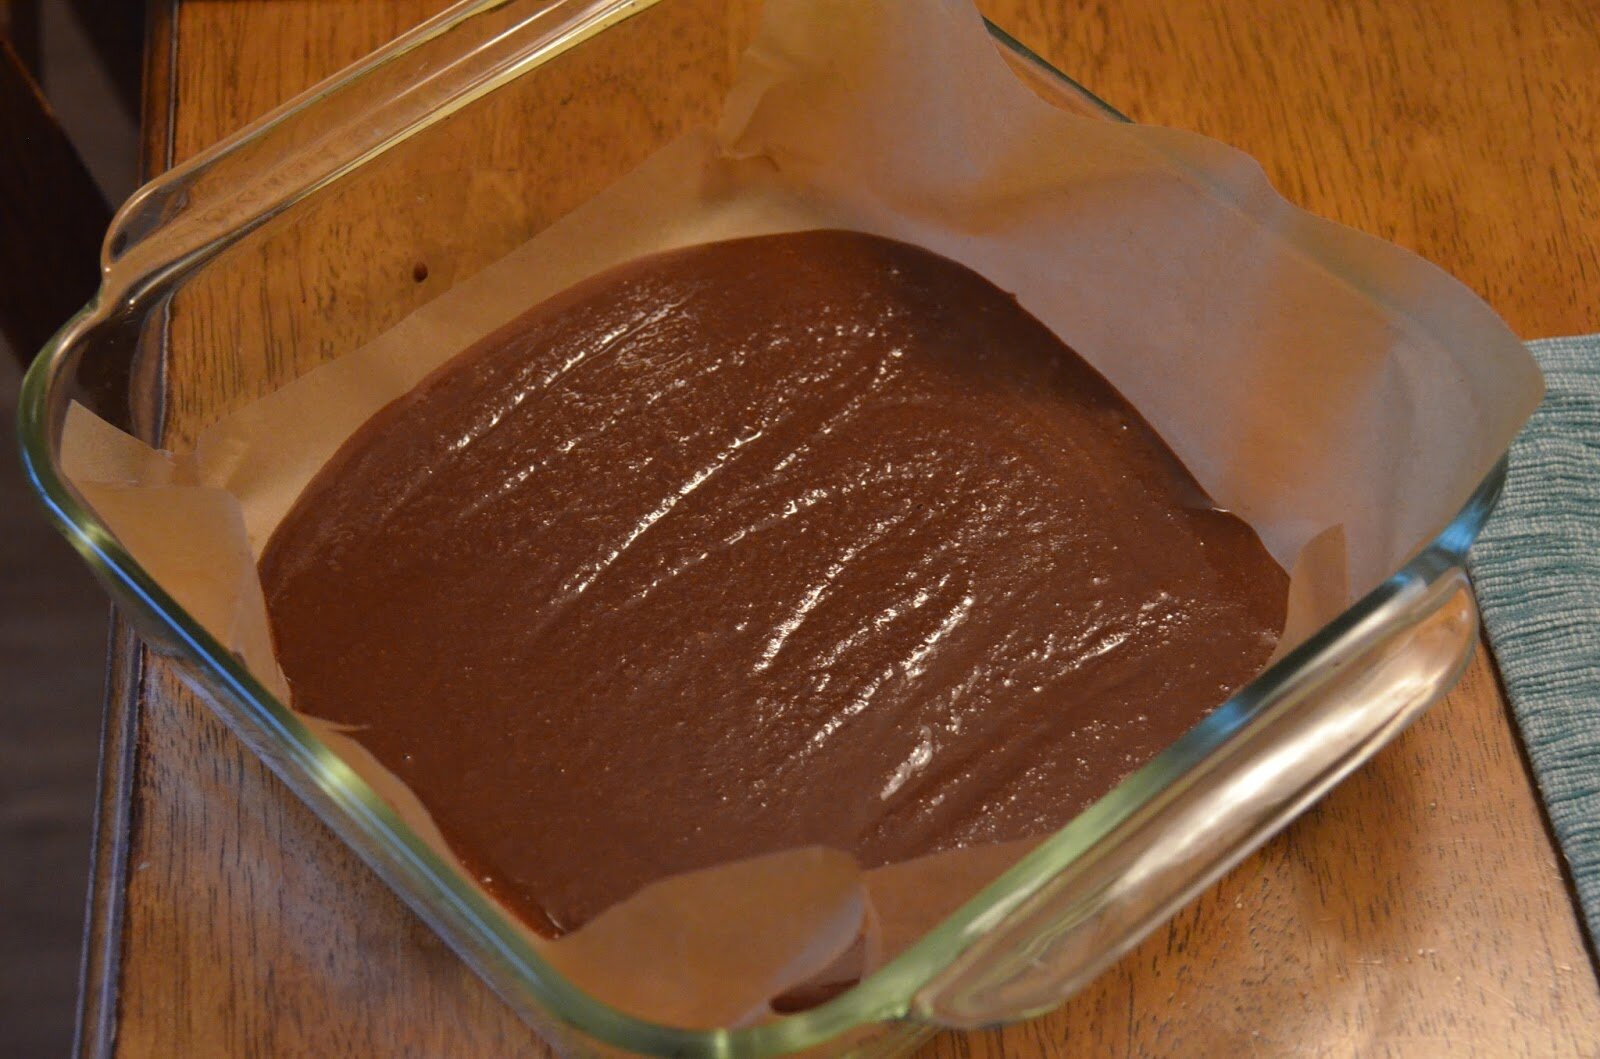
1.  Seed the dates and soak the dates in room temperature water for 1 hour (do not soak longer, as they will become too soft and create very thin caramel).
2.  After the dates have soaked for 1 hour, drain all the water off and add them to a food processor fitted with the S blade and pulse until broken down and coming together as a paste.
3.  Add in the cashew butter and blend.
4.  Drizzle in the honey and optional vanilla 
5.  Blend until everything is well incorporated and the mixture is thick and creamy.
6.  Eat as is or store in refrigerator.
 
Notes:
*For the cashew butter, use homemade or this store brand is quite delicious. 
*Cannot have cashews, try sunflower seed butter – it will completely change the flavor (just FYI).  Almond butter might work, but it has a much different texture, so the final product will not be as creamy (probably thin and gritty).  Sorry if you cannot have dates, I don’t have any subs for the dates. 
*In place of the honey, vegans use grade B maple syrup, coconut nectar, yacon syrup (or 10 drops of stevia).
{affiliate links in post} 
Shared on:  Busy Monday, Sweet Sharing Monday, Melt in your Mouth Monday, Mix it up Monday,  Allergy-Free Wednesdays, Gluten Free Wednesdays, Whole Foods Fridays, Raw Foods Thursday, Wellness Weekend, Lunchbox Love Friday,  Allergy-Free Wednesdays 
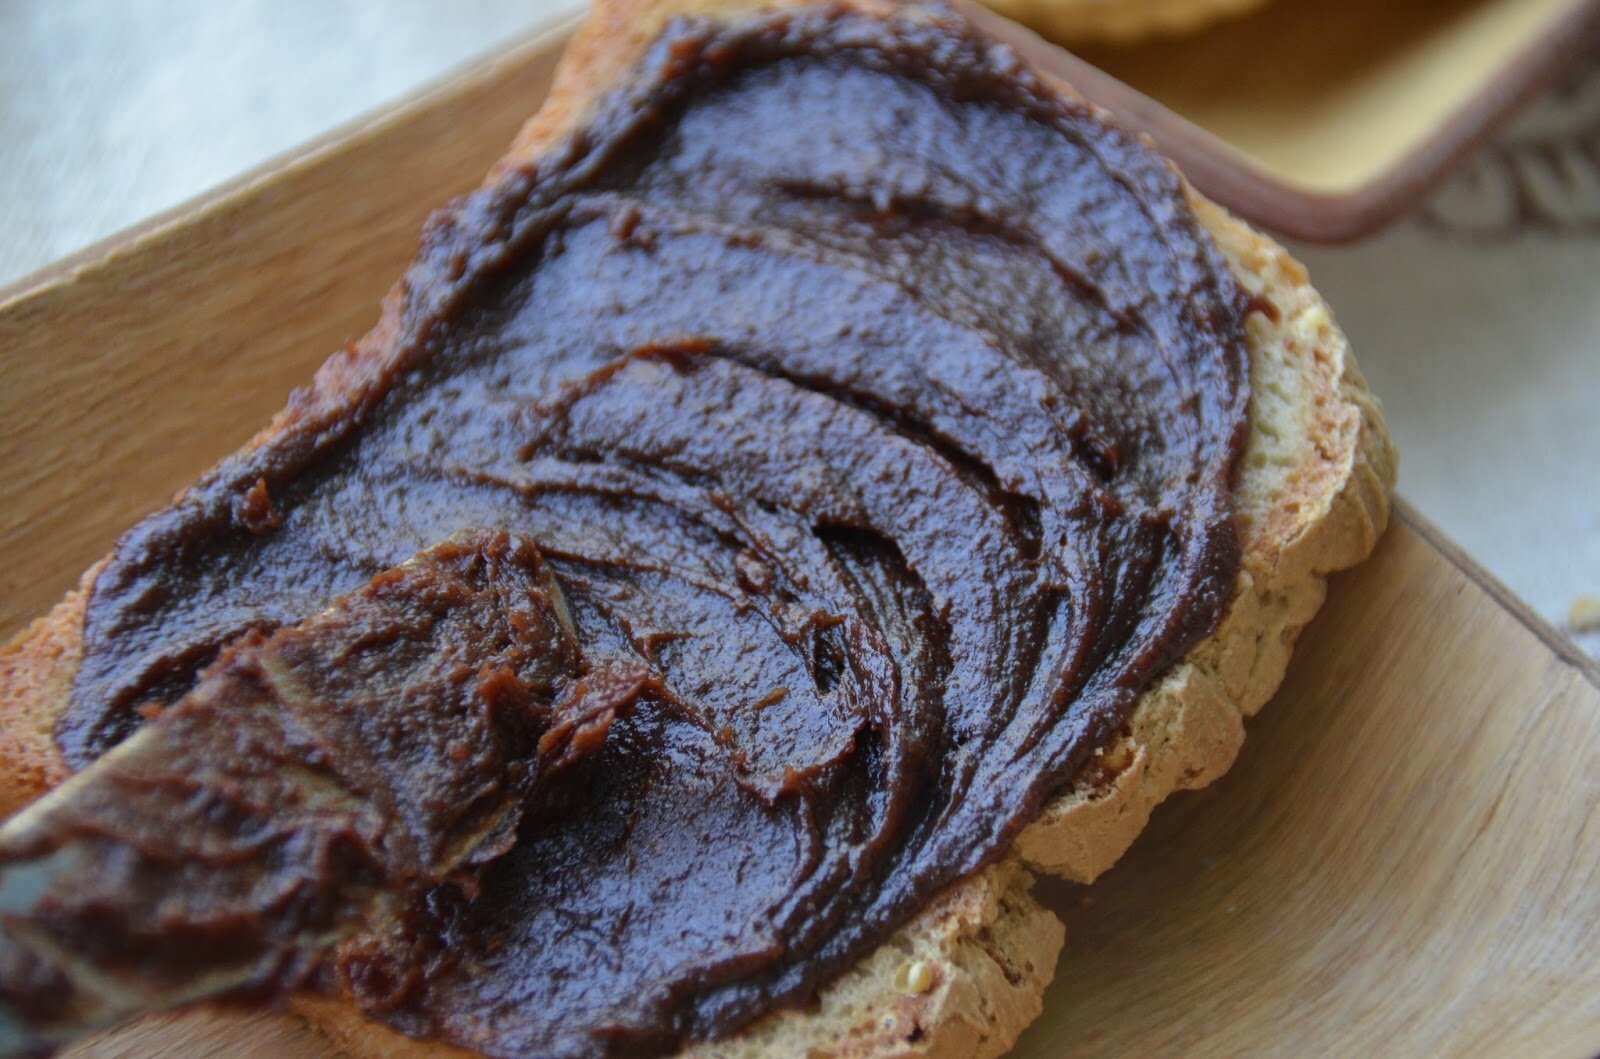
Posted by Amber at

Labels: dessert, GAPS, Paleo, raw, SCD, snacks.

20 Comments

Leave a Reply

Your email address will not be published. Required fields are marked *

Monday, November 11, 2013

Dairy-Free Banana Carob Pudding with Vanilla Bean Whipped Coconut Cream + Why I LOVE Carob

Last year after I posted my Bottomless Key Lime Pie recipe one of my lovely readers left a comment in the post introducing me to Great Lakes Gelatin.  I was so thankful for this reference, as I was using Knox gelatin up until that point and appreciated this new ingredient.  I’ve since been using Great Lakes to make weekly homemade Jello and to thicken smoothies and puddings (and most all my SCD desserts that need thickening).  Today I am sharing a carob pudding recipe that is the perfect anytime treat for my kiddos (and yes for my sweet tooth husbandwho LOVES this pudding BTW).  It’s smooth and creamy and has a lovely malty flavor from the carob.  We are big carob lovers in this house for many reasons (no caffeine & no theobromine) but for me I love that carob has so many health benefits (please see below for that information).  Pudding is such a great treat anytime of the year and so easy to fill with nutrient dense, whole foods!  
Health Benefits of Carob:
(Information below generated from this site)
Once referred to as locust, carob pods are found mainly in Mediterranean countries. Evergreen carob trees generally can grow wherever citrus or olive trees do, meaning a warm, dry climate. The pod’s fruit is technically a legume. 
 

Antioxidant

Carob is high in antioxidants. A study published in the “Plant Foods for Human Nutrition” journal in March 2011 found that carob germ flour showed not only antioxidant but also cytotoxic activities. The flour has capabilities to attack and target specific cervical cancer cells, the study found. The antioxidant activity helps the body repair free radical damage, which is a process of aging.

Fiber

Plants are naturally high in insoluble fibers, which contain polyphenols. Another study published in “Plant Foods for Human Nutrition” in January 2010 compared two groups of people with high cholesterol. One group took a placebo, while the other consumed approximately 4 grams of carob fiber a few times a day. After four weeks, the group eating the carob fiber had lower total and low-density lipoprotein cholesterol levels.

Gastrointestinal Support

Carob has a binding action within the intestinal tract. This means it helps absorb liquid and aids problems such as diarrhea. Mixing carob powder with pureed cooked fruit or an electrolyte solution is a gentle and natural way to help with diarrhea, notes the University of Maryland Medical Center. Talk to your health care provider before using carob or other herbs to treat diarrhea.
Please see HERE for Carob’s complete nutritional breakdown.  And HERE for another post discussing carob’s benefits.  Dairy-Free Banana Carob Pudding

Ingredients

Carob Banana Pudding:
-1 can room temperature coconut milk here or here 
-1 1/2 cups very ripe banana
-3 tablespoons local honey or grade B maple syrup
-1 teaspoon vanilla extract 
-2 teaspoons grass fed gelatin (see notes for vegan sub)
-1/4 cup carob powder

How To
1.  In a 1 cup glass Pyrex add 1/3 cup coconut milk and 2 teaspoons gelatin.  Whisk together well and let “bloom”
2.  In a sauce pan heat the remaining coconut milk until heated, not boiled (do not boil the milk).  
3.  Remove sauce pan from heat and whisk in the gelatin mixture.
4.  Add all the coconut milk to a blender along with the other pudding ingredients and blend on high for 15 seconds.  
5.  Pour pudding mixture into a bowl or several little jars or glasses.
6.  Transfer to refrigerator and allow to set up for at least 8 hours.  
7.  Top with maple coconut whipped cream or vanilla bean coconut whipped cream (recipe below).  

Vanilla Bean Coconut Whipped Cream:
-1/2 cup soaked cashews (4 to 6 hours)* 

-Coconut cream from 1 can of coconut milk here or here 
-1 teaspoon vanilla extract 
-1 vanilla bean, sliced in half and scraped out 
-2 tablespoons local honey or grade B maple syrup 

How To
1.  Drain the cashews and add to a blender (preferably high speed). Add in the coconut cream, vanilla, vanilla bean, and honey.
2. Using the tamper, move the mixture around and blend until everything is well incorporated, smooth and creamy.  
3.  Transfer to a glass container and store in fridge for 4 to 6 hours.
4.  Remove from fridge and mix.  Fill a pastry bag and top pudding. 

Notes:
*Omit cashews for AIP – just use the coconut cream 
*Vegans add 3 tablespoons ground chia seeds in place of the gelatin.  If you are a die hard chocolate lover and looking for a vegan chocolate recipe, please see my Chocolate Pumpkin Pudding. Or for a different flavor combination, try my Vegan Raw Persimmon Cranberry Pudding

{this post contains affiliate links}
Shared on:  Busy Monday, Sweet Sharing Monday, Melt in your Mouth Monday, Mix it up Monday,  Allergy-Free Wednesdays, Gluten Free Wednesdays, Slightly Indulgent Tuesdays, Raw Foods Thursday, Lunchbox Love, Whole Food Fridays, 
Posted by Amber at

Labels: AIP, dessert, Paleo, pudding, snacks.

20 Comments

Leave a Reply

Your email address will not be published. Required fields are marked *

Tuesday, October 8, 2013

No-Bake Mini Pumpkin “Cheesecake” with Vanilla Bean Coconut Cream Topping (dairy free, grain free, cane-sugar free)

Last month I gave a little teaser about this recipe on Facebook.  I’m so excited to finally share!  Angel from Wellness Angel put together a week-long fall inspired blog series.  To kick things off, yesterday Angel shared a wonderful vegan lentil loaf, a must try recipe.  Please visit Angel’s blog when you get a chance – I simply adore her wellness philosophy.

This no-bake pumpkin cheesecake is fabulous.  It’s light, super creamy, and bursting with fall flavors.  I had several traditional eaters test this recipe and they all gave it rave reviews, with the pumpkin flavor and sweetness spot on.  This is my pumpkin pie for the holidays.  No bake means easy peasy and there are minimal ingredients.  It can be made the day before which is always very convenient.  I hope you and your family enjoys this recipe as much as we do.    
No-Bake Pumpkin Cheesecake 
with Vanilla Bean Coconut Cream Topping 
and Pumpkin Seed Crust 

Ingredients:

Crust
-1 cup raw pumpkin seeds 
-1 cup Medjool dates (about 7 regular size), seeded and chopped 
-1 tablespoon maple syrup* 
-2 tablespoons carob powder 

Pumpkin Filling 
-1 cup raw cashews soaked 4 to 6 hours 
-1 cup cooked plain pumpkin puree 
-1/3 cup maple syrup* 
-1/2 cup melted coconut oil
-1 teaspoon vanilla extract 
-1 teaspoon ground cinnamon
-1/2 teaspoon ground ginger
-1/8 teaspoon ground nutmeg

Vanilla Bean Coconut Cream Topping
-3/4 cup cashews soaked 4 to 6 hours 
-Cream from 1 can of full fat coconut milk*
-2 tablespoons maple syrup*
-1 vanilla bean
-1 teaspoon vanilla extract 

How To:

Crust
In a food processor add the pumpkin seeds and blend for 10 seconds.  Add in the chopped dates and blend with the pumpkin seeds until incorporated.  With the food processor running, add in the maple syrup and carob.  Blend until incorporated.  Press the mixture into baking cups or a spring form pan.

Pumpkin Filling 
1.  Drain and rinse the cashews.  
2.  In a high speed blender (or high quality blender, such as a Ninja), add in the cashews, pumpkin puree, vanilla extract, and maple syrup and blend on medium speed. Use the tamper to encourage the mixture to move around.  
3.  Turn the blender on low and drizzle in the melted coconut oil. Repeat with the tamper, encouraging the mixture to flow, and turn on high.  
4.  Turn down to low and add in the spices, then continue blending.  
5.  The mixture is ready when it’s creamy and smooth.  
6.  Add this mixture to the top of the crust. Then place in the refrigerator.

Vanilla Bean Coconut Cream Topping
1.  Drain and rinse the cashews.  
2.  In a high speed blender (or high quality blender, such as a Ninja), add in the cashews, coconut cream, vanilla extract, and maple syrup and blend on medium speed. Use the tamper to encourage the mixture to move around.  
3.  Scrape out inside of the vanilla bean and add this to the mixture. Blend until incorporated.  
4.  Add this mixture to the top of the pumpkin mixture.  Sprinkle with cinnamon (optional).  Place in the refrigerator for at least 2 hours to firm up.

This recipe makes 18 mini cheesecakes or one 8 inch spring-form pie.    

Notes
*Vegans use maple syrup or coconut nectar.  SCD use only honey.  Paleo use coconut nectar or honey. SCD omit carob and use 2 tablespoons of coconut flour.
*For the coconut cream, place a can of full fat coconut milk in the refrigerator for at least 3 days (I always have 4 or 5 in there).  It’s okay if the coconut cream doesn’t separate well after 3 days.  Just be sure to NOT shake the can.  Gently open the can and pour the coconut cream into the blender.  Stop when you get to the watery part.  The coconut cream doesn’t need to be super thick for this recipe, you just want the cream and water to be separated so you can get the cream out.  

This recipe also works great in a spring form pan.  
Here is the process
Press crust into baking cups
Fill with the pumpkin mixture 
Then the coconut cream topping 
My kiddos love to help press the crust into the baking cups 
Other “Cheesecake” recipes from The Tasty Alternative 


Raw Strawberry “Cheesecake

Mini Strawberry Cultured “Cheesecakes” 
_________________________________________
{affiliate links included}
Shared on: Allergy-Free Wednesdays, Wellness Weekend, Lunchbox Love, My Meatless Mondays,
Fat Tuesdays 
Posted by Amber at

Labels: dessert, fall cuisine, grain free, Paleo.

38 Comments

Leave a Reply

Your email address will not be published. Required fields are marked *

Saturday, September 14, 2013

Melt In Your Mouth Carob Sunbutter Fudge – and pictures of gorgeous sunflower fields

This carob fudge came about when I was experimenting with my nut-free nutella.  One batch became very fudge-like after a few hours in the fridge.  I shared a little teaser about this recipe on Facebook last week.  I don’t know about you, but I don’t do a lot of chocolate for my kiddos.  It’s highly stimulating.  For us, chocolate is really a once in a while treat.  But carobcarob we eat often.  And I like that I can give a “chocolate” treat after dinner for dessert.  This recipe really does melt in your mouth and actually tastes (I kid you not) like chocolate.  Give it a try and let me know what you think.

  Melt In Your Mouth Carob Sunbutter Fudge 

Ingredients
-1/2 cup room temp homemade sunflower seed butter
-1/4 melted cup coconut oil
-1 teaspoon vanilla extract
-2 tablespoons honey (vegans use grade B maple syrup)
-5 drops stevia
-3 tablespoons raw carob poweder  
-Pinch of salt 

How To:
1.  To a food processor add the sunflower seed butter, coconut oil, vanilla extract, honey, stevia and blend until smooth.  Add in the carob and blend until well incorporated.  
2.  Set some wax paper into an 8×8 Pytex dish and spoon the mixture in.  Don’t spread it around to all sides too thin, just give it little smooth over.  Refrigerate for at least 2 hours.
3.  Cut into pieces and enjoy.  Store in fridge.  

I freaking LOVE sunflowers.  Love, love, LOVE them.  I love them so much, I had one tattooed on my back!  Sunflowers are my happy place.  They are my go-to calming visual.  I wanted to share these gorgeous pictures with you.  I took them back in June (on Father’s Day actually) after a trip from those there hills you see in the background (went for a hike with the kiddos).  We are surrounded by sunflower fields here in Davis.  This field pictured below is like two miles from my house.  If you’re not familiar with whereabouts we are located, we are roughly 15 minutes west of Sacramento (the capital of California), and about an hour away from San Francisco.  Even though we are only 15 minutes from Sacramento, we are quite isolated here in Davis and surrounded by agriculture.  It’s sorta nice.  Like best of both worlds.  When I want to meet up with my girlfriends for some city action, they are just a few minutes away.  Anyway, very rural here in our smallish town.  It may be rural, but proudly liberal/progressive (thankfully), and houses one of the finest Universities in the State (UC Davis).  And might I add, we are surrounded by some of the best organic farms around.  Damn, I am such a Northern California snob,  My husband and I worked so, SO very hard to land here in this wonderful town, so yes, I am proud.  And I could not be happier with all these comforting, warm and lovely sunflower fields embracing me every summer.  
Swoon.  
Shared on:  Allergy Free Wednesdays, Wellness Weekend, Allergy Free Alaska, Healthy Vegan Fridays, 
Posted by Amber at

Labels: allergy-friendly, dessert, nut free, snacks.

14 Comments

Leave a Reply

Your email address will not be published. Required fields are marked *

Friday, September 6, 2013

Raw Nutella Bites

I’ve had Nutella on my mind since making my nut-free version.  I was thinking about the hazelnut/chocolate combination and how popular it is and how pleasing the taste.  And I was thinkinghow about something bite size with this ever so popular pairing.  I’ve had some soaked and dehydrated hazelnuts in the fridge for daaaays, so I was happy to use them in something.  These are very portable little snacks.  The dates make it possible to carry at room temperature.  Nice treat for mommies and kids alike.  
Raw Nutella Bites

Ingredients:

-1 1/3 cups of hazelnuts soaked and dehydrated
-7 pitted Medjool dates
-3 tablespoons raw cacao powder (I do 2 T cacao and 1 T raw carob powder
-1/2 teaspoon vanilla extract 
-2 tablespoons honey (vegans use maple syrup, coconut nectar, or 10 drops liquid stevia)
-2 tablespoons melted coconut oil
-Pinch of salt

How To:
1.  In a food processor, add in the hazelnuts and process for 20 seconds.
2.  Add in the pitted dates, cacao, vanilla, honey, coconut oil and salt andpulse, pulse, pulse, then process until everything is well incorporated.
3.  With clean hands, form little balls and cover a few with shredded coconut if you wish.
4.  You can eat them at room temperature, or store in the fridge for later.
Makes about 12 

Shared on:  Wellness Weekend, Whole Foods Friday, Raw Foods Thursday,  Healthy Vegan Fridays, Allergy Free Wednesdays, 
Posted by Amber at

Labels: dessert, Paleo, raw, snacks.

16 Comments

Leave a Reply

Your email address will not be published. Required fields are marked *

Saturday, August 24, 2013

Homemade NUT-Free Nutella

 
The Nutella you’ll find in the store is made up of 55% refined sugar.  Yep.  There’s dairy in there too, along with soy and yes a few hazelnuts   I wouldn’t call this a health food…or even a healthy choice for breakfast (or any time of the day).  Okay, let’s put this into perspective…eating Nutella is like eating a milk chocolate bar for, what some would agree, is the most important meal of the day.  Now if that’s your thing, than you go for it, but you know how I feel about cane-sugar, so I say boo to Nutella.  They were actually sued for mislabeling as a “health food.”  Ha ha, I think they considered it healthy because it had a few hazelnuts in there.  I love indulgences as much as the next gal, but I try REALLY hard to make good choices when it comes to food, especially when it comes to my kiddos.  If something can be made at home, I give it a go.  Now Nutella, what is the appeal here really?  It’s the CHOCOLATE! It spreads.  It’s sweet.  It’s different…okay, so it’s clearly appealing.  Agreed.  I mean, it’s chocolate in a jar!  So I’ve created a chocolaty, sweet, spreadable, and nut free version that is quite a tasty alternative.  I actually use carob when I make this, as it’s better for our inflammatory issues.  Whether you use carob or chocolate, it’s fun to mix it up for snack time.  Give it a go and let me know what you think.  
Homemade NUT-Free Nutella 
Ingredients:
-6 large dates
-2 tablespoons melted coconut oil
-1/3 cup homemade sunflower seed butter or this brand is good too.
-3 tablespoons raw cacao powder  or carob powder.
-2 tablespoons honey (vegans use grade B maple syrup, coconut nectar, or yacon syrup)
-2 teaspoons vanilla extract 
-Tiny pinch of salt
How To:
1.  Seed the dates and soak them in water for 2 to 3 hours.
2.  Drain the dates (save the date water for smoothies) and add the dates to a food processor with all the other above ingredients.
3.  Blend until well incorporated.
4.  Store spread in fridge.  Allow it to sit at room temperature for a bit so it softens up.  Makes it easier to spread.
Notes:
*This recipe is also fabulous with carob powder (instead of the cacao)
*Can’t do dates?  Try the same amount of figs or 1 cup of raisins – soak as you would the dates.
Here is a date free version I tried that’s not as creamy, but still delicious and spreadable:
-1/4 cup coconut oil, liquid state
-1/2 cup homemade sunflower seed butter or cashew butter
-3 tablespoons raw cacao
-2 tablespoons honey (vegans use grade B maple syrup, coconut nectar, or yacon syrup)
-2 teaspoons vanilla extract
-Tiny pinch of salt
(Blend everything in a food processor)
Here is a picture of this date-free version at room temp.
It gets really firm in the fridge – sort of tastes like fudge!
*
Shared on: My Meatless Monday, Fat Tuesdays, Slightly Indulgent Tuesdays. Allergy-Free Wednesdays, Wellness Weekend, 
Posted by Amber at

Labels: allergy-friendly, dessert, dips and spreads, nut free, Paleo, snacks.

21 Comments

Leave a Reply

Your email address will not be published. Required fields are marked *

Thursday, July 25, 2013

Raw Peppermint Patties

These raw peppermint patties are dedicated to my handsome chocoholic husband.  This is his favorite combination (chocolate, peppermint, and coconut).  I love creating healthy treats for my family…I feel like such a superstar mom when I’m like, “Why yes, we have a fun sweet treat for snack, or yes, there is something tasty and healthy for dessert.”  I love it.  I’ve been working on this recipe for a while. I’m excited to share the final product with you today.  Enjoy!   
Raw Peppermint Patties 
 
Ingredients:
 
Chocolate Shell
-1/4 cup melted cocoa butter
-1/4 cup honey (vegans use 3 T maple syrup, 4 T coconut nectar or 1 teaspoon stevia) 
-1/4 cup raw cacao powder
-1/4 cup melted coconut oil 
-1 teaspoon vanilla extract 
-Tiny pinch of salt 
Filling
-1 cup shredded coconut
-1 to 2 tablespoon honey* (vegans use maple syrup or coconut nectar) 
-1 teaspoon vanilla 
-1 tablespoon peppermint extract/flavor (or more to your preference) 
-1 tablespoon cocoa butter (optional, but worth it) 
-Cacao nibs (optional) 
How To:
1.  Melt the cocoa butter.  Here is how to keep it raw while melting: fill a small pot with water (half full) and place a 1 cup glass Pyrex in the water.  Add the cocoa butter (shredded for quicker, more even heating).  Stir while it’s melting.  Once melted, remove from the water.  
2.  To the melted cocoa butter add in all the above chocolate shell ingredients.  Stir until the raw cacao powder is incorporated.  
3.  Don’t skip this next step:  Use an immersion blender (or some blender) to emulsify the mixture for only about 10 seconds* (see notes).  If you skip this step, the honey will sink to the bottom and will not be evenly distributed throughout the chocolate.  
4.  Pour chocolate (as much or as little as you like) into the bottom of a mold (silicone or paper) – place in the freeze for about 5 to 10 minutes to harden.  
5.  In a food processor make the filling.  Add the 1 cup of shredded coconut and blend 3 to 5 minutes.  Scrape down sides as needed. Add in the rest of the ingredients and blend until incorporated.  If adding the cacao nibs, add last and pulse a few times to incorporate.  
6.  Remove the molds from freezer and (with your hands) add in the filling on the layer of chocolate, leaving enough room on all side for the top layer of chocolate to form around the filling and touch the bottom layer of chocolate.  Add as much or as little as you like. 
7.  Transfer to fridge or freeze to harden.  
8.  Makes 4 to 5 large peppermint patties.  I pour any leftover chocolate into small silicone candy molds and refrigerate.   
Notes:
*Be careful…DO NOT blend the chocolate too long.  Something crazy will happen: the honey and coconut oil blob together and the cocoa butter separates.  There is no recovery when this happens.  
*I use 1 tablespoon of honey for the filling – these puppies are RICH, but add in more sweetener to your preference.    
Here they are with cocoa nibs for added texture and flavor 
Here’s what they look like made thin(er) 
*
Here is the general building process
Shared on: Fat Tuesdays, Raw Foods Thursdays, Allergy-Free Fridays, Wellness Weekend, Healthy Vegan Friday 
Posted by Amber at

Labels: candy alternatives, chocolate, dessert, Paleo, raw.

26 Comments

Leave a Reply

Your email address will not be published. Required fields are marked *

Friday, July 12, 2013

Refreshing Tropical Coconut Ice Cream (dairy free, SCD, Paleo, GAPS)

Once upon a time I ate cow milk ice cream.  And once upon a time I ate cow milk pineapple ice cream in Hawaii with my fiancé, now husband) – wow 13 year ago (and I still remember that ice cream).  We were at the Dole pineapple plantation in Oahu.  It was the most delightful ice cream I had ever eaten.  Not really one for heavy, overly sweet or chocolaty treats, this pineapple ice cream was so refreshing and light.  I fell in love.  This tropical coconut milk based ice cream brought me back to that romantic stay in the islands.  In addition to pineapple, however, I added fresh mango, banana, and lime.  It’s a real tropical explosion.  This recipes makes quite a bit – too much for my ice cream maker.  I suggest using the leftover mixture in popsicle molds or refrigerate to use in a smoothie.  I hope you enjoy it.  Mahalo.   

Ingredients:
-2 cans full fat coconut milk (3 cups). See here or here 
-2 cups fresh chopped mango
-1 1/2 cups fresh or canned pineapple 
-1 medium ripe banana (5 ounces worth)
-1/3 cup fresh lime juice
-1/4 cup honey (vegans use maple syrup or coconut nectar)

How To:
1. Add all the above ingredients to a blender and blend until well incorporated.  
2.  Fill your ice cream maker with the mixture (do not over fill) and churn until it starts to firm up and harden, and the ice cream maker starts to slow.  
3.  Transfer the ice cream to an air tight glass container and store in the freezer for at least 4 hours (I give mine a good 6 hours).
4. Remove 5  minutes before serving to allow ice cream to soften up a bit so it’s easier to scoop out.
Shared on: Fat Tuesday Slightly Indulgent Tuesdays, Raw Foods Thursday, Wellness Weekend, Whole Food Fridays, Allergy-Free Wednesdays 
Posted by Amber at

Labels: dessert, GAPS, ice cream, Paleo, raw, SCD, summer treats.

8 Comments

Leave a Reply

Your email address will not be published. Required fields are marked *

Thursday, July 11, 2013

Strawberry Coconut Cake w/ Strawberry Frosting (dairy free, gluten free, cane-sugar free)

I’m thrilled my blog is working again so I can share this cake with you.  I made this for my daughter’s 7th birthday last week.  The recipe is simply my coconut blueberry muffin recipe made into a cake.  I made two batches for two layers and I added strawberries instead of blueberries.  But the frosting is what I am excited to share with you.  Several traditional eaters taste tested this and really liked it.  I am always on the lookout for easy-to-spread frosting that won’t melt all over the place and this one did the trick.  This frosting is inspired by The Urban Poser’s whipped strawberry frosting, which I’ve made 5 or 6 times, and while I love it, the honey is far too overpowering so I used coconut nectar instead and added some soaked cashews.  It looks like chocolate, but it’s actually strawberry (I made a chocolate version too that was delightful, see pictures below).  Happy birthday to my amazing daughter.  We love you so much and we are so very proud of youbeyond words! 
Strawberry Coconut Cake w/ Strawberry Frosting 
Cake Ingredients:
(I made 2 batches of this recipe)
Wet
-2 eggs room temperature (weighing 4.5 ounces in the shell)
-1/2 cup coconut sugar
-1 cup canned full-fat coconut milk (room temperature)
-1/2 cup melted coconut oil
-1 teaspoon vanilla extract
-1/2 teaspoon vanilla or plain stevia
-3/4 cup fresh small chopped strawberries 

Dry
-100 grams sorghum flour (3/4 cup + 2 level tablespoons)
-100 grams brown rice flour (3/4 cup)
-60 grams tapioca starch/flour (1/2 cup)
-1 teaspoon baking powder 
-1/2 teaspoon baking soda
-1/4 teaspoon xanthan gum 
-1/2 teaspoon salt 

How To:
Preheat oven to 350 degrees 
1.  Prepare your cake plans by rubbing the inside with coconut oil and dusting a generous amount of flour (rice or sorghum to coat the pan.  If done properly, the cakes will pop right out with NO stick.  Set aside 
2. In a medium bowl, mix together all your dry ingredients.  
3. Next, in a large bowl, add in the eggs, coconut sugar, coconut milk, vanilla, and stevia (please make sure everything is room temperature).  Beat on medium with a hand mixer for 30 seconds.  Drizzle in your coconut oil with the beaters running on low.  Beat on medium for 15 seconds.  
4.  Add in the dry ingredients.  Hand mix gently for a few seconds, then beat with mixers on medium for 15 seconds.  
5.  Fold in the strawberries.  
6.  Fill the cake pans.  I make two separate batches at one time so I can place both pans in the oven together.  
7.  Bake on middle rack for 30 – 35 minutes.  Mine were perfect at the 35 minute mark.  
8.  Remove from oven and let cool for 10 minutes or so.  When you can handle the pans, scrape around the edge with a knife to loosen, then pop out the cakes and allow to cool completely on a cooling rack.

Strawberry Frosting Ingredients:
-1 cup cashews soaked for at least 8 hours, drained and rinsed 
-2/3 cup coconut nectar
-2 teaspoons vanilla extract
-5 teaspoons tapioca or arrowroot starch
-1 cup palm shortening
-1 1/2 cups freeze dried strawberries 
-A few drops of stevia for added sweetness (optional)

How To:
1.  In a high speed blender (don’t know if a regular blender will work), add in drained cashews, coconut nectar, vanilla, palm shortening, and freeze dried strawberries.  
2.  Blend until everything is well incorporated and it become smooth – I use the tamper the entire time. 
3.  Transfer into a large bowl and add in the tapioca or arrowroot starch.  Mix by hand until incorporated.
4. Place in the fridge to cool for about 10 minutes.  It will be warm from the blender – you just want to cool it off, not refrigerate it long.
5. Frost your cake.  This batch will frost a two layer cake as shown below.

Notes:
*See HERE for the Urban Poser’s Strawberry Frosting recipe.
Skylar also requested my homemade coconut strawberry almond ice cream.
Oh my, it was a strawberry explosion! 
Coming soon
Chocolate cake with chocolate frosting.  
Yup-Yup
Shared on: Allergy-Free WednesdaysSlightly Indulgent Tuesdays, 
Posted by Amber at

Labels: dessert, frosting, gluten free, summer treats.

9 Comments

Leave a Reply

Your email address will not be published. Required fields are marked *

Monday, June 24, 2013

Raw Nutrient Dense Key Lime Pie Creamsicles (also makes a tasty pudding) SCD/Paleo/GAPS

I’m always looking for new ways to serve not only sweet treats, but healthy sweet treats.  My freezer is usually full of popsicles at the ready.  It gets super hot here in the summer and so they are a necessity.  We usually go with juice based pops, but I love the use of coconut milk or other non-dairy milks for a fun, healthy twist.  I wasn’t sure how my kiddos would respond to theseand yeah, they LOVED them! And mommy loves how much nutrition they get in every cold, sweet and sour bite. 
This also makes a great pudding, you know, kind of like key lime pie without the crust.  Refrigerate at least 4 hours to thicken. 

Ingredients
-1 can (1 1/2 cups) coconut milk this or this 
-1 cup fresh spinach
-1 avocado 
-1/3 cup honey* (vegans use maple syrup or coconut nectar)
-1/2 cup fresh squeezed lime juice

How To:
1.  Add the above ingredients to a blender and blend until well incorporated.  Fill popsicle molds and freeze at least 4 hours.  
2.  I like these popsicle molds which are made with toxic free plastic. 

Notes:
*Please adjust the sweetness to your preference.  Taste test before and add more as needed.  
*You can also add in some protein powder of your liking for additional nutrition. 
*A banana with 1/4 cup water would add in another fun flavor combination to these pops. 

Shared on: Allergy-Free Wednesdays, Raw Foods Thursday, Wellness Weekend 

Posted by Amber at

Labels: allergy-friendly, dessert, GAPS, Paleo, SCD, snacks, summer treats.

20 Comments

Leave a Reply

Your email address will not be published. Required fields are marked *