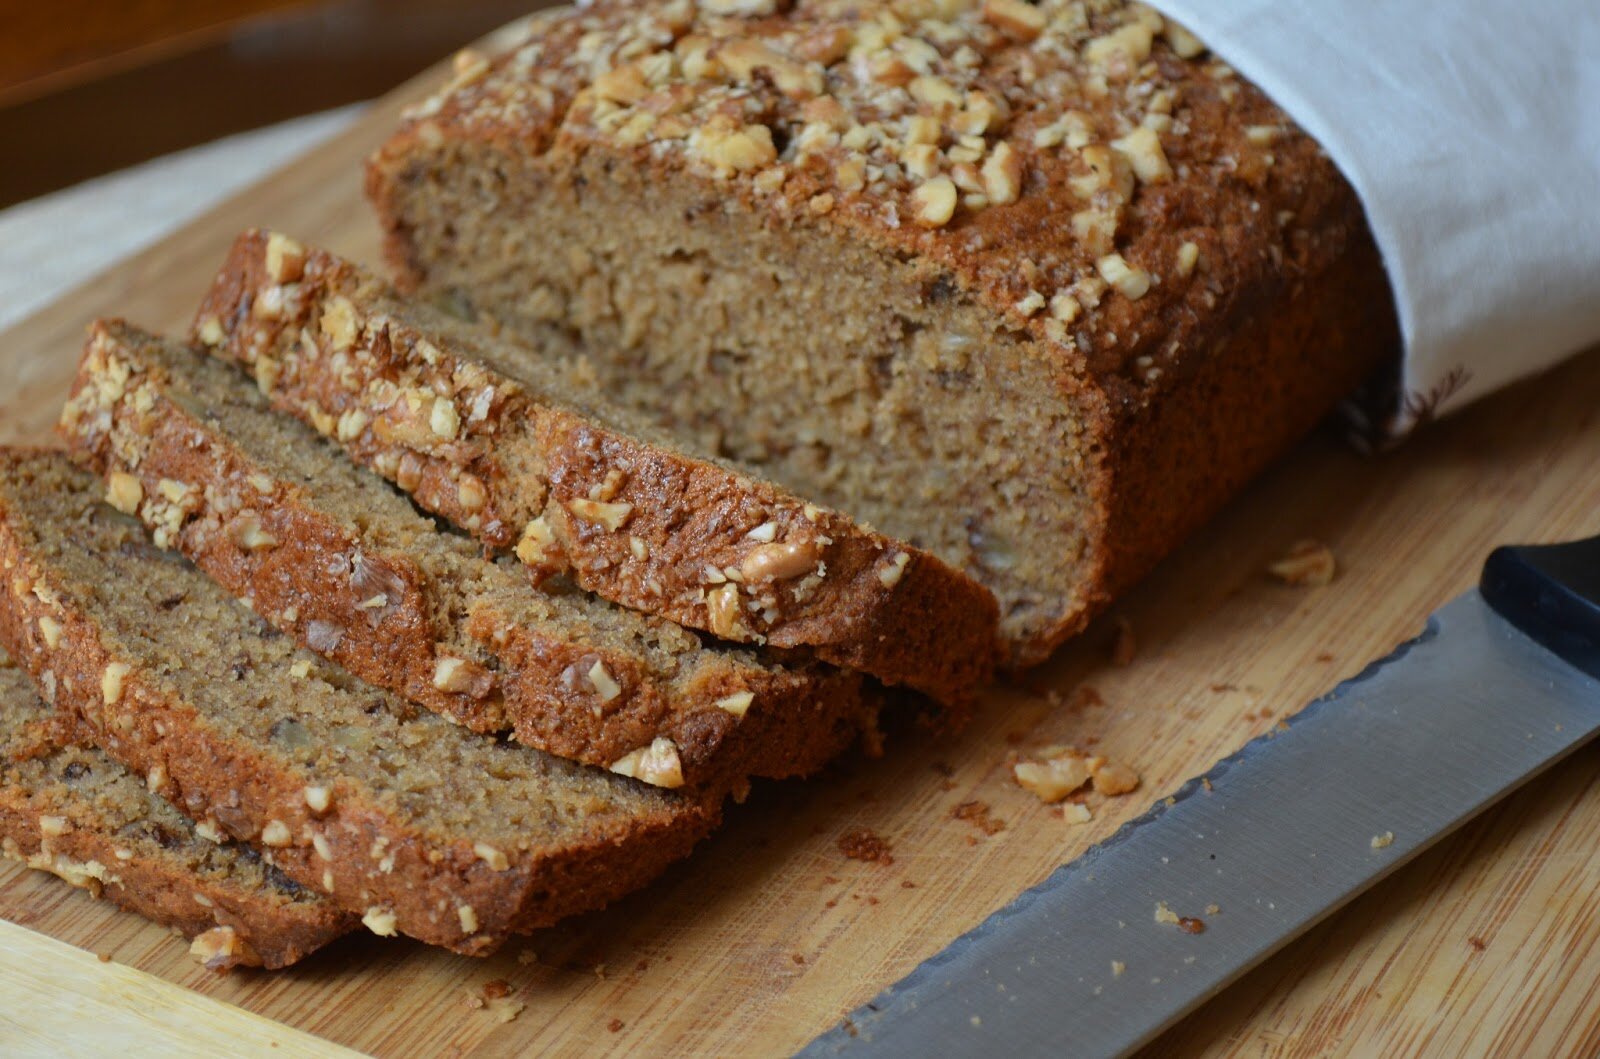
Monthly Archives: May 2013

Friday, May 31, 2013

Gluten Free Banana Walnut Bread (dairy free, cane-sugar free)

 Okay, there is nothing earth shattering about banana bread, I mean, banana bread is a very popular recipe. I get it.  But I’ve never made gluten free, dairy free, cane-sugar free banana bread that wasn’t a dry, crumbly, “I need a glass of milk now or I am going to choke to death,” mess of a bread.  So I’m glad it turned out so well.  Because I LOVE banana bread! And I love saying things like, “Oh, yes, of course I will bring some banana bread to the brunch girl, no problemoI have just the recipe.”
  
And you know I’m trying to bulk up the ‘baked goods‘ section of my recipe page, so of course I had to get this one in.  As you might suspect, this is my near exact chocolate chip banana muffin recipe, tested as a “bread.”  Yes, you can slice it, but it’s not for sandwiches, so I guess you can also call this banana cake.  This is fabulous in the morning with a cup of tea. I like the muffin version for my kids as a snack at school, but something about the sliced version says breakfast.  This is also quite tasty as a dessert topped with coconut vanilla bean ice cream.     
Gluten Free Banana Bread 
dairy free, cane-sugar free 

Ingredients:

Wet
-10 ounces of peeled banana (about 3 largish bananas)
-1/2 cup coconut sugar (3.0 ounces)
-2 room temp eggs (weighing 4.5 ounces with shell)
-3 tablespoons full fat canned room temp. coconut milk
-1/2 cup melted coconut oil
-1 teaspoon vanilla
-1/2 teaspoon liquid stevia

Dry
-80 grams sorogum flour (3/4 cup)
-100 grams brown rice flour (3/4 cup)
-60 grams tapioca starch (1/2 cup)
-1 teaspoon baking power 
-1/2 teaspoon baking soda
-1/4 teaspoon xanthan gum (if you can’t use xanthan gum, try 1 teaspoon of psyllium husk instead). 
-1 tablespoon cinnamon (or more if you like)
-1/4 teaspoon salt
-1 cup chopped walnuts (small pieces)

How To:
Preheat oven to 350 degrees 
1.  In a bowl add in the banana and mash it around for a bit with a fork until it’s a wet mixture.  Then add in all the other wet ingredients and mix everything with a hand mixer (or stand mixer) for 45 seconds on medium speed.
2.  In another bowl, add in the dry ingredients (except the walnuts) and whisk everything together until everything is well incorporated.  
3.  In small batches, add in the dry ingredients to the wet ingredients and continue mixing with the hand mixer.  Mix until everything is well incorporated.     
4.  Add in the walnuts and stir by hand.  
5.  Fill the bread pan  with batter and top with chopped walnuts and coconut sugar 
6.  Bake for 50 – 55 minutes on the middle rack (use the knife test to check the middle). I baked mine for 55 minutes.    
7.  Allow the bread to cool for about 15 minutes, then carefully turn it out and allow it to continue to cool on a rack.  
-Store in airtight container at room temp for 3 days. 

Notes:
*When baking, I suggest following the weight of the ingredients exactly (even the banana).  This might mean investing in a small kitchen scale.  I cannot guarantee results if the recipe is not followed as specified and measurements are not accuratejust sayin’.
*For wet ingredients use only a 1 cup glass Pyrex for measuring.  *For dry, use metal measuring cups.  And when measuring flours, spoon the flours into the measuring cup, then level off with a knife.  Never pack in the flour.
*I use a 5 x 9 inch glass bread pan.  I also line the bottom with some parchment paper.

My son LOVES to help momma in the kitchen.  
This is one of his favorite treats.  
Shared on: Allergy-Free WednesdaysAllergy-Friendly Lunchbox Love
Posted by Amber at

Labels: breakfast, cane sugar free, dairy free, dessert, gluten free.

5 Comments

Leave a Reply

Your email address will not be published. Required fields are marked *

Wednesday, May 29, 2013

Allergy Free Wednesdays Week 69: May 29, 2013

Hello and welcome to Allergy-Free Wednesdays (AFW).
  AFW is a weekly blog hop where folks can share their allergy-free cuisine, gain knowledge about allergy-related topics/issues, and connect with others living or caring for someone with food allergies.

This is a weekly blog hop hosted by myself and six other fabulous allergy-free bloggers.  Your weekly submissions will be shared on all 7 blogs!  Check back each week for reader favorites and recipe highlights.  

Before linking up – PLEASE click HERE to review rules, guidelines, and legal information.  Thank you!  
_________________________________
Featured Recipes & Highlights

Each week AFW features the most most popular recipe from the previous week, and the six AFW hostesses will highlight their favorites.  Please note that your submission must contain a link back to our Allergy-Free Wednesday’s Blog Hop in order to be featured.  Click HERE for last week’s entries and the appropriate back link.  

So without further ado

May I present you with the most popular submission (most viewed by readers):

Why You Should Avoid Carrageenan
From:  Eat, Play, LoveMore

And here are my three favorite recipe/posts from last week: 


“Liquid Gold” Dairy Free Caramel Sauce
From: Allergy-Free Alaska 

Maple Chili Bacon
From:  Conscious Eatery 

 Grain Free, Nut Free Brownies
From:  Cuter Than Gluten 

   *

Thanks for visiting Allergy-Free Wednesdays!
And thanks for being awesome and reading through our guidelines before linking up!
_________________________________

Posted by Amber at

Labels: Allergy-Free Wednesdays.

7 Comments

Leave a Reply

Your email address will not be published. Required fields are marked *

Tuesday, May 28, 2013

Turkey Mushroom Burgers with Cherry Tomato Pineapple Salsa (SCD/Paleo/GAPS) & 10 Side-Dish Suggestions

Mmmm, burgers.  Burgers are one of the easiest dinners to make.  And I’m all about easy (I mean really, who wants to get cooking burn-out on Monday).  If you’re like me, you make just about everything from scratch, so it’s nice to have an easy dinner to jump-start the week.  We don’t eat beef but LOVE to use ground turkey or chicken for our burgers.  The addition of sauteed mushrooms and onions to this recipe really kicks the yum factor up a notch.  These are super delish and I just adore the sweet savory touch from the salsa.  I like to tinker around with different ingredients to spice things up (see my veggie and sun dried tomato burgers for another great recipe).  I hope everyone enjoyed their Monday.  Happy Memorial Day.    
Ingredients:

Mushroom Burgers
-1 1/2 pounds ground turkey (preferably organic free range)
-2 cups crimini mushrooms, chopped 
-1 cup red onion, small chop
-2 teaspoons coconut aminos (or gluten free Worcestershire sauce – but this is not SCD/Paleo/GAPS) – omit both coconut ominos and Worsh if strict SCD.  
-1/4 teaspoon salt + 1/2 teaspoon salt
-1 teaspoon onion granules 
-2 teaspoons garlic granules 
-2 tablespoons oil

How To:
Preheat oven to 400 degrees 
1.  In a medium skillet, add in the oil, mushrooms, onions, and 1/4 teaspoons salt.  Saute on medium heat until soft and well sauteed.  Set aside.
2.  In a large bowl, add the meat, coconut aminos (or Worcestershire), 1/2 teaspoon salt, onion granules, garlic granules.  Mix.
3.  Add in the mushroom and onion mixture.  Mix.
4. Form into patties and bake for 25 – 30 minutes (or until internal temp reaches 180 degrees). 
*Makes 6 patties

Cherry Tomato Pineapple Salsa
-1 can organic pineapple chunks, drained (use 1 cup fresh if in season)
-1 1/2 cups chopped cherry tomatoes
-2 1/2 tablespoons diced shallot
-1 cup fresh cilantro, chopped 
-Juice from 1 lime 
-3/4 teaspoon garlic granules 
-1/2 to 1 teaspoons salt (to taste)

How To:
Salsa is best made a few hours ahead of time
1. Drain the pineapple juice from can (save this juice, it’s great,  kids love it).  Chop the pineapple to desired chunkiness.  
2.  To your pineapple add in the chopped cherry tomatoes, and the rest of the ingredients. Mix and refrigerate until ready to serve.  
For an easy side dish, try sliced roasted carrots.  Simply slice carrots and toss with salt, garlic granules, coconut oil and roast on 400 degrees for 45 minutes.  
Here are some other super easy side dish ideas for your burger night


*
Shared on: Whole Food Fridays 
Posted by Amber at

Labels: GAPS, main dish, Paleo, SCD, summer cuisine.

9 Comments

Leave a Reply

Your email address will not be published. Required fields are marked *

Thursday, May 23, 2013

Why Taking Care of Your Mental Health is an Important Part of The Healing Journey: My Personal Thoughts and Helpful Resources

While this blog is primarily about food, if you do keep up with my posts, you will see I share about a lot of other things here too…because life is more than just food and recipes (and chocolate).  There are so many other components of healing.  Food and nutrition are important and critical pieces for sure, but there is so much more. 
Today I am going to talk about why I believe taking care of your mental health is a critical part of any healing journey, and share some of my favorite resources with you.  Throughout this post you will see the art work of a healing/nurturing artist named Rita Loyd.
As you might know if you follow my blog, I am a licensed therapist (L.C.S.W.) which stands for Licensed Clinical Social Worker (also known as a psychotherapist, mental health clinician, or simply, a therapist).  I have to say that becoming a licensed therapist was a dream come true for me. I’ve worked with many different populations over the years, dealing of course with different mental health issues.  Currently, I work three days per week with children and families, and every other weekend at an inpatient mental health hospital.  I talk in detail with my clients and patients about the importance of taking care of their mental health, which translates to coping with depression, stress, anxiety, anger, etc.  It’s coping with the big emotions we encounter on a daily basis.  
I’ve been on my own healing journey for many years.  It’s a journey that will never end and a journey I never want to end.
My mental health is directly related to my physical health.  When I am overrun with stress, anxiety, worry, or just going TOO fast…my health suffers and I flare.  My immune system cannot compete and it shuts down.  Inflammation takes over in the many forms it does in my body, which is through the Crohn’s Disease or my Lupus symptoms (inflammation that attacks my heart and lungs, sometimes face).  Depression is not my vice.  My type A tendencies and high energy leave me vulnerable to irritability, mental fatigue and anxiety.  
So I must be in constant communication with myself.  Doing this allows me to identify when I’m losing control and when I need to switch my focus.  Coping skills are no joke.  We all need to know how to cope with the many stressors that bombard our body and mind.  I urge you to take a moment to reflect on how you deal with stressors in your life and make a list of your coping skills.  
Here are some of my personal methods for self care and coping:

1.  Deep breathing (a underestimated first defense in calming down)

2.  Laughing.  I love watching comedies and in general, anything funny.  I like to nurture my sense of humor.  

3.  Wait – don’t react right away

4.  Talking with my husband or a trusted friend 

5.  Being in nature 

6.  Hugging and cuddling my children

7.  Keeping a clean, uncluttered home and keeping things well organized and easy to find

8.  Making sure my to-do list doesn’t get too long.

9.  Playing guitar

10.  Keeping a one-sentence journal

11.  Getting shit DONE! I don’t procrastinate.  

12.  Gardening 

13.  Letting it go

14.  Dancing

15.  Cooking and blogging.  Blogging allows me to connect with others about food and health

16.  Being a total goof ball (I’m not a very serious person, so this comes easy)

17. Yoga

18.  Being alone, taking time for myself

19.  Reading self-help books or other uplifting books

20.  Asking for help

21.  Visualization.  I do have a happy place.  I have calming balancing images that bring me back to the present.

   #1 truth to self: 
“My physical health will never be well if my mental health is suffering.”
Here are my truths, promises and affirmations to self that I take with me everyday on my journey:
1.  I will never give up on healing from past experiences
2.  I will forgive myself for the mistakes I’ve made in life
3.  I will work on those automatic negative thoughts that we, as humans, all think (like our default setting)
4.  I will continue to work on self-love and self-appreciation
5.  I will forever work on improving myself as a person; work on mindfulness, self-awareness, being cognizant of my behavior, my feelings…my thoughts
6.  I will become the captain of my own mind and be in control of my thoughts and actions
7.  I  will not be held hostage by the past, and I will not worry about what I cannot control in the future
8.  I will say NO
9.  I will try and live more in the present
10.  I will be my own best friend and nurture the difficult parts of myself that are too easily suppressed
Do you think about this stuff too?
Is it scary?
Sure it is.
It takes courage to wake up everyday and be so aware of ourselves.
 
But the single most important thing you can do for yourself on your healing journey is work on self love, self care and acceptance.
 This can be difficult if the messages you received as a child or at some point growing up were telling you that you weren’t good enough and didn’t deserve love.  You might be riddled with shame and guilt.  You might have deep seeded negative core beliefs about yourself.
But this can change.  Your thinking can change.  You can change.
You just need to be ready and willing to take this journey with yourself.
We all possess the capability of change…
But YOU are the only one that can make this decision.
You must set this goal for yourself.
Here are a few books I’ve read recently that were very helpful on my healing journey: 
 
1.  Feeding Your Demons
-by Tsultrim Allione
(this book was a tremendous help a couple years ago
when I was struggling with some difficult issues).
2.  The Gifts of Imperfection
-by Brene Brown 
(Brene is a shame researcher and in this book provides us with her own personal accounts of shame and improving herself, as well as sharing her years of research on the subject).
3.  Change Your Brain, Change Your Life
-by Daniel G. Amen
(this is my favorite resource.  I teach and lecture from this book in my groups.  I also use it to address stress and anxiety.  It’s fantastic and I HIGHLY recommend it)
4.  The Happiness Project
-by Gretchen Rubin 
(this is a fun, lighthearted book that’s easy to read and PACKED full of great tips on how to improve your mood.  I have been referencing her book in my therapy groups).
This is Water
-by Davis Foster Wallace 
(an incredibly inspiring, raw, honest, and funny speech given at a graduation commencement about living a compassionate life)
 
Here are some self-help resources you can work on at home:
Action for Happiness
Mindfulness of Emotions
Writing as Therapy
Positive Self-Talk
Working with Imagery
Thought Record Sheet (self-compassion)
Thought Record Sheet (critical voice) 
Unhelpful Thinking Habits
With Compassion,
–Amber
Posted by Amber at

Labels: Holistic healing, mental health.

13 Comments

Leave a Reply

Your email address will not be published. Required fields are marked *

Wednesday, May 22, 2013

Raw Apple Cinnamon Cereal (nut free, grain free, dairy free, cane-sugar free, vegan) For Go Ahead Honey

Alrighty-then.  Here is it finally.  I shared my attempts at a nut-free raw cereal with you on Facebook a while back and it has taken me many tries to get this puppy share-worthy.  And I’m so excited to share!

First off let me say that making homemade cereal is driven by two forces.  First off, it’s part of my dedicated attempts to keep a low-waste green kitchen (see more about that here and here).  You see, cereal produces a lot of waste.  There’s that nasty plastic bag, then the cardboard boxand you don’t even get THAT much cereal.  What’s up with that!?  Secondly, and perhaps most obvious to us all, making homemade ANYTHING is preferred as there is total control over the ingredients (and it’s usually waaaay cheaper).  So ditching store-bought cereal is actually one of my latest omissions from my kitchen cupboard   And I have to say, I don’t miss the store bought stuff at all.  In reality, I don’t eat cereal very much (mainly because it all has stuff I can’t eat) but I love my homemade recipe.  The verdict, thumbs up all around from the family on mommy’s homemade cereal.  We enjoy it on yogurt too, which always makes a nice breakfast or snack.  Let me know if you give it a try.  And perhaps with some homemade dairy-free milk: almondhempwalnut, or macadamia (my fave is walnut).  
My lovely and supportive friend Shirley from Gluten Free Easily and All Gluten Free Desserts, All The TIme is hosting this month’s Go Ahead Honey.  And the theme: “When You’re Grain Free and Feeling Like A Nut, But Can’t Eat Tree Nuts or Peanuts!”
I’m SUPER pumped about this month’s theme, as I don’t personally eat a lot of tree nuts (can’t digest almonds worth a darn these days) and I’m DEATHLY allergic to peanuts.  So I knew this recipe would be perfect to bring to the party.  I can’t wait to check out all the other entries.  Make sure you follow my sweet friend Shirley on Facebook and subscribe to her blogs.  She is one lady you want to stay connected with!  Thanks for hosting, Shirley.
Raw Apple Cinnamon Cereal 
nut free, grain free, dairy free, cane-sugar free, vegan
Ingredients:
-2 cups organic raw sunflower seeds
-1 cup organic raw pumpkin seeds
-1 cup shredded coconut 
-1/4 cup raw hemp seeds
-3/4 cup coconut sugar
-2 cups peeled and small diced apples 
-3 tablespoons chia seeds (optional)
-1/4 cup unsweetened applesauce 
-1 teaspoon liquid stevia 
-2 to 3 tablespoons ground cinnamon (I used 2 T in this recipe)
-1 teaspoon ground chia 
-1 teaspoon psyllium husk
-1/4 teaspoon salt 

How To:
1.  In a large bowl add the sunflower seeds and pumpkin seeds and cover with filtered water (about 2 inches over) and soak for at least 8 hours.  I like to soak mine as long as I can, so I gave mine about 15 hours. 
2.  After they have soaked, drain and rinse (do not pat dry or try to dry the seeds, you need the moisture).
3.  To the drained seeds add all the ingredients except the applesauce and stevia.
4.  In a separate bowl (I used a 1-cup Pyrex) mix together the applesauce and stevia.  This will evenly distribute the stevia.
5.  Mix the applesauce with the seed mixture (your hands work best) and then evenly spread onto your dehydrator I spread the mixture onto these screens that come with the dehydrator. I do not use these fruit roll sheets. 
6.  I set my dehydrator on about 110 degrees, put in the laundry room and let it rock.  After about 18 hours I check for the crisp level.  I dehydrate longer until that perfectly crisp texture is achieved.  
7.  The final mixture will be very stiff and pop out in a sheet, very stiff and crisp.  Break into pieces and store in an air tight container.  This will keep for weeks.  But it never lasts that long.  
*
Here are the sunflower seeds and pumpkin seeds in the early sprouting stage after soaking for about 15 hours
(soak the seeds at least 8 hours)
Here are all the ingredients piled on the seeds
I like to mix the stevia with the applesauce so it’s evenly distributed 
Mixing everything together 
Here is a link to the dehydrator I use.  
It’s nothing fancy, but it gets the job done. 
Press the mixture evenly around… 
and make sure it’s not too thick.
You can see it makes A LOT.  
I dehydrate on 115 degrees for 18- 24 hours 
But the ultimate test for doneness is when it’s super-duper crispy! 
*
I’ve also made Lauren’s 5-Ingredient Healthy Cocoa Crispies (another great homemade cereal), and and if you like the CRUNCH factor in your cereal, this recipe is for you!!  Lauren’s recipe does NOT go soggy in milk (reminds me of grape-nuts).  It’s super delicious and I love how chocolaty it makes the milk.  This is a must try.  Here is my picture of her cereal.  
Shared on: Wellness Weekend, Raw Foods Thursday, Whole Food Fridays, Healthy Vegan Friday, Healthy 2nd Wednesday 
Posted by Amber at

Labels: breakfast, cane sugar free, dairy free, grain free, raw, snacks.

27 Comments

Leave a Reply

Your email address will not be published. Required fields are marked *

Allergy-Free Wednesdays Week 68: May 22, 2013

Hello and welcome to Allergy-Free Wednesdays (AFW).
  AFW is a weekly blog hop where folks can share their allergy-free cuisine, gain knowledge about allergy-related topics/issues, and connect with others living or caring for someone with food allergies.

This is a weekly blog hop hosted by myself and six other fabulous allergy-free bloggers.  Your weekly submissions will be shared on all 7 blogs!  Check back each week for reader favorites and recipe highlights.  

Before linking up – PLEASE click HERE to review rules, guidelines, and legal information.  Thank you!  
_________________________________
Featured Recipes & Highlights

Each week AFW features the most most popular recipe from the previous week, and the six AFW hostesses will highlight their favorites.  Please note that your submission must contain a link back to our Allergy-Free Wednesday’s Blog Hop in order to be featured.  Click HERE for last week’s entries and the appropriate back link.  

So without further ado

May I present you with the most popular submission (most viewed by readers):

Vanilla Protein Cake with Peanut Butter Frosting
From:  Food and Yoga For Life 

And here are my three favorite recipe/posts from last week: 


Personalizing Nutritional Healing for YOUR Specific Needs
From: Phoenix Helix 


Kale Peso Baked Zucchini
From:  Pure Ella


 Grain Free and Ginger Lemon Tart in a glass
(I made this recipe  – it’s delicious)!!  
From:  Gluten Free, SCD, Veggie 

   *

Thanks for visiting Allergy-Free Wednesdays!
And thanks for being awesome and reading through our guidelines before linking up!
_________________________________

Posted by Amber at

Labels: Uncategorized.

6 Comments

Leave a Reply

Your email address will not be published. Required fields are marked *

Saturday, May 18, 2013

Just Right Coconut Blueberry Muffins (gluten free, dairy free, nut free, cane-sugar free)

You might remember last month I shared my kitchen epiphany regarding baking.  Well, I’ve been having a grand ole’ time here in the kitchen BAKING and loving it, yes, Amber the “I am soooo not a baker” loves to bake.  Why the change of heart?  Well, things are working out.  Things are happening.  Things are not tasting like dirt and cardboard.  Things are delicious.  

YEAH! 

I’m starting off here with basic gluten-free baking (using eggs)vegan gluten-free baking will be my next conquest.  Last month I shared my banana chocolate chip muffins (that I’ve also made into a banana walnut breadsharing soon).  I have to tell you, a couple of my friends have made my banana chocolate chips muffins and like them very much.  My friend Jen tells me she makes a double batch every week. How great is that!  I love it when my recipes are enjoyed by others.  So nice.  

Okay, so these muffins (that really taste like cupcakes) were my latest baking adventure.  I played around with the recipe about four times before I found the PERFECT moist factor.  Last night’s batch was the winning batch.  Yeah.  When I took that first bite, I thought, “ahhh, just right.”  These muffins are so moist, I just can’t get enough.  They are moist, yet light and fluffy.  The sweetness is right-on for me.  BUT, you know I’m not a huge sweet tooth, so make them once yourself and adjust the sweetness as needed the next time.  I think they’re fantastic.  I’m super proud of this recipe.  I hope you try it soon, and perhaps enjoy with a glass of non-dairy milk, such as: almond, hemp, walnut, or macadamia.  
Cheers.  
Just Right Coconut Blueberry Muffins 
(gluten free, dairy free, nut free, cane-sugar free)

Ingredients:
Wet
-2 eggs room temperature (weighing 4.5 ounces in the shell)
-1/2 cup coconut sugar
-1 cup canned full-fat coconut milk (room temperature)
-1/2 cup melted coconut oil
-1 teaspoon vanilla extract
-1/2 teaspoon vanilla or plain stevia
-3/4 cup fresh blueberries 

Dry
-100 grams sorghum flour (3/4 cup + 2 level tablespoons)
-100 grams brown rice flour (3/4 cup)
-60 grams tapioca starch/flour (1/2 cup)
-1 teaspoon baking powder 
-1/2 teaspoon baking soda
-1/4 teaspoon xanthan gum 
-1/2 teaspoon salt 

How To:
Preheat oven to 350 degrees 
1. In a medium bowl, mix together all your dry ingredients.  
2. Next, in a large bowl, add in the eggs, coconut sugar, coconut milk, vanilla, and stevia (please make sure everything is room temperature).  Beat on medium with a hand mixer for 30 seconds.  Drizzle in your coconut oil with the beaters running on low.  Beat on medium for 15 seconds.  
3.  Add in the dry ingredients.  Mix gently until incorporated   Then beat with mixers on medium for 15 seconds.  
4.  Fold in the blueberries.  
5.  Fill batter to the top of the muffin cups.  
6.  Bake for 18 minutes.  
7.  Remove muffin from tin and cool on rack.  
Makes 12 muffins

Notes:
*Due to the high coconut content in these muffins, they will stay moist at room temperature, but if they get cold, they will become stiff.  It’s warm here in my neck of the woods (high 80s to mid-90s).
*When baking, I suggest following the weight of the ingredients exactly. This might mean investing in a small kitchen scale.  I cannot guarantee results if the recipe is not followed as specified and measurements are not accuratejust sayin’.
*For wet ingredients use only a 1 cup glass Pyrex for measuring.  *For dry, use metal measuring cups.  And when measuring flours, spoon the flours into the measuring cup, then level off with a knife.  Never pack in the flour. 
*The muffins will stay moist for 3 or 4 full days at room temp in a container.  
*Oh, and I only use these large baking muffin cups.

Shared on: Melt in your Mouth Mondays, Motivate Me Mondays, My Meatless Monday, On The Menu Monday, Mealtime Monday, Fat Tuesdays, Slightly Indulgent Tuesdays, Allergy-Friendly Lunchbox Love
Posted by Amber at

Labels: allergy-friendly, breakfast, cane sugar free, dairy free, dessert, gluten free, nut free, snacks.

10 Comments

Leave a Reply

Your email address will not be published. Required fields are marked *

Wednesday, May 15, 2013

Allergy-Free Wednesdays Week 67: May 15, 2013

Hello and welcome to Allergy-Free Wednesdays (AFW).
  AFW is a weekly blog hop where folks can share their allergy-free cuisine, gain knowledge about allergy-related topics/issues, and connect with others living or caring for someone with food allergies.

This is a weekly blog hop hosted by myself and six other fabulous allergy-free bloggers.  Your weekly submissions will be shared on all 7 blogs!  Check back each week for reader favorites and recipe highlights.  

Before linking up – PLEASE click HERE to review rules, guidelines, and legal information.  Thank you!  
_________________________________
Featured Recipes & Highlights

Each week AFW features the most most popular recipe from the previous week, and the six AFW hostesses will highlight their favorites.  Please note that your submission must contain a link back to our Allergy-Free Wednesday’s Blog Hop in order to be featured.  Click HERE for last week’s entries and the appropriate back link.  

So without further ado

May I present you with the most popular submission (most viewed by readers):

Protein Carrot Cake
From:  Food and Yoga For Life 

And here are my three favorite recipe/posts from last week: 


5-Ingredient Healthy Cocoa Crispies
From: Oatmeal With a Fork

Ramp Pesto Pasta & Balsamic-Roasted Tomatoes
From:  Spiced Curiosity 

 Chocolate Peppermint Candy 
From: Laura’s Gluten Free Pantry 

   *

Thanks for visiting Allergy-Free Wednesdays!
And thanks for being awesome and reading through our guidelines before linking up!
_________________________________

Posted by Amber at

Labels: Allergy-Free Wednesdays.

17 Comments

Leave a Reply

Your email address will not be published. Required fields are marked *

Tuesday, May 14, 2013

Morning snack: Sliced apples and chips
Lunch: Chicken salad with lettuce and carrot sticks.
Banana and grain free bread.

Morning Snack: Ginger cookies

Lunch: Almond butter and jelly sandwich with celery and blueberries.
Banana and strawberries.

Morning snack: Banana chocolate chips muffin

Lunch: Avocado and brown rice sushi  with salad and cucumber.
Strawberries, dried apples, and chips. 

Morning Snack: Raw homemade apple cinnamon cereal

Lunch: “Cheese” quesadilla with refried black beans.
Salad with sweet orange peppers and guacamole

Afternoon snack at friends house: Apple slices and any leftover food 


Morning Snack:  Sliced apples

Lunch: Cashew butter and jelly sandwich with pickles.
Strawberries with salad and carrot sticks.


Morning snack: Banana

Lunch: White bean and artichoke drip with carrots, cucumber and chips

Morning snack: Green lettuce with fruit salad

Lunch: Ground turkey pasta with green beans

Morning snack: bread with homemade chocolate hazelnut spread

Lunch: Macaroni Salad with breaded paleo chicken.
Bananas and carrots.


Morning Snack: Banana and chips

Lunch: Bean and cheese burrito with salad and strawberries

Morning Snack: Apple slices
Lunch: Chickpea and Sweet Potato Medley and
Sunflower-Hemp Seed Granola Bites

Morning Snack: Banana chocolate chip muffin

Lunch: Grilled turkey and “cheese” sandwich with sweet orange pepper,
celery and salad.  Strawberries and apple slices.

Afternoon snack at friend’s house: Banana and any leftover food

Posted by Amber at

Labels: Uncategorized.

Leave a Reply

Your email address will not be published. Required fields are marked *

Sunday, May 12, 2013

Happy Mother’s Day (2013)

Happy Mother’s Day to all the loving women who care for, not only children, but for so many other people and creatures in their lives.  To the nurturers, the providers, the bearers.  To everyone who loves a mother and to everyone who has felt the love of a mother.  
____________________________
*
Thoughtful Homemade Gifts For Mom:

Homemade Coconut Milk 
Shampoo and Body Wash 
From:  Delicious Obsessions  


Rose Water
From: Roost 


Natural Chapstick 
From: Rambly Blog 


Homemade Body Spray with
Essential Oils
From: The Tasty Alternative 

Cocoa and Shea Body Butter

From: The Tasty Alternative 
Nourishing Homemade Sugar Scrub 
From: Whole New Mom
Mint Julep Masque
From: My Plastic Free Life 
From: The Tasty Alternative 

Cocoa Shea Body Butter
From: The Tasty Alternative 

Soothing Gel Mask
From: Empowered Sustenance 

Comfrey, Calendula, Chamomile, & Nettle Salve 
From: A Handmade Life

Two-Ingredient Organic Eye Make-Up Remover
From: New Nostalgia 

Posted by Amber at

Labels: homemade gifts.

7 Comments

Leave a Reply

Your email address will not be published. Required fields are marked *