Category Archives: main dish

Monday, November 16, 2015

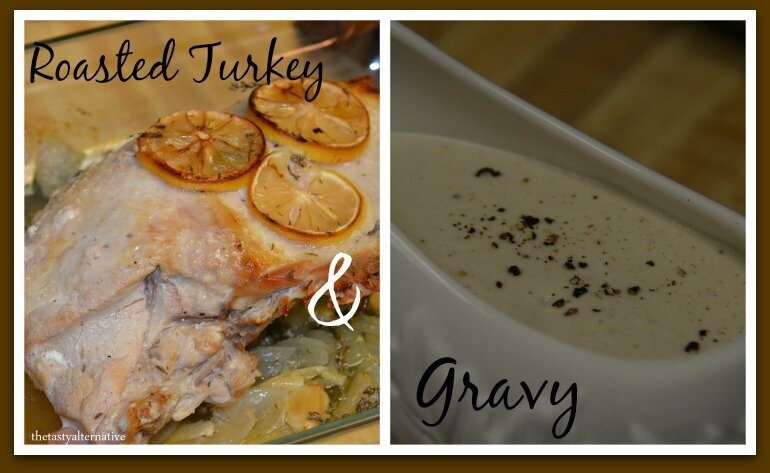
Roasted Turkey with Garlic, Thyme, and Lemon w/ Paleo Gravy

Cover2

I’ve been hosting Thanksgiving dinner for several years.  Because I enjoy cooking and can plan and multitask like no one’s business, Thanksgiving is totally doable for me.  And I love that I can make it all gluten, dairy, and cane-sugar free, and everyone always, every year, raves about the food.  They can’t tell my stuffing is gluten free, or that the sweet potatoes aren’t swimming in cane-sugar, or the gravy is Paleo (gasp)!  So when I started hosting the thought of roasting an entire turkey was completely unappealing.  I mean, yes, it looks lovely, but it takes so long and it just made more sense (to me) to buy turkey parts and roast them to their appropriate doneness (as we all know, white meat cooks differently than dark meat).  I’ve also noticed that turkey legs are really popular and I like having more than two available.  I’ve really enjoyed preparing turkey this way and my guests seem to enjoy it as well.  Perfectly moist breast meat and perfectly moist dark meat?!  Yes please.  I wanted to share my method with you in case you were feeling a little overwhelmed by the whole bird. By the way, brining turkey is a necessary step to that delicious, moist meat…so don’t skip it!  Gobble-gobble.   Continue reading

Posted by Amber at

Labels: fall cuisine, grain free, main dish, Paleo, Thanksgiving.

3 Comments

Leave a Reply

Your email address will not be published. Required fields are marked *

Rate this recipe:  

Monday, January 27, 2014

Nightshade Free Roasted Veggie Pasta Sauce (SCD, Paleo, AIP, GAPS)

To the average person pasta sauce is a pretty healthy choice.  But if you suffer from an auto-immune disease and trying to decrease pro-inflammatory foods, tomato-based pasta sauces can be quite aggravating on the system.  Some folks find great success and relief by eliminating nightshades from their diets.  What are nightshades you ask?  Good question.  Nightshades are the following foods: Potatoes, tomatoes, sweet and hot peppers, eggplant, tomatillos, tamarios, pepinos, pimentos, paprika, tobacco, goji berries, ground cherries, and cayenne peppers (and more).  See this post by the Paleo Mom with a complete list of all nightshades.  
Posted by Amber at

Labels: AIP, GAPS, main dish, Paleo, sauces, SCD.

29 Comments

Leave a Reply

Your email address will not be published. Required fields are marked *

Monday, November 4, 2013

Pumpkin & Apple Veggie Turkey Meatballs with Sauteed Spaghetti Squash (SCD/Paleo)

Lately, this has been one of my favorite SCD meals.  Super easy for dinner and leftovers are fabulous.  Have you ever tried eggs with spaghetti squash?  Delicious my friends.  And I love these meatballs for lunch or even breakfast sauteed in some coconut oil (you’ll get the browning effect you see in the pictures).  They are moist and flavorful and packed full of goodies – yes I threw some pumpkin in there.  Ha ha.  But I’ve also made these with leftover baked butternut squash and delicata squash.  Enjoy!
Pumpkin & Apple Veggie Turkey Meatballs with Sauteed Spaghetti Squash

Ingredients
-1 1/2 to 2 pounds ground turkey (free range/organic is best if you can find it) 
-1 cup peeled and grated carrots
-1 cup peeled and grated zucchini
-1 cup peeled and grated apple 
-1/2 cup baked pumpkin or any squash you like (best if not completely pureed) 
-1/3 cup diced yellow onion
-1 egg (omit for AIP)
-3 tablespoons homemade balsamic vinegar or a SCD legal brand or coconut aminos (not SCD)
-1 tablespoon garlic granules
-2 teaspoons salt
-1 teaspoon onion granules 
-A few turns of the pepper grinder 
-1 medium to large spaghetti squash 
–Coconut oil 

How To:
1.  Roast the spaghetti squash.  Preheat the oven to 375.  The easiest method for roasting a spaghetti squash is to cut the squash in half lengthwise, scoop out the seeds, place the two halves flesh down in a roasting pan (I use a glass Pyrex) and roast for 45 minutes to 1 hour. Checking at the 45 minute mark for doneness. Let cool and use a fork to get out the squash strings.  
2.  Coat a large baking dish with coconut oil (I use a glass Pyrex).
3.  Grate the veggies and apple with a hand grater or food processor (I use the food processor fitted the the grating plate).  In a large bowl, add all the meatball ingredients and mix with your hands (this is really the best method).  
4.    Make golf ball size meatballs and place them on the oiled baking dish.  
5.  Bake the meatballs at 400 degrees for 25 minutes (or until internal temperature is at least 175 degrees). Remove meatballs from baking dish and let rest for about 5 minutes, then serve.  Makes about 20 meatballs. 
6.  Saute the spaghetti squash.  To a large skillet, add 1 tablespoon coconut oil.  Add in some spaghetti squash with salt to taste (I also add in garlic granules).  Saute until warmed through.  

Notes
*To create the browning you see in the pictures, place the baked meatballs in a large skillet with coconut oil and saute until the browning occurs. It just takes a few minutes.  This step is not necessary – they are great baked right out of the oven. 
{Affiliate links in post}
__________________________________________________
Shared on: Fat Tuesdays, Slightly Indulgent Tuesdays 
Posted by Amber at

Labels: AIP, fall cuisine, main dish, Paleo, SCD.

4 Comments

Leave a Reply

Your email address will not be published. Required fields are marked *

Friday, September 27, 2013

Slow Cooker Pulled Pork with Homemade Barbecue Sauce

One of my favorite farm to fork restaurants here in Davis serves a great pulled pork sandwich.  It’s a rotation meal (not always on the menu) but when it’s there, I love to treat myself to lunch once in a while.  It comes with a very mild barbecue sauce and if I could change just one thing, I would definitely make it heavier on the sauce both in taste and quantity.  So I decided make my own version.  I am a gal who likes a messy pulled pork sammi – dripping with sauce thank you very much.  I planned on buying sauce, but found they were all loaded with with cane-sugar (or corn syrup, or something else nasty I didn’t want to ingest).  So I just made my own.  I found a recipe online that looked pretty painless and made a few adjustments.  The verdict: success!  It’s everything I love about barbecue sauce – thick, sweet, and tangy.  And oh man, did it go great with the pulled pork.  Fabulous!
Slow Cooker Pulled Pork 
with Homemade Barbecue Sauce 

Ingredients:

Pork
-2 1/2 pounds of boneless pork leg*
-2 teaspoons salt
-2 teaspoons garlic granules
-2 teaspoon onion granules 
-1 tablespoon coconut sugar
-1/2 cup water

Barbecue Sauce 
-1/2 cup diced red onion
-2 teaspoons oil + dash of salt
-1 teaspoon garlic granules, or 1 tsp minced fresh garlic
-2 tablespoons tomato paste
-1 teaspoon cumin
-2 cups tomato sauce*
-1/2 cup water
-2 tablespoons black strip molasses*
-1/4 cup + 3 tablespoons coconut sugar
-1 tablespoon Worcestershire sauce
-2 teaspoons Dijon mustard
-1 teaspoon salt
-Freshly ground pepper to taste

How To

For the pork
1.  Remove any twine around the meat.  Place the pork in the slow cooker.  In a small bowl, mix together the spices.  Then sprinkle the spices over the pork and rub it in all around.  
2.  Add the water to the bottom of the pork. 
3.  Cover and cook for 4 to 6 hours (or longer).  
4.  When the pork is finished, remove it from the slow cooker.  Trim off large pieces of fat.  Cut the pork in 4 sections against the grain, then with a fork, pull it apart against the grain.  
5.  Remove leftover contents in the slow cooker (water and any large pieces of fat).  
6.  Place the meat back into the slow cooker with 1 1/2 cups of barbecue sauce.  Or add as much or as little as you want.  
7.  Set the slow cooker to warm and cover until you serve.
Serves 5

For the sauce
1.  In a medium sauce pan add the diced onions, oil, and dash of salt.  Saute until tender (4 – 5 minutes).
2.  Add the garlic and saute another minute.  
3.  To the pan now add in the tomato paste, cumin, tomato sauce, water, molasses, coconut sugar, Worcestershire sauce, Dijon, salt, and a turn off the pepper grinder.  
4.  Bring to a gentle boil.  Immediately turn the heat down to a gentle simmer for about 15 minutes.  Stir occasionally. 
5.  Remove from heat and allow to cool bit.  Then you can either add it to a blender or use an immersion blender to incorporate and thicken (I use the latter – so easy).  
6.  I then transfer to glass jar and set it at room temp until I combine it with the pork.  The sauce will keep for weeks in the fridge. 

Notes:
*You can use any cut of meat including loin or butt.  The leg is my favorite cut if you can find it – nice marbling with way less fat. 
*I found a great salt free organic tomato sauce in a glass jar that was cheaper than purchasing fresh tomatoes and making my own.
*Honey or maple syrup can be used in place of the molasses. 

Posted by Amber at

Labels: allergy-friendly, condiments, main dish, slow cooker recipes.

7 Comments

Leave a Reply

Your email address will not be published. Required fields are marked *

Thursday, September 19, 2013

Pulled Pineapple Chicken with Cauliflower Tortillas ~ Guest Post for "The Seasonal REAL Food Blog Series" @ Recipes To Nourish

The lovely Emily from Recipes to Nourish is hosting “The Seasonal REAL Food Blog Series” showcasing a diverse collection of recipes from guest bloggers for the month of September.  I’m so honored to be part of this series.  I adore Emily, her blog, and her philosophy on food.  Emily is passionate about healthy, whole, REAL food, and also shares holistic healing and herbal remedies.  Be sure to visit Recipes to Nourish.  You can also connect with Emily on Facebook and Pinterest. 
Put your slow cooker to good use with this 
Pulled Pineapple Chicken recipe. 

Join me today over at Recipes to Nourish for the entire recipe.
Posted by Amber at

Labels: GAPS, guest post, main dish, Paleo, SCD.

2 Comments

Leave a Reply

Your email address will not be published. Required fields are marked *

Cauliflower Tortillas

Once upon a time (not too long ago) I received an email from a sweet girl named Lauren informing me about her new blog: Empowered Sustenance.  Like me, Lauren has been diagnosed with IBD (Inflammatory Bowel Disease).  I was thrilled to learn that Lauren followed a SCD/Paleo diet, used real food to heal and had some awesome nut-free recipes.  Well, I’m am sure you’ve heard of Lauren by now.  Her blog has rightfully become a powerful source in the grain free, holistic healing blogosphere.  I am so very thankful she started blogging.  I reference her blog constantly regarding the many topics she covers and recipes she shares.  And speaking of recipes, I wanted to share a recipe of hers that I have been making since, well, she published the post: Cauliflower Wraps.  Literally the day after her post came out I made her cauliflower wraps and I’ve been making them ever since.  Over the months I’ve tried to make my own version, but it became clear that I didn’t need to reinvent the wheel here.  Her recipe is perfect and I love it.  See below for my slight modifications to the process.  I started making smaller versions of her wraps to use as “tortillas.”  We are big fans of taqueria night and when I can, I try to follow a grain free diet.  Her wraps work absolutely perfect as little tortillas and I actually pile on the ingredientsand they do great.  So my friends, take all the “OMG my kitchen smells like a garbage can now from the cauliflower” comments with a grain of salt.  It’s not that terrible.  So go for it, and be sure to thank Lauren for this awesome recipe.  
Cauliflower Tortillas 
Recipe inspired by: Lauren from Empowered Sustenance 
Ingredients:
-1 head of cauliflower 
-4 eggs
-1/2 teaspoon salt
-3/4 teaspoon garlic granules 
-1/2 teaspoon Mexican seasoning/spices (optional)

How To:
1.  Cut the cauliflower into florets
2.  Add 1/2 of the florets to a food processor and pulse until they are a crumb like texture, then pulse a little further until a fine texture is achieved.  Remove the cauliflower and add it to a steamer basket.  Add the remaining florets to the food processor and repeat, adding this batch now to the steamer.  Add in 3/4 cup water to the pot and steam for 8 minutes.  
3.  After steaming, the cauliflower will be HOT, so I like to spread it out on a plate to cool.
Preheat the oven to 375 degrees 
4.  After it has cooled, I use my nut milk bag to squeeze out ALL the water from the cauliflower.  THIS STEP WILL MAKE OR BREAK THE TORTILLAS!  You must squeeze all the water out as much as your can.  I’ve found the less moisture, the better results.
5.  Add the cauliflower to a bowl.  To the bowl also add in the eggs and spices.  Mix well.  It will look like a batter.  Somewhat thick.
6.  Fit some parchment paper on top of two baking pans.  
7.  Spoon the batter onto the parchment paper.  I get about 6 out of this recipe, so three on each pan. 
8.  The trick is to evenly spread the batter in a circle.  And as Lauren states, keep the batter compact – there should be no parchment showing through any area of the tortilla.
9.  Bake for 17 minutes.  After they bake, I flip mine over and give them another 2 minutes.  
10.  Remove from parchment and transfer to a cooling rack.  

Notes:
*I prefer to make these earlier in the day.  I store them in the fridge and simply heat on a pan before I serve.
*I cannot offer any subs for the eggs, and I’ve only made these with eggs.  
*The cauliflower is not overwhelming and they don’t taste to “eggy” either.   
Shared on: Allergy Free Alaska 
Posted by Amber at

Labels: GAPS, grain free, main dish, Paleo, SCD.

20 Comments

Leave a Reply

Your email address will not be published. Required fields are marked *

Thursday, September 12, 2013

Lemon Garlic Baked Chicken w/ Lemon Garlic Gravy (Paleo, SCD, GAPS)

Any gravy lovers out there?  Mmmmm, I LOVE the stuff.  I like it thick, creamy, and bursting with flavor.  I don’t reserve gravy for JUST the holidays.  No ma’am.  I like it all year round.  I’ve been making this recipe for over a year now and finally sharing it.  It’s super easy and adds a little panache to the usual weeknight dinner.  Anyone else enjoy gravy year round?  I have made this with turkey drippings before and it as fabulous (just a FYI with turkey day right around the corner)….what!  Man, I can’t believe it’s already September.  
Lemon Garlic Roasted Chicken w/ Lemon Garlic Gravy


Ingredients:

Chicken
-2 pounds boneless skinless chicken breasts
-1 cup chopped yellow onions
-3 tablespoons oil
-1/4 cup filtered water
-2 teaspoons garlic granules (or 2 chopped garlic cloves)
-1 teaspoon salt
-6 to 8 lemon slices
-0.3 ounces fresh thyme with stems (about 7 small stems)

How To: 
1.  Preheat the oven to 400 degrees 
2.  Arrange the chicken in a large glass Pyrex baking dish.  Add the oil, water, salt, garlic granules, sprinkle the onions around, top with two lemon slices per chicken breast, and fresh thyme. 
3.  Cover and bake for 35 minutes.  Make sure internal temp is at least 180 degrees.  I use my stainless steel baking sheet as a cover (I don’t use foil in my kitchen).
4.  When the chicken is done, remove each breast from the baking dish and let rest on a plate
5.  Now make the gravy

Gravy
-All the liquid from baked chicken (just over 1 cup)
-2 of the baked lemon slices
-1/2 teaspoon garlic grans (or 1/2 teaspoon chopped fresh)
-1/3 cup + 2 tablespoons raw cashews 
-Salt and pepper to taste 


How To:
1.  Remove all the thyme and baked lemons from the baking dish (reserve 2 lemon slices).
2.  Pour all the liquid, including all the onions, and the 2 baked lemon slices from the baking dish into a blender.  
3.  To the liquid add the cashews, garlic, and salt/pepper (if needed).
4  Blend on high for 20 seconds and until smooth and creamy.
5. Add more cashews for thicker gravy, add some water to thin it out.  

Notes:
*I use a lot of garlic granules because garlic is not always in season at my Coop.  I rely on garlic granules (which I purchase in bulk).  

Shown below with the chicken and gravy is 
roasted and pureed butternut squash
This gravy also goes GREAT with my
Shared on:  Allergy Free Wednesdays Allergy Free Alaska 

Posted by Amber at

Labels: GAPS, main dish, Paleo, SCD.

5 Comments

Leave a Reply

Your email address will not be published. Required fields are marked *

Thursday, August 22, 2013

Zughetti with Roasted Butternut Squash, Roasted Cherry Tomatoes and Baked Chicken Topped with Lemon Garlic Cashew Sauce


I don’t know about you, but I am always on the hunt for dinner ideas.  I like to keep things fresh and different.  For one, it helps me stay motivated to cook the dinner, and two, I think variety is important.  I made this last week for dinner and everyone loved it.  For me, the cashew cream sauce really made the dish and the overall favors were quite pleasing.  The sweet butternut squash is nicely complimented by the sweet and tart tomatoes.  The savory chicken adds in a nice texture and the fresh herbs with their earthy, fresh taste.  The sauce is lemony with just the right amount of garlic, light and so creamy.  You can add as much or as little sauce as you like…or none at all.  It’s sort of like an Alfredo sauce, but it won’t kill your gut.  Vegetarians can leave out the chicken and add more veggies or white beans would be great.  
Salud. 
Zughetti with Roasted Butternut Squash, Roasted Cherry Tomatoes and Baked Chicken Topped with Lemon Garlic Cashew Sauce 
(SCD, GAPS, Paleo)

Ingredients:

Zughetti 
  
-1 medium butternut squash
-2 1/2 cups cherry tomatoes
-2 pounds chicken 
-3 1/2 pounds zucchini
-A handful of fresh parsley and/or basil

Lemon Garlic Cashew Cream Sauce
2 cups cashews soaked 4 – 6 hours

-1 1/4 to 1 1/2 cups filtered water
-1/2 teaspoon salt (or to taste)
-2 teaspoons garlic granules (or 1 fresh clove)
-1/3 cup fresh squeezed lemon juice

How To:

1.  Preheat the oven to 400.
2.  Prepare the butternut squash by peeling and cubing.  Add to a baking dish with 1 1/2 tablespoons of oil and 2 teaspoons garlic granules (optional).  Set aside. 
3.  Wash the cherry tomatoes and cut them in half.  Place them open face in a baking dish.  Sprinkle with oil and salt.  Set aside.
4.  Add the chicken to a baking dish.  Add in salt, onion granules and garlic granules (to your flavor preference, I do about 1 1/2 teaspoons of each).  Add in 1/4 cup water.  Drizzle with 2 tablespoons of oil.  Set side.
5.  When the oven comes to temp, put everything into the oven together (the butternut, tomatoes, and chicken).  Set timer for 30 minutes.  This should be enough time for the tomatoes and chicken to finish (check for chicken’s internal temp to be 180 degrees or more).  The butternut squash takes about 45 minutes.  So set the timer for an extra 15.  
6.  While everything is roasting and baking, make your zughetti and the cashew cream sauce.
7.  For the zughetti, peel, trim ends, and spiralize the zucchini.  Boil for 8 minutes in water.  Allow to drain while you make the cashew cream sauce.  
8.  For the cashew cream sauce add the soaked and drained cashews to a blender along with all the other ingredients.  Add in 1 1/4 cups water for a thicker sauce, and the 1 1/2 cups for a thinner sauce (as shown above).
9.  When everything is out of the oven, build the dish.  Zughetti, butternut, chicken, tomatoes, fresh herbs, and drizzle on that sauce!
    Shared on: Fat Tuesdays,  Slightly Indulgent Tuesdays, Allergy-Free Wednesdays
Posted by Amber at

Labels: chicken recipes, GAPS, main dish, Paleo, SCD, summer cuisine.

4 Comments

Leave a Reply

Your email address will not be published. Required fields are marked *

Saturday, August 10, 2013

Zughetti with Mushroom Fennel Pasta Sauce (SCD/GAPS/Paleo)

I was surprised by the interest in this recipe I posted on FB last week.  I figure zucchini pasta is such old news by now as I’ve been making my sun dried tomato and artichoke heart zucchini pasta for about a year and a half (and freaking LOVE it).  Also check out my raw pesto sauce with zucchini and carrot noodles.  Well, turning squash into noodles may be a standard in our house, but it’s not common for everyone.  Anyway, it’s a good reminder that everybody is on a different journey and at different points on their journey.  This recipe is near and dear to my heart.  The meat sauce is based on my Gramie’s pasta sauce recipe.  I love making it because the smells bring me right back into her kitchen.  As you might know from reading my blog, I spent a lot of time with my grandparents growing up and lived with them for many years of my life (in childhood and as a teenager).  And I was exposed to my Gramie’s deep, devout love for food and her passionate cooking and baking (everything was from scratch).  I made a few adjustments from the original pasta sauce recipe, but it’s still wonderful and lovely and if she were still alive today, I have no doubt she would gobble this upand laugh hysterically at these funky little non-pasta noodles.
 Zughetti with Mushroom Fennel Pasta Sauce 
  
Ingredients:
-3 to 4 pounds of zucchini (I do 3 1/2 lbs)
Sauce

-2 1/4 cups homemade marinara sauce or THIS is my favorite store brand (it’s in a glass jar, organic, and salt free)

-2 pounds ground turkey 
-1/2 cup chopped onion
-1 chopped fennel bulb (1 1/4 cup)
-2 cups chopped mushrooms
-1/4 cup coconut vinegar (or apple cider vinegar)
-1 tablespoon coconut sugar (or sub: honey, maple syrup)
-2 tablespoons coconut oil + 2 tablespoons coconut oil 
-1 teaspoons salt + 1/2 teaspoon + 1/2 teaspoon 
-2 teaspoons garlic granules 
-1/4 cup fresh chopped basil
-1/2 teaspoon dried oregano and basil (both optional) 
How To:
Sauce
1.  In a large skillet add 2 tablespoons of oil, 1/2 teaspoon of salt, onions, and fennel and saute 5 minutes on medium heat.  Add in the mushrooms, 1/2 teaspoon salt and saute for 3 minutes. 
2.  Move the onion mixture to the sides of the pan, add the two final tablespoons of coconut oil to the middle of the pan and then add the ground turkey in the middle, chopping it up, browning, and incorporating it with the onion mixture.  
3.  After the meat and onion mixture are well combined and the meat is starting to brown, add in the garlic granules and the final teaspoon of salt.  
4.  Now add in the marinara sauce, the vinegar, and coconut sugar.  Mix everything together, turn down to low, and cover for 20 minutes.
5.  Turn off heat, remove the cover and add in the fresh chopped basil and additional dried spices (optional).
Pasta
1.  Fill a large pot with water and bring to a boil 
2.  While the water is coming to a boil, peel and trim edges off zucchini. Make sure the cuts are straight to work best in the spiralizer.  
3.  Create the zucchini noodles.  I love this gadget or this peeler works too.
4.  Place noodles in the boiling water for 4 minutes (I love the texture at this cook time).
5.  Drain into a colander and allow the water to drain off for 5 or 10 minutes or so (you could also rid excess water by spinning in a salad spinner).  
6. Plate the zucchini noodles (zughetti) and top with the sauce and fresh basil (or parsley). 
Serves 4 to 5

Notes:
*Try THIS recipe for a nightshade free marinara sauce 
*Vegetarian?  Simply skip the meat and double all the veggies.  I would also add in 2 cups chopped carrots and 1 cup chopped celery.
Fabulous zucchini noodles! 
Boil
Drain
Shared on: Fat Tuesdays, Allergy-Free WednesdaySlightly Indulgent Tuesdays
Posted by Amber at

Labels: allergy-friendly, GAPS, main dish, Paleo, SCD.

6 Comments

Leave a Reply

Your email address will not be published. Required fields are marked *

Monday, August 5, 2013

Asian Chicken with Sweet Orange Cabbage Salad (Paleo, gluten free, soy free)

You all know I love cabbage.  I LOVE it.  Many things upset my digestion, but cabbage has always been okay (crazy right).  Did you know that cabbage juice is used for those of us with IBD flare ups (especially helpful for colitis)?  Have you heard of this?  You simply run the raw cabbage through a juicer and drink six ounces four times per day.  It’s also touted to heal ulcers.  So my friends, if you are in a flare and nothing is pulling you out, try the cabbage juice.  You might need a chaserso also juice some fresh apples and mix together (if need be).  Okay, back to the food, this is perhaps one of my favorite dishes.  I love the Asian flavors along with the warm baked chicken and cold cabbage.  The fresh squeezed orange juice creates a nice sweet and sour touch.  I hope you enjoy this recipe as much as my family.  So easy to make. Oh and I’ve included my other cabbage recipes at the end of the post for ya! 
Asian Chicken with Sweet Orange Cabbage Salad 
(gluten free, soy free, paleo)

Ingredients:

-2 pounds boneless skinless chicken breasts 

The marinade
-1/4 cup coconut aminos 
-2 tablespoons honey
-2 tablespoons sesame oil
-1 teaspoon garlic granules (or fresh)
-3 tablespoons fresh squeezed orange juice
-1 teaspoon fresh ginger (zested)
-1/2 cup chopped green onions
The Salad
1 pound red cabbage
-1 pound savoy cabbage (a sweet, tender cabbage that I love)
-1 1/2 cups sliced red onion

The Salad Dressing  
-3 tablespoons coconut vinegar (or apple cider vinegar)
-2 tablespoons + 2 teaspoons sesame oil
-2 tablespoons honey
-1 teaspoon garlic granules
-1 teaspoon ginger (zested)
-1/4 teaspoon salt 
-1 tablespoons sesame seeds
-1 large segmented orange for garnish 
-1/2 cup green onions for garnish 

How To:
1.  Combine all the marinade ingredients in a small bowl, mix.  
2. In a glass Pyrex baking dish combine the chicken and marinade. Allow the chicken to marinate for at least an hour (I do about 3). After the chicken has soaked up this yummy goodness, preheat an oven to 400 and put the glass Pyrex with the chicken right into the oven and bake for 30 minutes (or until internal chicken temp is at least 180 degrees).  I cover the Pyrex baking dish with a baking sheet while the chicken cooks, but this is not necessary.   
3.  For the salad, thinly slice both cabbages.  Wash and spin dry.  Place the cabbage in a large bowl.  Add in the sliced onions.  
4.  Make the dressing, including everything from the coconut vinegar to the salt.  Mix and pour over the cabbage.  
5.  Mix the cabbage dressing well.  The cabbage will shrink down by half (it wilts quickly with liquid and salt). 
6.  Garnish with oranges, green onions, and sesame seeds.
Serves 4

~Other cabbage recipes by The Tasty Alternative~

Shared on: Melt in your Mouth Mondays, Motivate Me Mondays, Fat Tuesdays, Slightly Indulgent Tuesdays
Posted by Amber at

Labels: chicken recipes, main dish, Paleo, sides, summer cuisine.

4 Comments

Leave a Reply

Your email address will not be published. Required fields are marked *