Category Archives: snacks

Tuesday, September 13, 2011

Lox of Love with Dairy Free Dill Cream Cheese

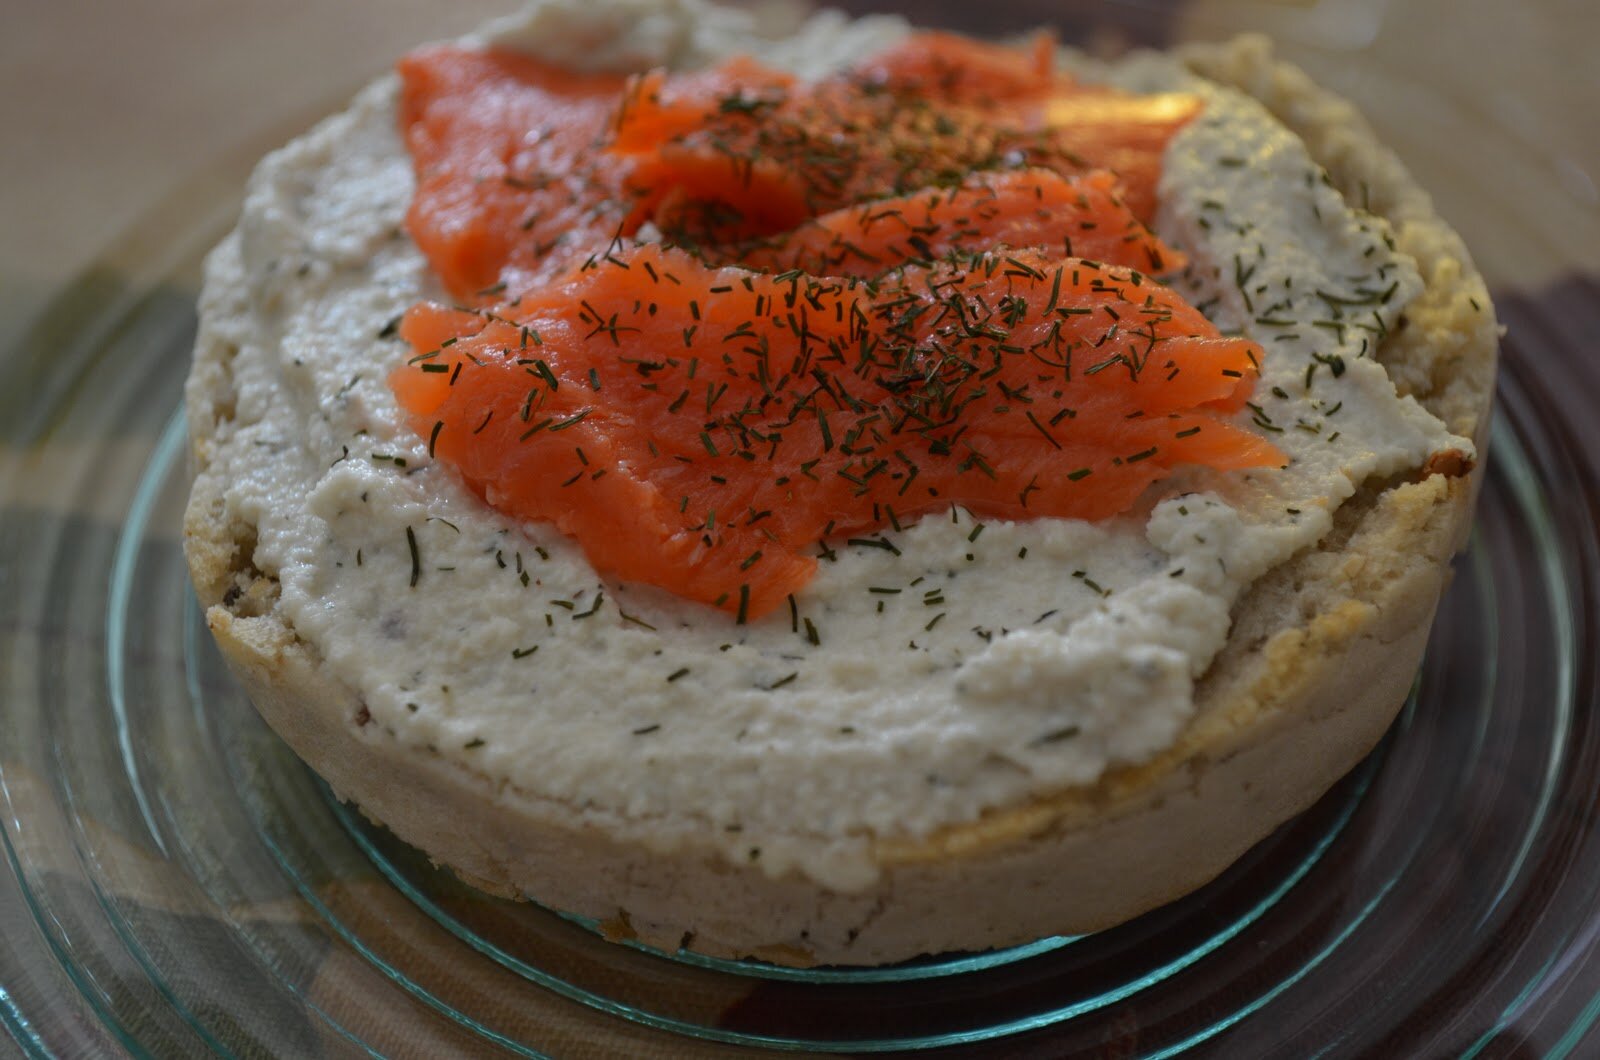
 During my weekly grocery shopping I passed some lox and started to dream about cream cheese and bagels.  I don’t spend too much time in this dream world though (because there is always a tasty alternative to be had) and popped those lox into my basket with a grin along with some gluten free English muffins.  Before bed I put  1/2 cup of cashews in some water to soak until morning and breakfast was nothing short of a dream come true.  This recipe is based off THIS vegan/dairy free “sour cream.”  


Ingredients
–These gluten-free English muffins
-1 package of wild caught Lox
-1/2 cup cashews, soaked for at least 4 hours (I soak mine for around 6) 
-1 teaspoon dried dill
-1/4 to 1/2 teaspoon salt (to taste) 
-3 tablespoons fresh lemon juice (more or less to your sour preference)
-3 tablespoons filtered water (or more until desired texture)

How To
1.  To make the cream cheese place soaked cashews in blender with salt, dill and add 3 tablespoons of water and 3 tablespoons of lemon juice.  Blend.  Continue blending and adding water or lemon juice until your desired consistency is achieved.  I prefer a thicker spread and used more lemon for a sour taste.  
2.  Toast English muffins
3.  Add lox
4.  Make your favorite cup of tea and enjoy an elegant breakfast.

Shared onFresh Bites Friday, Fight Back Friday, Friday Food, Show Off Friday, Freaky Friday, Slightly Indulgent Tuesdays, 
Posted by Amber at

Labels: breakfast, dips and spreads, snacks.

4 Comments

Leave a Reply

Your email address will not be published. Required fields are marked *

* Copy This Password *

* Type Or Paste Password Here *

You may use these HTML tags and attributes: <a href="" title=""> <abbr title=""> <acronym title=""> <b> <blockquote cite=""> <cite> <code> <del datetime=""> <em> <i> <q cite=""> <s> <strike> <strong>

Sunday, September 11, 2011

Baked Veggie Spring Rolls (gluten free, dairy free, sugar free with soy free option)

What’s better than stir fry?  Stir fry wrapped up in a cute little package!  What’s a good word to describe more than craving something?  I don’t know, but this is how I feel about egg rolls/spring rolls, but alas my weak digestion doesn’t love the trifecta factor, the deep-fried/sodium/gluten factor.  So for this month’s Go Ahead Honey, It’s Gluten Free challenge hosted by the beautiful and talented chef, Iris of The Daily Dietribe, I figured why not make a healtheir and gluten-free version of my favorite Asian cuisine: spring rolls.  I nearly cried over these.  First, because they were hopelessly delicious, and two because I tripped and smashed my toe sprinting to the oven when the timer went off.  I also burned my mouth.  Yes, I’m that impatient when it comes to taste testing…no control.  The true test came at dinner.  The verdict:  Husband loved them.  Daughter loved them.  Son loved them.  Happy bellies.  Happy mommy.

I served these spring rolls with vegetarian fried rice and cold cabbage salad. 

Ingredients
-1 small red pepper, julienned
-2 carrots, julienned
-2 celery stalks, julienned
-1 cup shredded cabbage
–Rice noodles, about 2 cups cooked 
-2 1/2 tablespoons coconut aminos 
-1 tablespoon garlic granules
-2 teaspoons onion powder  
-Red Pepper flakes, to taste 
-Oil of your choice (GS, sesame, olive, coconut, etc)
-Rice wrappers 

How To
1.  Saute veggies (carrots, celery, pepper & cabbage) with some oil. Add the coconut aminos, garlic granules and onion powder. 
2.  Cook the rice noodles.  In a large pot, bring water to a boiland add noodles.  Drain and rinse noddles. 
3.  Add cooked rice noodles to veggies.  Cook on medium until the flavors meld (you can add red pepper flakes to taste, but I left this out for my kids)
4.  Let this mixture cool completely…nice to make this earlier in the day and have it ready to assemble the rolls, but it only takes about 20 minutes to cool

After mixture cools:
1.  Preheat oven to 375 degrees 
2.  Add some filtered water to a flat wide pan or dish and soak the rice paper until pliable.  Add the filling and roll – while you are filling one, have another in the water waiting
3.  Fill rice wrappers and place on baking sheet.  I use my favorite silicone baking mat 
4.  At this point you can spray the rolls with oil if you so desire, it makes them very shinny.  Be forewarned, however, oil sprayed or not, the tips and ends of the rolls get very poky when cooked
5.  Bake for 15 minutes.  (I didn’t test these any longer than 15 minutes, so I’m guessing they will become crispier if left in longer.  I happen to prefer the chewy texture at the 15 minute mark). 
6.  Walk with caution to the oven, minding chair & table legs, toys and furniture 
7.  Do not eat these right out of the oven like a wild animal (like moi)

Notes
*You can add just about anything you like to these rolls.  Other suggestions include: mushrooms, bamboo shoots, bean sprouts, chicken/pork, onions, cilantro, basil or fennel.  Have fun with your food! 
*Traditional spring rolls call for oyster sauce, but I couldn’t find any gluten-free brands.  The rolls taste absolutely delicious with the coconut aminos. 
*I didn’t bother making a dipping sauce for the rolls, they were tasty all on their own.  But see comments for suggestions. 
*These take a while to cool.  Have these out and cooling a good 15 minutes before you eat, 30 minutes if serving to children.  

Shared on: Just Another Meatless MondayMelt in your Mouth Mondays, Monday Mania, Ruth’s Real Food 101 (Mondays), Whole Food Wednesdays, Lunch Box Love Friday, Allergy-Friendly Fridays
Posted by Amber at

Labels: appetizer, gluten free, snacks, vegan, vegetarian.

16 Comments

Leave a Reply

Your email address will not be published. Required fields are marked *

* Copy This Password *

* Type Or Paste Password Here *

You may use these HTML tags and attributes: <a href="" title=""> <abbr title=""> <acronym title=""> <b> <blockquote cite=""> <cite> <code> <del datetime=""> <em> <i> <q cite=""> <s> <strike> <strong>

Friday, September 2, 2011

Cilantro Hummus

Over the years I have made many variations of hummus.  This delicious dip is a family favorite so we always have some in the fridge.  I’ve never thought about cilantro in hummus and I’m sorry I didn’t figure this out sooner! It’s delicious.  

Ingredients
-2 1/2 cups prepared garbanzo beans* (or two cans garbanzo beans) 
-1/4 cup tahini 
-3 tablespoons lemon juice (or more to taste)
-3/4 teaspoon garlic granules (or 1 clove) 
-1/2 teaspoon salt (or to taste) 
-1/2 cup of olive oil 
-3/4 cup fresh cilantro (or more to taste)
-1/4 teaspoon chili powder (or to taste)
-Filtered water (to bring the hummus to a preferred consistency)

How To
1. Add beans, tahini, garlic granules, salt, cilantro and optional chili powder to a food processor and blend.  
2.  With the food processor running, drizzle in oil.  
3.  Check for texture.  Too thick?  Add in 1 tablespoon of water at a time until you reach your desired texture. 

Notes
*Soak beans in filtered water for at least 8 hours, I soak mine for 24 hours and change the water 2x.  Boil in filtered water until tender and store in fresh water until ready to use. I soak & boil around 6 cups of beans at a time and freeze the leftovers for another day (they do great in the freezer!).
*A word about the beans:  I go back and forth between garbanzo beans and chana dal beans.  Chana dal yields a nice smooth hummus but with a much milder flavor so you really need to increase your ingredients.  Garbanzos are rich and flavorful with a thicker consistency.  I love them both but lately I’ve been using garbanzo beans for that full hummus flavor.  
____________________________________________
Posted by Amber at

Labels: dips and spreads, snacks, vegan, vegetarian.

One Comment

Leave a Reply

Your email address will not be published. Required fields are marked *

* Copy This Password *

* Type Or Paste Password Here *

You may use these HTML tags and attributes: <a href="" title=""> <abbr title=""> <acronym title=""> <b> <blockquote cite=""> <cite> <code> <del datetime=""> <em> <i> <q cite=""> <s> <strike> <strong>

Wednesday, August 24, 2011

Raw Vegan Walnut Pesto (SCD/Paleo/GAPS)


 I have to sayI’m very pleased with vegan pesto.  I don’t miss the the cheese at all.  And I use walnuts instead of pine nuts.  I guess there is a global pine nut shortage which prompted my local coop to put the pine nuts they did have in these ittty-bitty tiny plastic bags.  I laughed so hard and thought, I can’t make pesto with 5 pine nuts!!  Thus, the walnuts made their debut and the outcomesooo tasty!


Ingredients
-2 ounces of fresh basil (sort of hard to measure in cups, probably 4 cups)
-1 cup raw organic walnuts (you could also toast the walnuts, but do not if making raw)
-3 to 4 tablespoons fresh lemon (to taste)
-1/2 cup olive oil (or preferred oil)
-1/2 teaspoon garlic granules (or one clove of fresh garlic – or to taste)
-1/2 teaspoon salt


How To
1.  Place toasted walnuts in food processor and pulse a few times.   
2. Add basil, garlic granules, salt and pulse.
3. Turn on food processor, add in lemon juice and drizzle in oil.  Scrape down sides now and then.
4.  Test for seasoning.  


**********
Daddy and Ethan gathering basil from the garden. 

Shared on: Just Another Meatless Monday  Melt in your Mouth Mondays, Monday Mania, My Meatless Mondays, Mealtime MondayMade From Scratch Monday, Allergy-Free Wednesdays, Allergy-Friendly St. Pattie’s Day,  Fat Tuesday,Slightly Indulgent Tuesdays, Traditional Tuesdays, Whole Food Wednesdays, Real Food Wednesdays, Gluten Free Wednesdays, Potluck Party Friday, Wellness Weekend, 

Posted by Amber at

Labels: dips and spreads, GAPS, Paleo, raw, SCD, snacks, vegan, vegetarian.

3 Comments

Leave a Reply

Your email address will not be published. Required fields are marked *

* Copy This Password *

* Type Or Paste Password Here *

You may use these HTML tags and attributes: <a href="" title=""> <abbr title=""> <acronym title=""> <b> <blockquote cite=""> <cite> <code> <del datetime=""> <em> <i> <q cite=""> <s> <strike> <strong>