Category Archives: Paleo

Saturday, August 10, 2013

Zughetti with Mushroom Fennel Pasta Sauce (SCD/GAPS/Paleo)

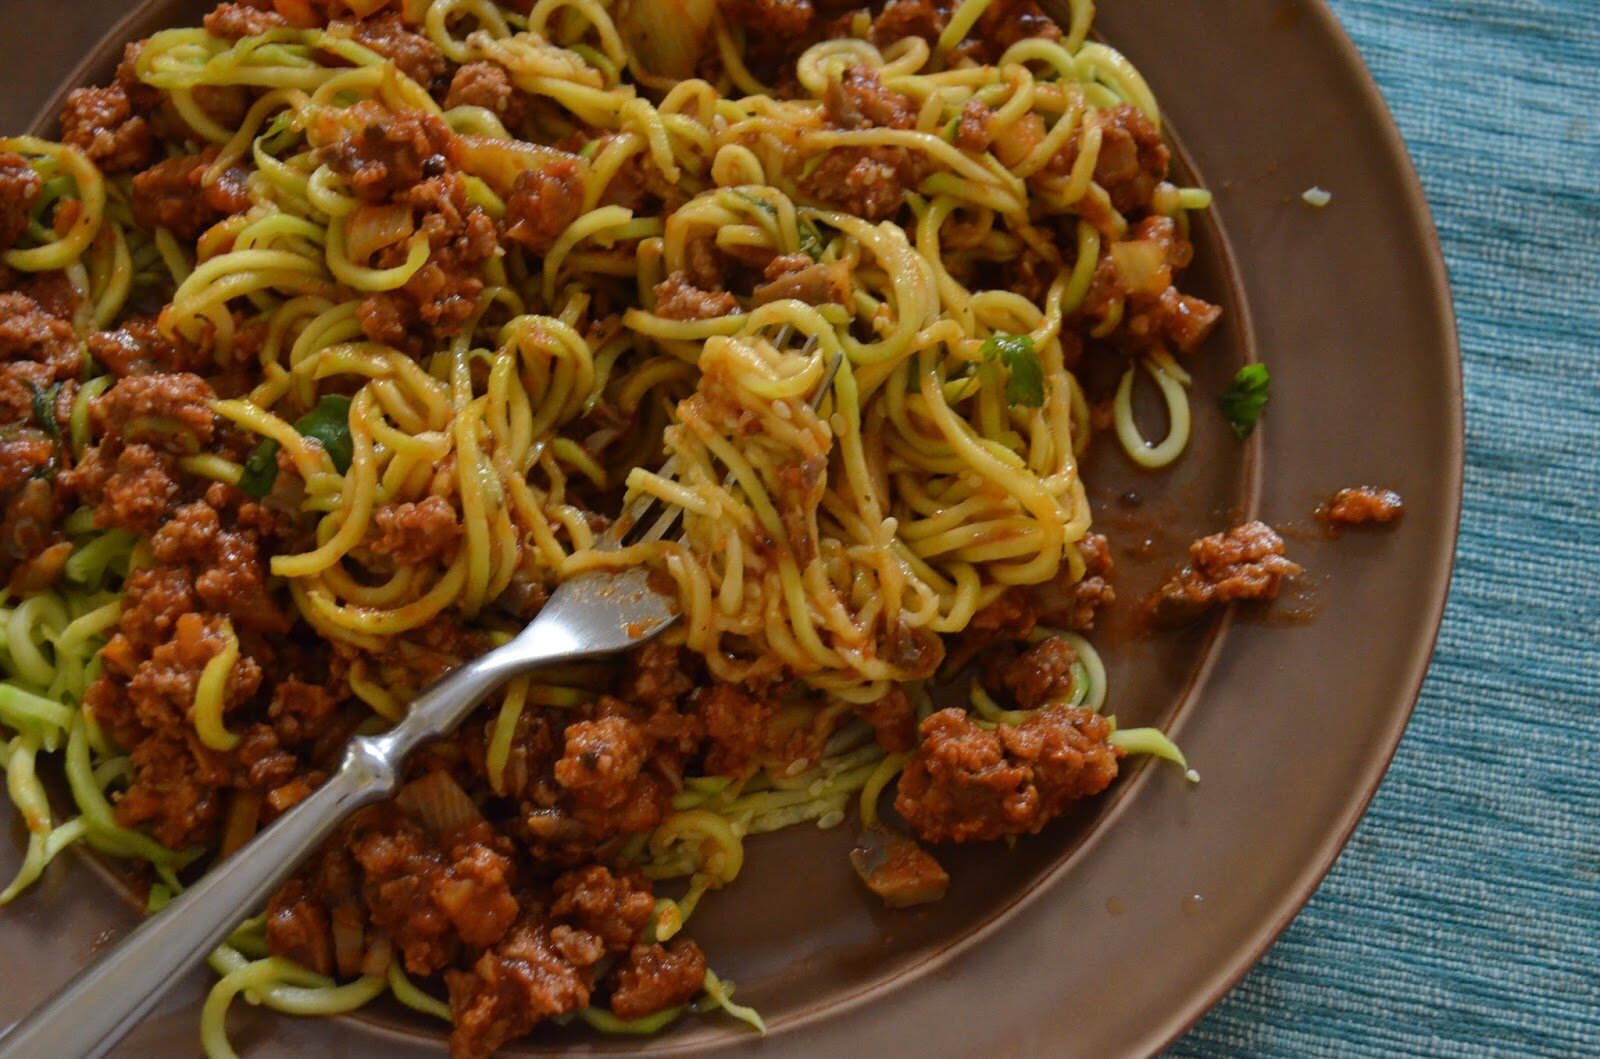
I was surprised by the interest in this recipe I posted on FB last week.  I figure zucchini pasta is such old news by now as I’ve been making my sun dried tomato and artichoke heart zucchini pasta for about a year and a half (and freaking LOVE it).  Also check out my raw pesto sauce with zucchini and carrot noodles.  Well, turning squash into noodles may be a standard in our house, but it’s not common for everyone.  Anyway, it’s a good reminder that everybody is on a different journey and at different points on their journey.  This recipe is near and dear to my heart.  The meat sauce is based on my Gramie’s pasta sauce recipe.  I love making it because the smells bring me right back into her kitchen.  As you might know from reading my blog, I spent a lot of time with my grandparents growing up and lived with them for many years of my life (in childhood and as a teenager).  And I was exposed to my Gramie’s deep, devout love for food and her passionate cooking and baking (everything was from scratch).  I made a few adjustments from the original pasta sauce recipe, but it’s still wonderful and lovely and if she were still alive today, I have no doubt she would gobble this upand laugh hysterically at these funky little non-pasta noodles.
 Zughetti with Mushroom Fennel Pasta Sauce 
  
Ingredients:
-3 to 4 pounds of zucchini (I do 3 1/2 lbs)
Sauce

-2 1/4 cups homemade marinara sauce or THIS is my favorite store brand (it’s in a glass jar, organic, and salt free)

-2 pounds ground turkey 
-1/2 cup chopped onion
-1 chopped fennel bulb (1 1/4 cup)
-2 cups chopped mushrooms
-1/4 cup coconut vinegar (or apple cider vinegar)
-1 tablespoon coconut sugar (or sub: honey, maple syrup)
-2 tablespoons coconut oil + 2 tablespoons coconut oil 
-1 teaspoons salt + 1/2 teaspoon + 1/2 teaspoon 
-2 teaspoons garlic granules 
-1/4 cup fresh chopped basil
-1/2 teaspoon dried oregano and basil (both optional) 
How To:
Sauce
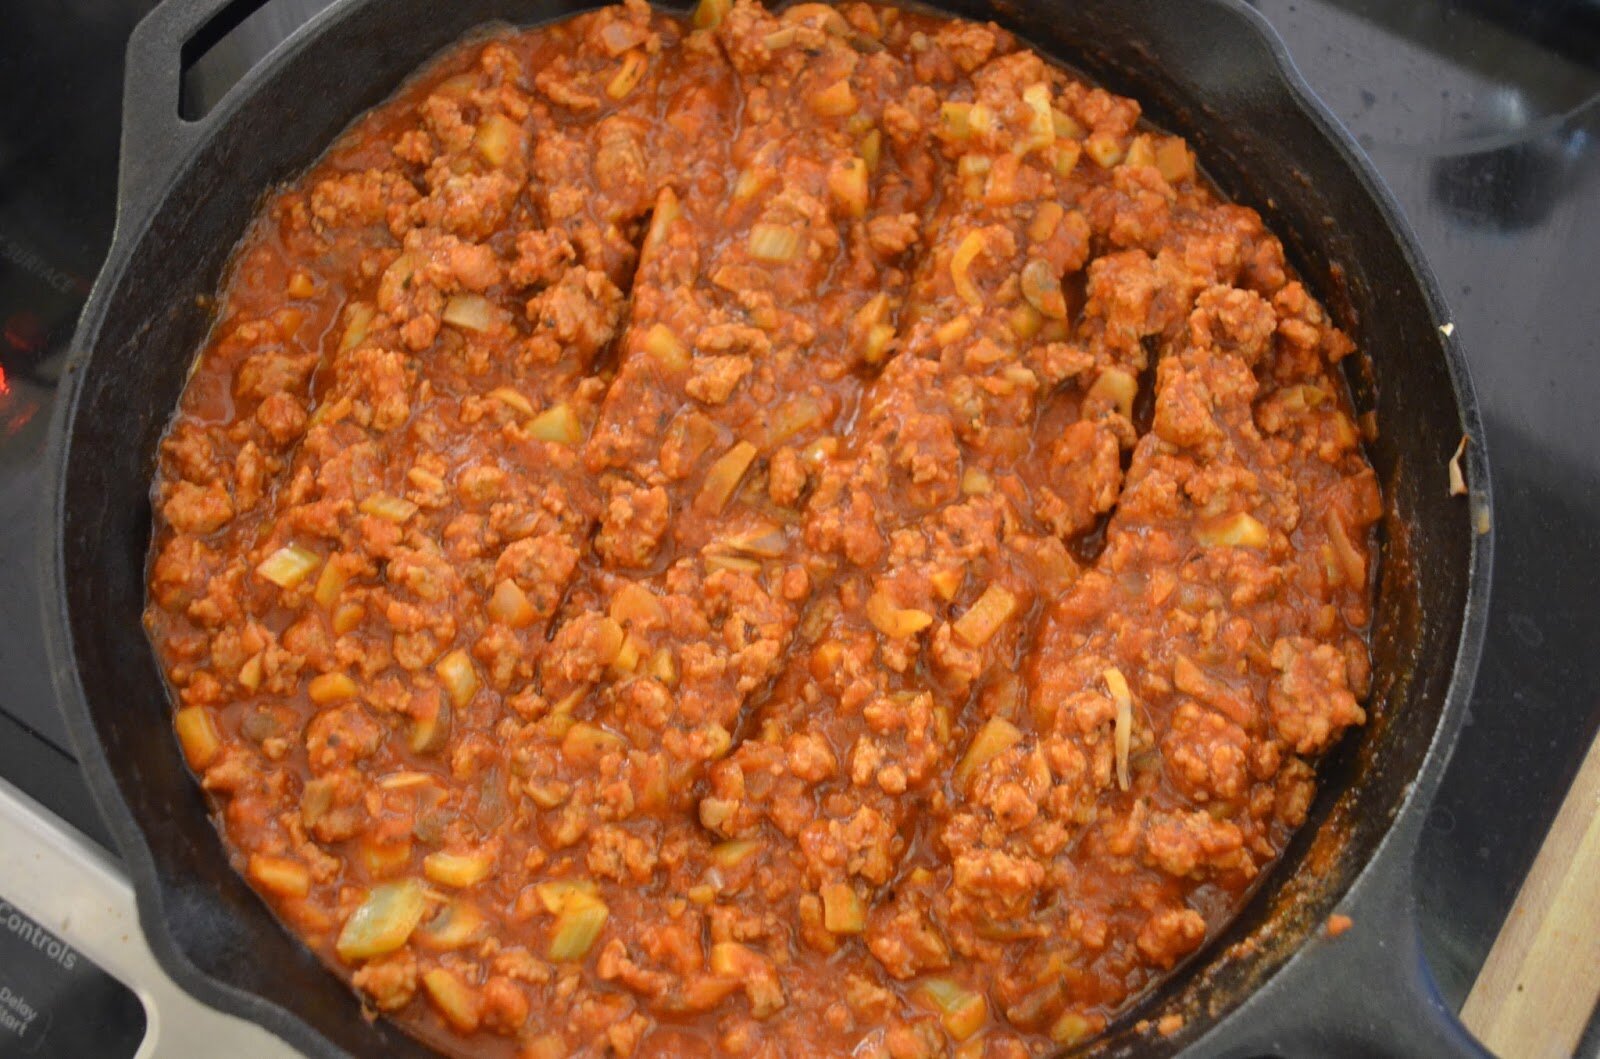
1.  In a large skillet add 2 tablespoons of oil, 1/2 teaspoon of salt, onions, and fennel and saute 5 minutes on medium heat.  Add in the mushrooms, 1/2 teaspoon salt and saute for 3 minutes. 
2.  Move the onion mixture to the sides of the pan, add the two final tablespoons of coconut oil to the middle of the pan and then add the ground turkey in the middle, chopping it up, browning, and incorporating it with the onion mixture.  
3.  After the meat and onion mixture are well combined and the meat is starting to brown, add in the garlic granules and the final teaspoon of salt.  
4.  Now add in the marinara sauce, the vinegar, and coconut sugar.  Mix everything together, turn down to low, and cover for 20 minutes.
5.  Turn off heat, remove the cover and add in the fresh chopped basil and additional dried spices (optional).
Pasta
1.  Fill a large pot with water and bring to a boil 
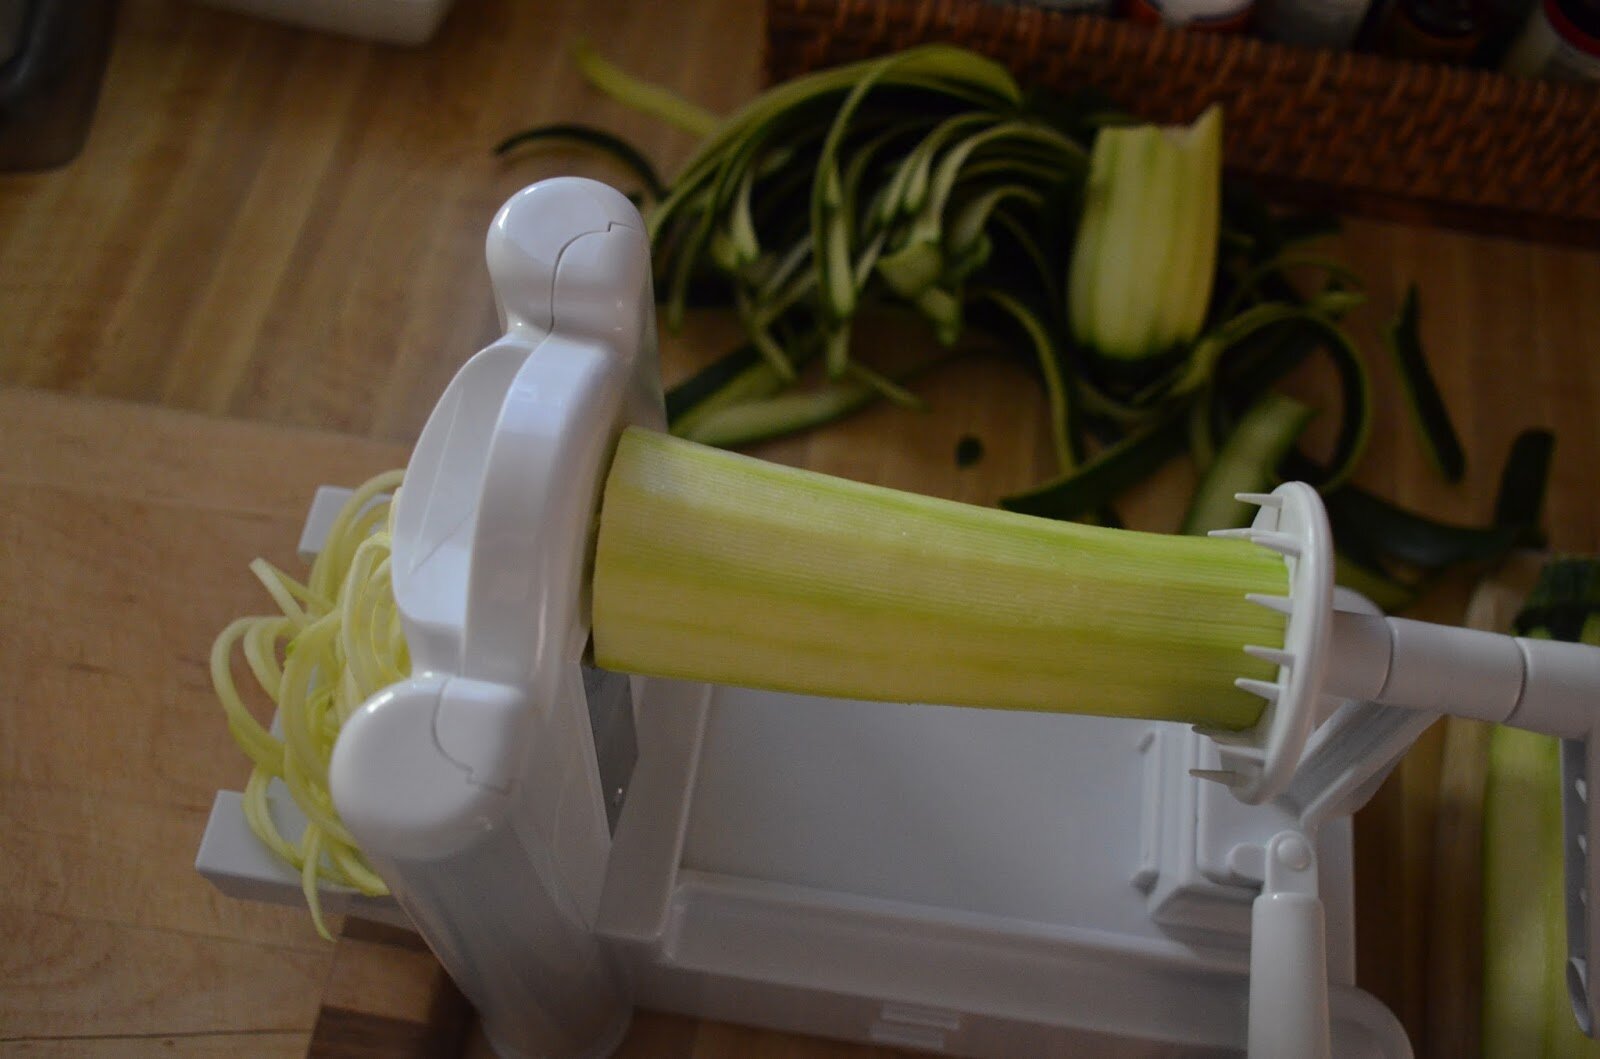
2.  While the water is coming to a boil, peel and trim edges off zucchini. Make sure the cuts are straight to work best in the spiralizer.  
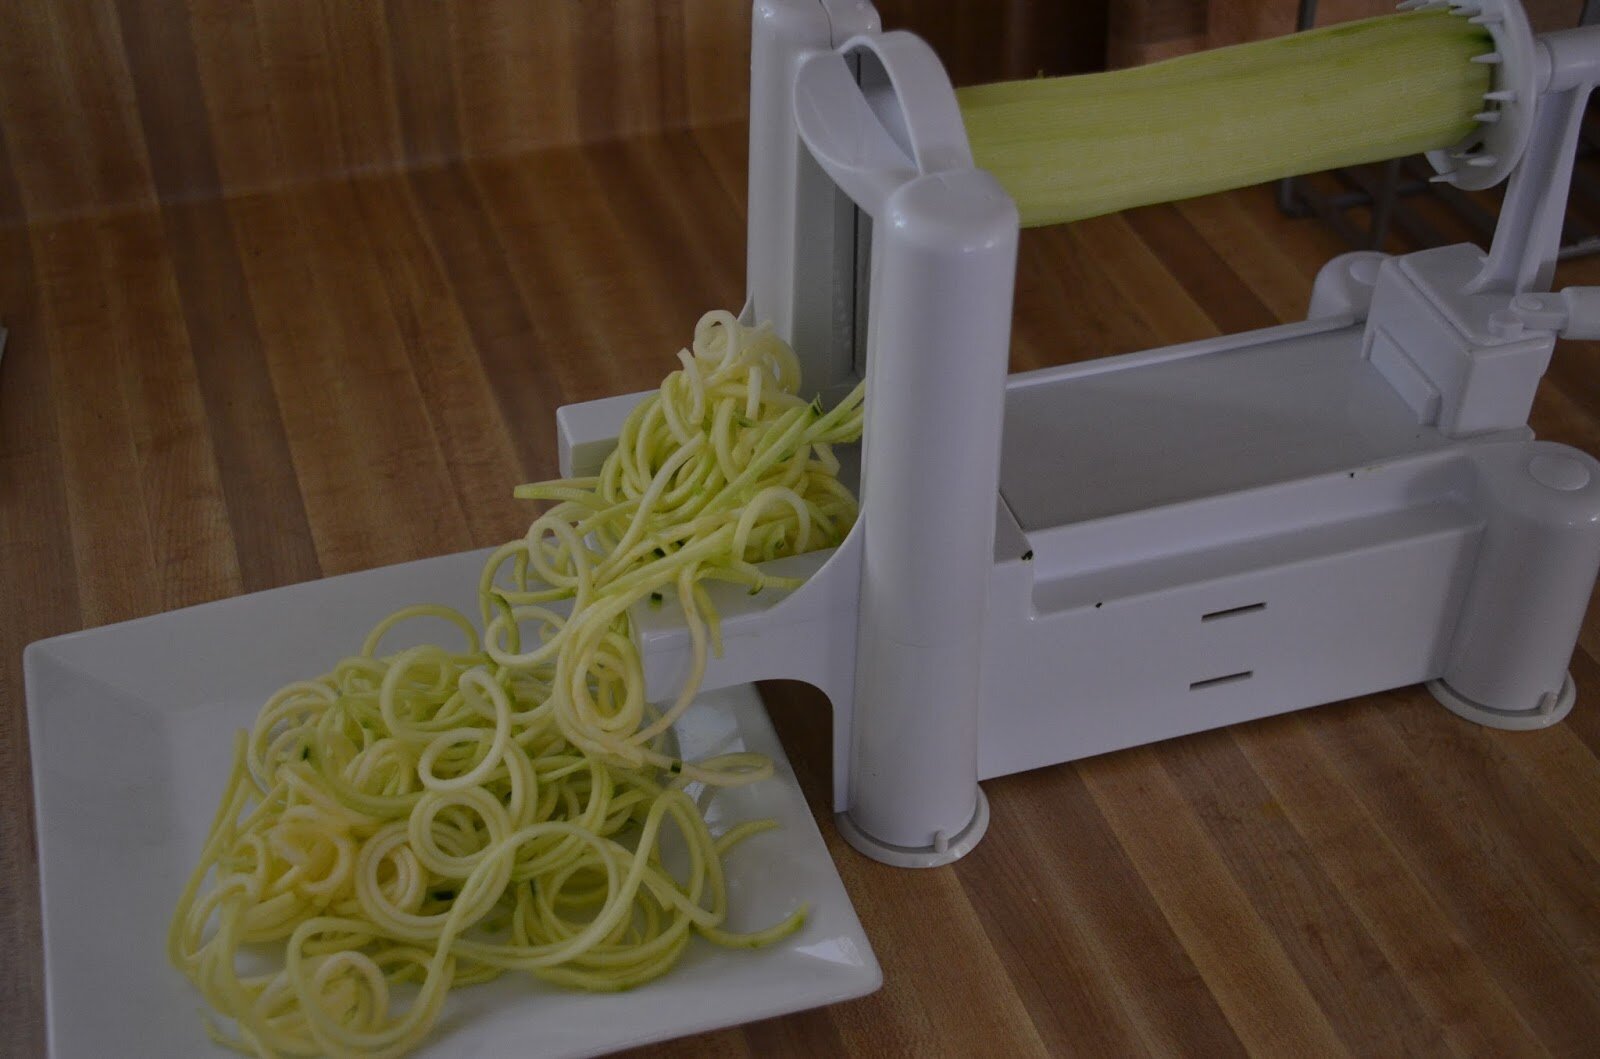
3.  Create the zucchini noodles.  I love this gadget or this peeler works too.
4.  Place noodles in the boiling water for 4 minutes (I love the texture at this cook time).
5.  Drain into a colander and allow the water to drain off for 5 or 10 minutes or so (you could also rid excess water by spinning in a salad spinner).  
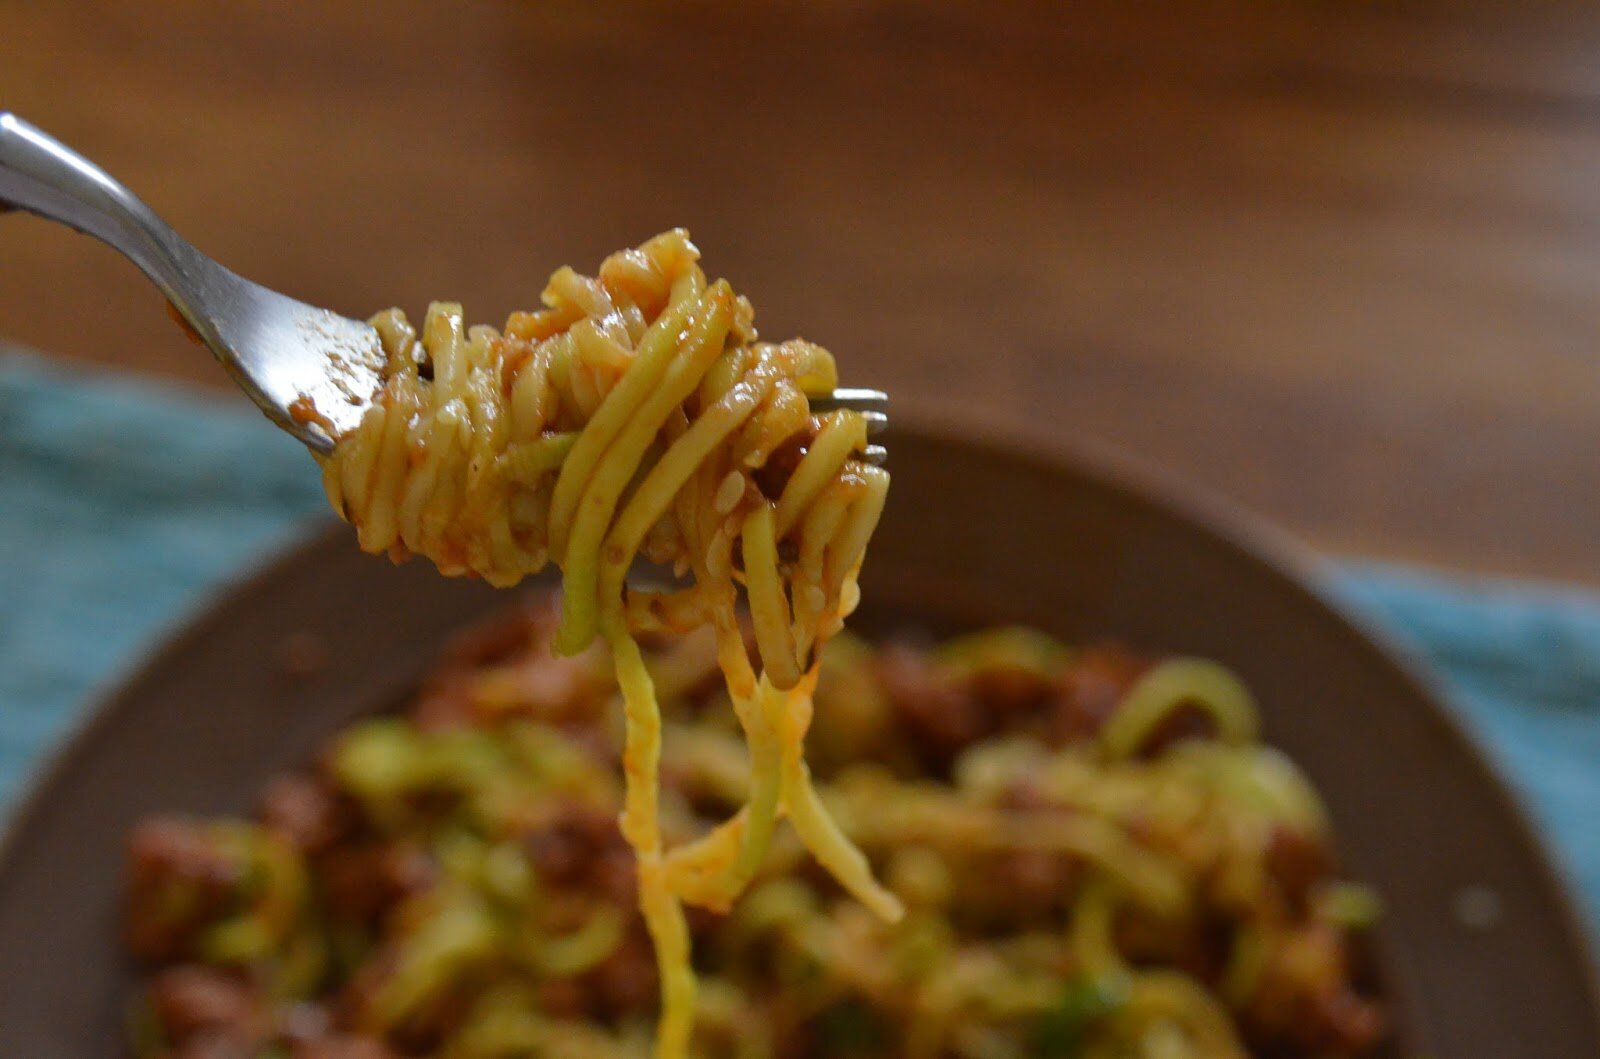
6. Plate the zucchini noodles (zughetti) and top with the sauce and fresh basil (or parsley). 
Serves 4 to 5

Notes:
*Try THIS recipe for a nightshade free marinara sauce 
*Vegetarian?  Simply skip the meat and double all the veggies.  I would also add in 2 cups chopped carrots and 1 cup chopped celery.
Fabulous zucchini noodles! 
Boil
Drain
Shared on: Fat Tuesdays, Allergy-Free WednesdaySlightly Indulgent Tuesdays
Posted by Amber at

Labels: allergy-friendly, GAPS, main dish, Paleo, SCD.

6 Comments

Leave a Reply

Your email address will not be published. Required fields are marked *

* Copy This Password *

* Type Or Paste Password Here *

You may use these HTML tags and attributes: <a href="" title=""> <abbr title=""> <acronym title=""> <b> <blockquote cite=""> <cite> <code> <del datetime=""> <em> <i> <q cite=""> <strike> <strong>

Monday, August 5, 2013

Asian Chicken with Sweet Orange Cabbage Salad (Paleo, gluten free, soy free)

You all know I love cabbage.  I LOVE it.  Many things upset my digestion, but cabbage has always been okay (crazy right).  Did you know that cabbage juice is used for those of us with IBD flare ups (especially helpful for colitis)?  Have you heard of this?  You simply run the raw cabbage through a juicer and drink six ounces four times per day.  It’s also touted to heal ulcers.  So my friends, if you are in a flare and nothing is pulling you out, try the cabbage juice.  You might need a chaserso also juice some fresh apples and mix together (if need be).  Okay, back to the food, this is perhaps one of my favorite dishes.  I love the Asian flavors along with the warm baked chicken and cold cabbage.  The fresh squeezed orange juice creates a nice sweet and sour touch.  I hope you enjoy this recipe as much as my family.  So easy to make. Oh and I’ve included my other cabbage recipes at the end of the post for ya! 
Asian Chicken with Sweet Orange Cabbage Salad 
(gluten free, soy free, paleo)

Ingredients:

-2 pounds boneless skinless chicken breasts 

The marinade
-1/4 cup coconut aminos 
-2 tablespoons honey
-2 tablespoons sesame oil
-1 teaspoon garlic granules (or fresh)
-3 tablespoons fresh squeezed orange juice
-1 teaspoon fresh ginger (zested)
-1/2 cup chopped green onions
The Salad
-1 pound red cabbage
-1 pound savoy cabbage (a sweet, tender cabbage that I love)
-1 1/2 cups sliced red onion

The Salad Dressing  
-3 tablespoons coconut vinegar (or apple cider vinegar)
-2 tablespoons + 2 teaspoons sesame oil
-2 tablespoons honey
-1 teaspoon garlic granules
-1 teaspoon ginger (zested)
-1/4 teaspoon salt 
-1 tablespoons sesame seeds
-1 large segmented orange for garnish 
-1/2 cup green onions for garnish 

How To:
1.  Combine all the marinade ingredients in a small bowl, mix.  
2. In a glass Pyrex baking dish combine the chicken and marinade. Allow the chicken to marinate for at least an hour (I do about 3). After the chicken has soaked up this yummy goodness, preheat an oven to 400 and put the glass Pyrex with the chicken right into the oven and bake for 30 minutes (or until internal chicken temp is at least 180 degrees).  I cover the Pyrex baking dish with a baking sheet while the chicken cooks, but this is not necessary.   
3.  For the salad, thinly slice both cabbages.  Wash and spin dry.  Place the cabbage in a large bowl.  Add in the sliced onions.  
4.  Make the dressing, including everything from the coconut vinegar to the salt.  Mix and pour over the cabbage.  
5.  Mix the cabbage dressing well.  The cabbage will shrink down by half (it wilts quickly with liquid and salt). 
6.  Garnish with oranges, green onions, and sesame seeds.
Serves 4

~Other cabbage recipes by The Tasty Alternative~

Shared on: Melt in your Mouth Mondays, Motivate Me Mondays, Fat Tuesdays, Slightly Indulgent Tuesdays
Posted by Amber at

Labels: chicken recipes, main dish, Paleo, sides, summer cuisine.

4 Comments

Leave a Reply

Your email address will not be published. Required fields are marked *

* Copy This Password *

* Type Or Paste Password Here *

You may use these HTML tags and attributes: <a href="" title=""> <abbr title=""> <acronym title=""> <b> <blockquote cite=""> <cite> <code> <del datetime=""> <em> <i> <q cite=""> <strike> <strong>

Thursday, July 25, 2013

Raw Peppermint Patties (paleo, cane-sugar free)

These raw peppermint patties are dedicated to my handsome chocoholic husband.  This is his favorite combination (chocolate, peppermint, and coconut).  I love creating healthy treats for my familyI feel like such a superstar mom when I’m like, “Why yes, we have a fun sweet treat for snack, or yes, there is something tasty and healthy for dessert.”  I love it.  I’ve been working on this recipe for a while. I’m excited to share the final product with you today.  Enjoy!   
Raw Peppermint Patties 

Ingredients:

Chocolate Shell
-1/4 cup melted cocoa butter
-1/4 cup honey (vegans use 3 T maple syrup, 4 T coconut nectar or 1 teaspoon stevia) 
-1/4 cup raw cacao powder
-1/4 cup melted coconut oil 
-1 teaspoon vanilla extract 
-Tiny pinch of salt 

Filling
-1 cup shredded coconut
-1 to 2 tablespoon honey* (vegans use maple syrup or coconut nectar) 
-1 teaspoon vanilla 
-1 tablespoon peppermint extract/flavor (or more to your preference) 
-1 tablespoon cocoa butter (optional, but worth it) 
-Cacao nibs (optional) 

How To:
1.  Melt the cocoa butter.  Here is how to keep it raw while melting: fill a small pot with water (half full) and place a 1 cup glass Pyrex in the water.  Add the cocoa butter (shredded for quicker, more even heating).  Stir while it’s melting.  Once melted, remove from the water.  
2.  To the melted cocoa butter add in all the above chocolate shell ingredients.  Stir until the raw cacao powder is incorporated.  
3.  Don’t skip this next step:  Use an immersion blender (or some blender) to emulsify the mixture for only about 10 seconds* (see notes).  If you skip this step, the honey will sink to the bottom and will not be evenly distributed throughout the chocolate.  
4.  Poor chocolate (as much or as little as you like) into the bottom of a mold (silicone or paper) – place in the freeze for about 5 to 10 minutes to harden.  
5.  In a food processor make the filling.  Add the 1 cup of shredded coconut and blend 3 to 5 minutes.  Scrape down sides as needed. Add in the rest of the ingredients and blend until incorporated.  If adding the cacao nibs, add last and pulse a few times to incorporate.  
6.  Remove the molds from freezer and (with your hands) add in the filling on the layer of chocolate, leaving enough room on all side for the top layer of chocolate to form around the filling and touch the bottom layer of chocolate.  Add as much or as little as you like. 
7.  Transfer to fridge or freeze to harden.  
8.  Makes 4 to 5 large peppermint patties.  I pour any leftover chocolate into small silicone candy molds and refrigerate.   

Notes:
*Be carefulDO NOT blend the chocolate too long.  Something crazy will happen: the honey and coconut oil blob together and the cocoa butter separates.  There is no recovery when this happens.  
*I use 1 tablespoon of honey for the filling – these puppies are RICH, but add in more sweetener to your preference.    
Here they are with cocoa nibs for added texture and flavor 
Here’s what they look like made thin(er) 
*
Here is the general building process 
Shared on: Fat Tuesdays, Raw Foods Thursdays, Allergy-Free Fridays, Wellness Weekend, Healthy Vegan Friday 
Posted by Amber at

Labels: candy alternatives, chocolate, dessert, Paleo, raw.

25 Comments

Leave a Reply

Your email address will not be published. Required fields are marked *

* Copy This Password *

* Type Or Paste Password Here *

You may use these HTML tags and attributes: <a href="" title=""> <abbr title=""> <acronym title=""> <b> <blockquote cite=""> <cite> <code> <del datetime=""> <em> <i> <q cite=""> <strike> <strong>

Monday, July 22, 2013

Homemade Organic Roasted Almond Butter w/ Raw Option (never buy the expensive store brands again)

Almond butter came into my life about 10 years ago when I was doing my first candida cleanse.  And I kid you not, at the time it was pure indulgence.  Not much was allowed on the cleanse, but small doses of almond butter was okay, so I pretty much fell in love.  After the cleanse and through the years I ate almond butter regularly.  I’m deathly allergic to peanuts, so how fun to make my own version of PB&J with almond butter.  As much as I love almond butter, about a year ago I discovered that it irritates my digestion to no end.  My unsuccessful run on the SCD was due to my high intake of almonds.  So although I don’t eat almonds or almond butter much anymore, it’s beloved by my husband and children.  So I make it for them.  Making at home is also motivated by the insanely high price of store bought organic almond butters (common to see $15 for a jarI’ve seen it as high as $24!!).  If you love roasted almond butter and want to save a little money, then this recipe is for you.  I also make a raw version with soaked and dehydrated almonds and included directions for this at the end of the post.

Homemade Organic Roasted Almond Butter 

Ingredients:
-3 cups raw organic almonds 
-Pinch of salt 
How To:
1. Preheat oven to 350 degrees
2.  Arrange the almonds on a baking sheet in a single layer
3.  Roast for 10 minutes
4.  Remove from oven and allow the almonds to cool completely
5.  When the almonds are cool, add to a food processor
6.  Turn it on and let it whirl.  After about a minute the almonds will form a stiff, dry ball.  This is okay.  Take off the lid and break the ball apart with a fork.  Turn the machine back on and keep it blending.  If it stops up again, do the same with the fork. 
7.  After about 3 minutes the oils in the almonds will release and the mixture will become thin.  Continue blending until the almonds are creamy and smooth.  It takes about 9 minutes in my food processor. Add in your pinch of salt toward the end of the process.  Please note, I do NOT have a fancy, high tech food processor.  It is the most basic model.
8.  Store in glass container in the fridge
Version 2: 
Raw Almond Butter 
with soaked and dehydrated almonds
Ingredients:
-3 cups raw organic almonds
-Walnut oil (or olive oil) 
-Pinch of salt

How To:
1.  In a large bowl, add the almonds and fill with filtered water (with about two inches over top of almonds).  Soak for 12 – 24 hours.  I soak mine for 24 and change the water once.  
2.  Drain and rinse the almonds.  
3.  Lay them out on a towel and pat off the excess water.
4.  Add almonds to a food dehydrator and dehydrate on 105 degrees for about 30 hours.  
5.  The almonds will be properly dehydrated when they are crisp and crunch to the taste and you an visually see the meat of the almond is dry.  You can tell when there is moisture left, you can see it and feel it.
6.  Place the dehydrated almonds in a food processor and blend.  You need to stay close to the food processor and give it many breaks, as the almonds get very hot and you don’t want the temp to rise over 118 degrees.  So if you are keeping this raw, blend and check the temperature throughout the process.  
7.  After the almonds look well blended, you can add in a little oil to help the moisture factor. It’s up to you how much to add, so start with a teaspoon and go from there.  At this point you can also add in the pinch of salt. 
8.  Raw almond butter made with this method smells and tastes different than roasted almond butter, but still delicious (and much easier to digest!)
__________________________________________
Shared on: Fat Tuesday, Slightly Indulgent Tuesdays, Allergy-Free Fridays, Wellness Weekend, Healthy Vegan Friday 
Posted by Amber at

Labels: dips and spreads, GAPS, how to, Paleo, SCD, snacks.

5 Comments

Leave a Reply

Your email address will not be published. Required fields are marked *

* Copy This Password *

* Type Or Paste Password Here *

You may use these HTML tags and attributes: <a href="" title=""> <abbr title=""> <acronym title=""> <b> <blockquote cite=""> <cite> <code> <del datetime=""> <em> <i> <q cite=""> <strike> <strong>

Friday, July 12, 2013

Refreshing Tropical Coconut Ice Cream (dairy free, SCD, Paleo, GAPS)

Once upon a time I ate cow milk ice cream.  And once upon a time I ate cow milk pineapple ice cream in Hawaii with my fiancé, now husband) – wow 13 year ago (and I still remember that ice cream).  We were at the Dole pineapple plantation in Oahu.  It was the most delightful ice cream I had ever eaten.  Not really one for heavy, overly sweet or chocolaty treats, this pineapple ice cream was so refreshing and light.  I fell in love.  This tropical coconut milk based ice cream brought me back to that romantic stay in the islands.  In addition to pineapple, however, I added fresh mango, banana, and lime.  It’s a real tropical explosion.  This recipes makes quite a bit – too much for my ice cream maker.  I suggest using the leftover mixture in popsicle molds or refrigerate to use in a smoothie.  I hope you enjoy it.  Mahalo.   

Ingredients:
-2 cans full fat coconut milk (3 cups). See here or here 
-2 cups fresh chopped mango
-1 1/2 cups fresh or canned pineapple 
-1 medium ripe banana (5 ounces worth)
-1/3 cup fresh lime juice
-1/4 cup honey (vegans use maple syrup or coconut nectar)

How To:
1. Add all the above ingredients to a blender and blend until well incorporated.  
2.  Fill your ice cream maker with the mixture (do not over fill) and churn until it starts to firm up and harden, and the ice cream maker starts to slow.  
3.  Transfer the ice cream to an air tight glass container and store in the freezer for at least 4 hours (I give mine a good 6 hours).
4. Remove 5  minutes before serving to allow ice cream to soften up a bit so it’s easier to scoop out.
Shared on: Fat Tuesday Slightly Indulgent Tuesdays, Raw Foods Thursday, Wellness Weekend, Whole Food Fridays, Allergy-Free Wednesdays 
Posted by Amber at

Labels: dessert, GAPS, ice cream, Paleo, raw, SCD, summer treats.

8 Comments

Leave a Reply

Your email address will not be published. Required fields are marked *

* Copy This Password *

* Type Or Paste Password Here *

You may use these HTML tags and attributes: <a href="" title=""> <abbr title=""> <acronym title=""> <b> <blockquote cite=""> <cite> <code> <del datetime=""> <em> <i> <q cite=""> <strike> <strong>

Wednesday, June 26, 2013

Healthy and Hearty Summer Salad with Homemade Honey Balsamic Vinaigrette

Salads are a MUST make dish this week here in Northern California.  There is a heat wave coming through pushing us up into the triple digits for several days.  Today is gorgeous and so we are taking advantage of this mild weather and heading to the Farmer’s Market tonight for some dinner and fun.  Yesterday I made a big batch of honey balsamic vinaigrette in preparation for the heat and the many salads I have planned to make.  My kids always gobble up their greens with this sweet and tangy dressing.  Also a great drizzle for roasted potatoes, veggies, chicken, etc.  I think we all need a good go-to balsamic vinaigrette recipe.  I hope this one makes it into your kitchen soon.  
Summer Salad with Homemade Honey Balsamic Vinaigrette 

Salad Ingredients:
-9 ounces fresh greens (I used 3 ounces each of: dinosaur kale, arugula, and baby spinach)

-1 1/2 cups peeled and chopped apple
-1 cup chopped cucumber
-2/3 cup diced red onion
-2/3 cup chopped sweet orange pepper (I like the gypsy variety)
-1/4 cup raw pumpkin seeds 
-Fresh herbs for garnish (I used parsley and tarragon) 

Vinaigrette Ingredients:
-1/2 cup balsamic vinegar 
-3 tablespoons local honey (vegans sub with 3 tablespoons coconut nectar and maybe a drop or two of stevia to your sweet preference, perhaps maple syrup would work as a sub too)
-3/4 cup extra virgin olive oil
-1/2 teaspoons salt
-1/2 teaspoon garlic granules 
-1/2 teaspoon onion granules
-1 teaspoon dijon mustard

How To:
1.  To a blender, add in the vinegar, honey, salt, garlic grans, and onion grans.  Blend on low for 10 seconds.  
2.  Keep the blender running on low and drizzle in the oil very slowly.  
3.  Then add in the mustard.  Blend on medium-high for 10 seconds.
4.  Adjust salt and other flavors to taste.

Notes:
*I’ve included two links above to the products I use.  I buy them in town, but I wanted to give you an example of what I am using. 

Shared on: Raw Foods Thursday, Wellness Weekend  Fat Tuesday
Posted by Amber at

Labels: Paleo, raw, salads, SCD, sides, summer cuisine, vegetarian.

4 Comments

Leave a Reply

Your email address will not be published. Required fields are marked *

* Copy This Password *

* Type Or Paste Password Here *

You may use these HTML tags and attributes: <a href="" title=""> <abbr title=""> <acronym title=""> <b> <blockquote cite=""> <cite> <code> <del datetime=""> <em> <i> <q cite=""> <strike> <strong>

Monday, June 24, 2013

Raw Nutrient Dense Key Lime Pie Creamsicles (also makes a tasty pudding) SCD/Paleo/GAPS

I’m always looking for new ways to serve not only sweet treats, but healthy sweet treats.  My freezer is usually full of popsicles at the ready.  It gets super hot here in the summer and so they are a necessity.  We usually go with juice based pops, but I love the use of coconut milk or other non-dairy milks for a fun, healthy twist.  I wasn’t sure how my kiddos would respond to theseand yeah, they LOVED them! And mommy loves how much nutrition they get in every cold, sweet and sour bite. 
This also makes a great pudding, you know, kind of like key lime pie without the crust.  Refrigerate at least 4 hours to thicken. 

Ingredients
-1 can (1 1/2 cups) coconut milk this or this 
-1 cup fresh spinach
-1 avocado 
-1/3 cup honey* (vegans use maple syrup or coconut nectar)
-1/2 cup fresh squeezed lime juice

How To:
1.  Add the above ingredients to a blender and blend until well incorporated.  Fill popsicle molds and freeze at least 4 hours.  
2.  I like these popsicle molds which are made with toxic free plastic. 

Notes:
*Please adjust the sweetness to your preference.  Taste test before and add more as needed.  
*You can also add in some protein powder of your liking for additional nutrition. 
*A banana with 1/4 cup water would add in another fun flavor combination to these pops. 

Shared on: Allergy-Free Wednesdays, Raw Foods Thursday, Wellness Weekend 

Posted by Amber at

Labels: allergy-friendly, dessert, GAPS, Paleo, SCD, snacks, summer treats.

20 Comments

Leave a Reply

Your email address will not be published. Required fields are marked *

* Copy This Password *

* Type Or Paste Password Here *

You may use these HTML tags and attributes: <a href="" title=""> <abbr title=""> <acronym title=""> <b> <blockquote cite=""> <cite> <code> <del datetime=""> <em> <i> <q cite=""> <strike> <strong>

Thursday, June 13, 2013

Raw Lemon Pie Macaroons: Coco-Roon Knock Offs (dairy free, grain free, Paleo, SCD, GAPS)

A few months ago some new raw food items made an appearance at my local Natural Foods Coop.  Ever hear of Coco-Roons? They are a tasty take on macaroons, incorporating almond flour with the shredded coconut.  They come in a variety of flavors and are super healthy, but the price tagouch!  So I decided to make these bad-boys at home.  The turn out was amazing. I hope you enjoy making these too.  
See HERE and HERE for my other raw homemade (store-brand knock-offs).  
Raw Lemon Pie Macaroons 
(Coco-Roon Knock-Offs)
SCD, Paleo, GAPS, dairy free, grain free, cane-sugar free

Ingredients:

-2 cups shredded coconut (any brand will do, I purchase mine in the bulk section)
-1 cup almond flour (I used Bob’s)
-2 teaspoons lemon zest
-2 tablespoons honey (vegans, use maple syrup or coconut nectar)
-2 tablespoons melted coconut oil
-2 tablespoons fresh squeezed lemon juice
-1/2 teaspoon vanilla extract 
-1/4 teaspoon lemon oil (optional, or use an extra tablespoon of lemon juice)
-1/2 teaspoon salt

How To:
1.  In a food processor add the 2 cups of shredded coconut.  Blend for 30 seconds.  Then add in the almond flour.  Blend together for 10 seconds.
2.  With the food processor running, add in the lemon zest, honey, coconut oil, lemon juice, salt and lemon oil (optional). Blend together for 15 seconds.
3. The mixture will feel wet and oily.  That’s okay.
4. Scoop out the mixture with a 1-ounce ice cream scoop and place directly on the dehydrator tray (no screens).  This is the dehydrator I use.   
5.  Dehydrate for at least 6 hours on 110 degrees.  These dry nicely on the outside (leaving no oily residue) and stay moist on the inside.  Makes about 12 macaroons.

Shared on: Raw Food Thursday, Wellness Weekend, Allergy-Friendly Lunchbox Love, Whole Food Fridays, Healthy Vegan Fridays, 
Posted by Amber at

Labels: cane sugar free, dessert, GAPS, grain free, Paleo, raw, SCD.

27 Comments

Leave a Reply

Your email address will not be published. Required fields are marked *

* Copy This Password *

* Type Or Paste Password Here *

You may use these HTML tags and attributes: <a href="" title=""> <abbr title=""> <acronym title=""> <b> <blockquote cite=""> <cite> <code> <del datetime=""> <em> <i> <q cite=""> <strike> <strong>

Saturday, June 8, 2013

Homemade Coconut-Cashew SCD Yogurt (dairy free, paleo, cane-sugar free, gum free w/ vegan option)

I have had a long somewhat frustrating run at homemade yogurt. The last batch I attempted was a runny mess and grew red mold inside (somehow) and I threw my hands up.  Last month I was really craving some yogurt, and felt motivated to try it again.  This time I turned to Kelly’s blog, The Spunky Coconut, for assistance.  She uses gelatin to thicken her yogurt and I was like, YES! This is it!  I took some time to experiment with the gelatin.  I was looking for a creamy texture, one much like store bought.  The two teaspoons of gelatin is PERFECT!  The texture is spot on!  I know you will love this recipe.  I am pleased with the outcome and happy to say I have been enjoying creamy, tangy (dairy-free) yogurt and loving it!  I also experimented with a vegan version for my vegan peeps out there.
Homemade Coconut-Cashew SCD Yogurt 
Recipe Modified and Inspired by Kelly @ The Spunky Coconut 
paleo, dairy free, gum free, cane-sugar free  

Ingredients:
-2 cups cashew milk
-2 cups coconut milk this or this
-2 tablespoons honey
-1 tablespoon vanilla extract
-2 teaspoons pure gelatin (plus 1/4 cup room temp water)
-5 capsules of probiotics

How to Make Cashew Milk:
-Soak 1 cup of raw cashews over night (8 hours is great).  Strain and rinse.  Blend with 4 cups of filtered water for 45 seconds. Let sit for 15 minutes.  Scoop off any excess foam.  Stir and use 2 cups for the yogurt.  Save the other 2 cups for a thousand different uses.  Cashew milk/cream rocks!

Directions:

1.  Add the milks, honey, and vanilla to a large, heavy pot and heat until 185 degrees.  Stirring often, taking care that the milk does NOT burn on the bottom.  A very gentle, slight simmer is fine.  I like to use (and thus recommend) a dutch oven to heat the milk.

2. In another large pot, add your jars and lids, water to cover, and bring to a boil.  Simmer jars and lids for 10 – 15 minutes.  Set a clean towel on the counter somewhere and carefully remove the jars to cool when they have been properly sterilized.

3.  After the milk comes up to 185 degrees, remove from the heat and allow to cool.  To speed up the process, I pour the milk into a 4-cup glass Pyrex and line my crock pot with ice packs and put the Pyrex with the ice.

4.  In a small bowl, add 1/4 cup ROOM TEMP water and mix in the 2 teaspoons of gelatin.  Then add it to your milk, use immersion blender to incorporate the gelatin.  I usually add the gelatin between 110 – 120 degrees.

5.  When the temp drops to 100 degrees, give the milk another good spin with the immersion blender.  Break open the 5 probiotics and add them to the milk.  Use the immersion blender again to fully incorporate the probiotics.

6.  Transfer the milk into a sterilized 4-cup glass container (or 2 smaller containers), or bunch of little yogurt containers. Place in your yogurt maker for at least 12 hours.  Do not shake, move, or disturb in any way while the milk cultures.  Please see below for how I use my yogurt maker for this process.

7.  After culturing for 12 hours, remove the jars from yogurt maker and give the jars a good shake.  My jars always have a liquid in the bottom, so give it a good shake. Let them cool for about an hour before you place in the fridge.  Refrigerate at least 8 – 10 hours to allow the gelatin to set up and thicken the yogurt.

Notes:

*Gelatin contains many health benefits.  See HERE

*I cannot offer any milk subs here.  Cashews are great in that they thicken naturally, so I’m not sure how this would work with, say, just almond milk.  You would need to increase the gelatin, but not sure by how much.

*Vegans use maple syrup instead of honey and 1/2 teaspoon agar agar.  After the milk hits 185 degrees, remove a 1/4 cup of the milk and stir in the 1/2 teaspoon agar agar.  Then add it back in the milk and whisk until well incorporated.  When the temp drops to 100 degrees, add in the 5 capsules of probiotics.  Proceed as suggested above.  The agar agar yogurt will be thick after culturing. Place in fridge until cool.  Vegans might also want to experiment with pectin or sunflower lecithin as thickeners.  I personally stay away from seaweed based thickeners (such as agar agar), as it can exacerbate IBD symptoms and cause inflammation in the intestines.  I stopped ingesting carageenan long ago for this reason (it’s actually why I started making homemade nut milk 5 years ago).

*
It’s extremely important to sterilize your jars.  I also sterilize anything that will touch the milk.  I even clean out my blender with a little hydrogen peroxide before I make the cashew milk.
Here is the milk coming to temperature (185 degrees) in my dutch oven.
After it reaches 185 degrees, I transfer into a sterilized 4-cup Pyrex.
Okay, the most annoying thing about making yogurt is waiting for it to reach temp, then waiting for it to cool down.  So I make yogurt in the evening after the kids are in bed, and I watch reruns of How I Met Your Mother or Arrested Development on Netlifx to pass the time.  Win-win!
Here is the gelatin mixed with water
I like to use these large 4-cup glass jars
To culture the yogurt I use an ice chest.
I simply put the bottom part of my yogurt maker in there, fill with jars, put a makeshift lid on it, and close the large lid.
(I use the bottom part of my salad spinner as a lid).
The ice chest heats up inside just fine and keeps temp.
Here it is before I close it up
*
Here is the yogurt.  So creamy and perfect.  Not ONE gelatin lump found in this recipe!
Shared on: Allergy-Free WednesdaysWhole Food Fridays,
Posted by Amber at

Labels: breakfast, dairy free, Paleo, SCD.

13 Comments

Leave a Reply

Your email address will not be published. Required fields are marked *

* Copy This Password *

* Type Or Paste Password Here *

You may use these HTML tags and attributes: <a href="" title=""> <abbr title=""> <acronym title=""> <b> <blockquote cite=""> <cite> <code> <del datetime=""> <em> <i> <q cite=""> <strike> <strong>

Monday, June 3, 2013

Cherry Amaretto Coconut Ice Cream (SCD, Paleo, dairy free, cane-sugar free)

Ever had that So Delicious Cherry Amaretto Coconut Ice Cream or Coconut Bliss Cherry Amaretto Ice Cream? I have, and they are pretty darn tasty.  But I don’t like all the other added ingredients (or the agave used to sweeten).  And speaking of ingredients, I was thinking about amaretto today.  What is it?  Oh okay, thanks again Wikipedia, it’s a liqueur.  No wonder I didn’t know this.  I am (err, was) a beer drinker.  Don’t know too much about those fancy liqueurs.  I looked at three popular ice cream brands that were “cherry amaretto” and you know what?  I did not see amaretto in any of the ingredients.  Hmmm.  I am not going to go through the trouble of buying a bottle of liqueur for an ice cream recipe if Haagen Dazs won’t.  I’m not a Mad Men character, what am I going to do with a bottle of amaretto liqueur anyway?  Okay, so almond flavoring will have to do.  And it did.  And it’s delicious.  And by golly, it tastes like this and this.  And can’t say for sure, but maybe even this.  So there you go with the amaretto info.  
And oh yes, yeah for cherry season!! 
Cherry Amaretto Coconut Ice Cream
dairy free, cane-sugar free 

Ingredients:
-2 cans full fat coconut milk this or this   
-2 1/2 cups fresh pitted sweet cherries (comes out to 13 ounces)
-1/3 cup honey (vegans use maple syrup, NOT SCD or Paleo)  
-1/2 teaspoon vanilla extract 
-1 teaspoon pure almond extract  

How To:
1.  Blend the above ingredients until smooth.
2.  Add the mixture into an ice cream maker and churn until thick.
3.  Transfer ice cream into a glass container and freeze for 4 to 6 hours.
4. Remove 5 to 10 minutes before serving to allow ice cream to soften a bit.

Notes:
*I have made this ice cream two ways.  The first is the method in this post.  The second way is to leave 1 cup of the fresh cherries out of the blended mixture.  Finely chop the 1 cup of cherries and then add them into the ice cream maker in the last few minutes of churning.  At this time you can also add in 1 cup of cacao nibs, chocolate chunks, or finely chopped almonds.  
 Cherry Nutrition 
Other ways to enjoy the beloved cherry

In a smoothie
In a pie
In my belly!
_________________________________
Shared on: Allergy-Free WednesdaysHealthy Vegan Fridays
Posted by Amber at

Labels: cane sugar free, dessert, ice cream, Paleo, raw, SCD, summer cuisine.

15 Comments

Leave a Reply

Your email address will not be published. Required fields are marked *

* Copy This Password *

* Type Or Paste Password Here *

You may use these HTML tags and attributes: <a href="" title=""> <abbr title=""> <acronym title=""> <b> <blockquote cite=""> <cite> <code> <del datetime=""> <em> <i> <q cite=""> <strike> <strong>