Category Archives: spreads

Sunday, November 4, 2012

Super Easy Homemade Cranberry Apple Jelly/Sauce (cane-sugar free) with Vegan and SCD Options

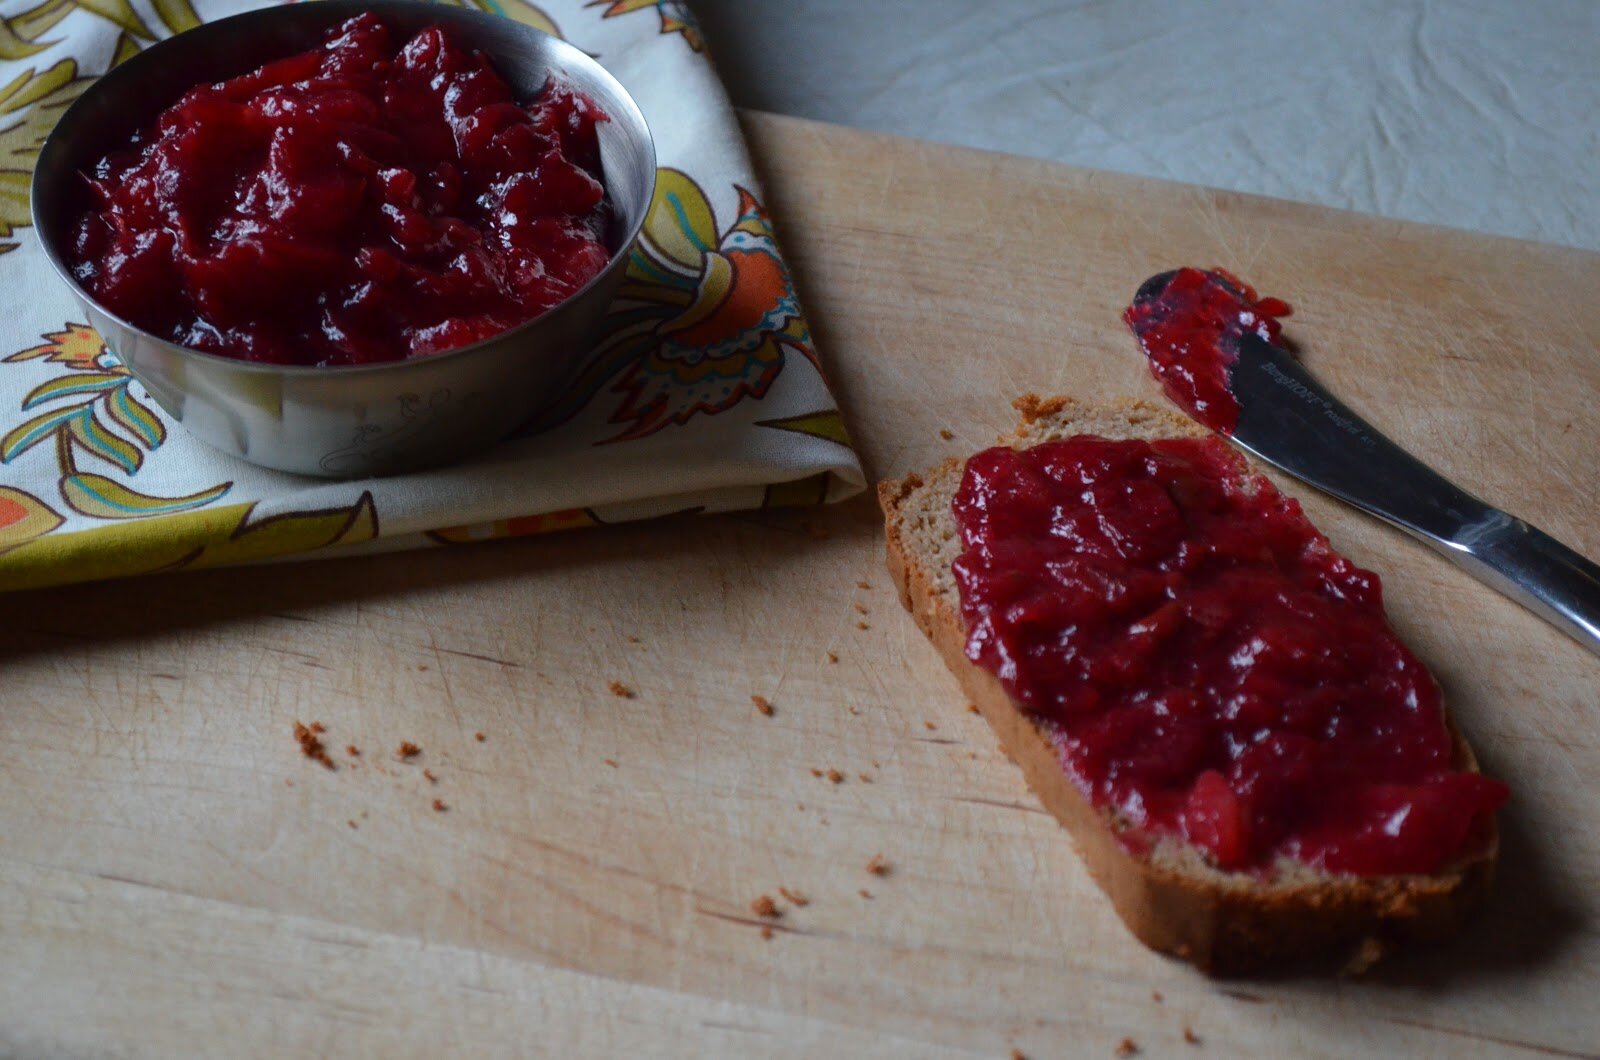
Hello friends.  As soon as cranberry season comes rolling around I like to make a batch of cranberry jelly (sauce) each week.  If you follow my blog, then you know I am NOT a big sweet tooth.  Jelly always seems a bit too sweet for me.  Even the cane-sugar free jelly I buy, yes, often too sweet.  So you can imagine how much I love the tartness of cranberries.  This jelly comes together super quick.  You can sweeten it with anything you like and to your sweetness preference.  This also makes a fabulous Thanksgiving cranberry sauce.  See here for my other cane-sugar free cranberry sauce recipe.  Also seen in the above picture is my all-time favorite bread from Danielle at Against All Grain.  I make it nearly every week!  I like to add 2 1/2 tablespoons of honey.  This gives the bread a gentle sweetness and incredibly soft texture.  Together, this bread and jelly makes a lovely breakfast or anytime snack.  
Ingredients:
-16 ounces fresh cranberries (about 5 cups) 
-1 1/2 cups filtered water 
-1/2 cup (3 ounces) Medjool dates, seeded and diced
-3/4 cup sweet red apple, peeled and very small chop 
-1/4 cup honey (vegans use maple syrup, coconut nectar or coconut sugar and adjust to your sweet preference)
-1/4 teaspoon liquid stevia (SCDers use additional 3 tablespoons honey)

How To:
1.  In a medium sauce pan add the fresh cranberries and water and bring to a boil.  After the mixture comes to a boil, give it a stir and turn it down to a rapid simmer.  Add in the dates and apples.  Rapid simmer for about 10 minutes stirring frequently.  
2.  After 10 minutes it should look fairly thick and the cranberries should all be cooked down.  At this point add in the honey (or sweetener of choice), turn down heat to a soft simmer for about 5 minutes, stirring frequently.
3.  Turn off heat and add in the stevia.  Stir.  Allow mixture to cool before serving.  Total cook time is around 20 – 25 minutes.  
Serves 6 to 8 (depending on serving size). 
  Shared on: Melt in your Mouth MondaysMotivate Me MondaysMonday Mania, Mealtime Monday My Meatless Monday, Just Another Meatless Monday, On The Menu Monday, Mix It Up Monday, Meatless Monday, Gluten Free Monday, Slightly Indulgent Tuesdays, Fat Tuesday, Allergy-Free Wednesdays, Keep It Real Thursdays, Wellness Weekend Whole Foods Friday,Whole Foods Friday,  
Posted by Amber at

Labels: cane sugar free, fall cuisine, sides, spreads, thanksgiving side dishes.

15 Comments

Leave a Reply

Your email address will not be published. Required fields are marked *

* Copy This Password *

* Type Or Paste Password Here *

You may use these HTML tags and attributes: <a href="" title=""> <abbr title=""> <acronym title=""> <b> <blockquote cite=""> <cite> <code> <del datetime=""> <em> <i> <q cite=""> <strike> <strong>

Wednesday, August 1, 2012

Homemade Pizza Sauce (SCD Friendly)

I make pizza every week for my family.  My kids love it – especially my son who’s never had “real” pizza, so it’s such a treat for him.  I make an allergy friendly crust (that I will be sharing with you on Friday) which he loves.  For a long time I purchased a popular canned organic pizza sauce, but then one day it dawned on me that I could make the sauce, and another added bonus, I can have an SCD pizza sauce on hand.  It’s so easy to double this batch and freeze for the following week.  Many store bought brands add sugars or thickeners (boo).  You can control every ingreidnet in homemade (yay).  And making your own pizza sauce is yet another way to decrease waste in your kitchen, thus one more step toward a greener kitchen (double yay).  There are only a few ingredients (and summer garden ingredients too).  So give it a try and have fun adding your own twist and flavors.    

Ingredients 
-1 pound of small slicer tomatoes, chopped 
-1 medium yellow onion, chopped 
-1 ounce fresh basil (about 1 1/2 cups)
-1/2 teaspoon of salt (or to taste)
-1 1/2 teaspoons garlic granules
-1/2 teaspoon dried Italian Seasoning
-1/4 teaspoon dried oregano 
-1 tablespoon oil
-1/4 to 1/2 teaspoon honey (optional) 

How To:
Preheat oven to 400 degrees
1.  In a large roasting dish, combine above ingredients (except honey) and toss to incorporate.
2.  Roast veggies for 25 minutes. 
3.  Remove from oven and cool.
4.  Blend in food processor or blender of choice, add in honey at this time if desired.  I add in about 1/4 teaspoon, just to offset the acidic tomatoes – add more if using very acidic tomatoes. 

Notes:
*Using the right tomatoes is important, as some tomatoes have much more juice.  The key to a successful pizza sauce is minimal liquid.  So, I add just a bit of oil for roasting, use meaty tomatoes, and squeeze out any juice (I like smaller slicers or big meaty heirlooms).  Romas are very watery, but if this is all you have, try and squeeze out all the liquid before roasting.  
(free of: gluten, dairy, eggs, soy, yeast, nuts, and sugar) 

Shared on:  Melt in your Mouth Mondays, Keep It Simple Mondays, Monday Mania, Mealtime Monday My Meatless Monday, Just Another Meatless Monday, Made from Scratch Monday, Fat Tuesday, Slightly Indulgent Tuesdays, Recipe Box Tuesday,  

Posted by Amber at

Labels: sauces, SCD, spreads.

8 Comments

Leave a Reply

Your email address will not be published. Required fields are marked *

* Copy This Password *

* Type Or Paste Password Here *

You may use these HTML tags and attributes: <a href="" title=""> <abbr title=""> <acronym title=""> <b> <blockquote cite=""> <cite> <code> <del datetime=""> <em> <i> <q cite=""> <strike> <strong>

Saturday, July 28, 2012

Homemade Cashew Butter + Cashew Honey Spread (SCD Friendly)

I’ve been straight obsessed with cashews lately.  I can’t get enough. I’ve been using them in everything.  What a fabulous little nut, wouldn’t you agree (ahem, unless you’re allergic that is).  What prompted me to make my own cashew butter is the pricey jarred cashew butter I use to make Danielle’s awesome bread (as seen in the pictures).  I can get it pretty darn close, but I think you need a magic machine to yield the creaminess you’ll find with Artisana.  But it does the job and I love it.  I wanted to share with you how easy it is to make it yourself.  I make this in a high speed blender (Vitamix).  I know for sure it will not become creamy in a food processor (trust me, I’ve tried).  Cashew butter is delightfully creamy and mixed with honey it’s quite divine.  I hope you’ll give it a try.
Ingredients:
-2 cups room temperature raw organic cashews *
-1/2 teaspoon oil (or as needed) 

How To:
1.  Add the cashews to blender and start on low, allowing the cashews to turn into flour.  Then turn it up a notch and use the tamper to keep things moving.  
2.  You will feel like the motor is going to burn out, but you’re okay (and it’s loud).  Keep it moving.  
3.  I don’t turn the blender on high during this process (you know, that left switch) – I just keep it turned up to about 10.  
4.  After it looks really well incorporated and starts getting creamy, add in the little bit of oil and continue blending.  The oil just helps move things along in the final process.  Add more as needed.   
5.  The cashew butter will be very warm the longer you blend.  YOu might want to take a break if things are getting too hot.  Use a silicone spatchula to scoop everything out.  Don’t worry about the little bit remaining between the blades, just make a smoothie and it will clean it right out.  
6.  You can store the cashew butter in an air tight container in the cupboard.  

Cashew Honey Spread:
-1 tablespoon honey
-2 tablespoons cashew butter
-Mix until incorporated

Notes:
*If you’re not comfortable with 2 cups of cashews, start with 1, and after some practice, you can move up to 2 cups. 
*The cashews must be room temperature!   
*Add oil as needed.  Don’t burn out your motor…and PLEASE don’t blame me if you do.  :-)

Shared on: Melt in your Mouth Mondays, Keep It Simple Mondays, Monday Mania, Mealtime Monday My Meatless Monday, Just Another Meatless Monday, Fat Tuesday, Slightly Indulgent Tuesdays, Allergy-Free Wednesdays, Gluten Free Wednesdays, Real Food Wednesdays, Whole Foods Wednesdays, Raw Foods Thursdays, 

Posted by Amber at

Labels: SCD, spreads.

37 Comments

Leave a Reply

Your email address will not be published. Required fields are marked *

* Copy This Password *

* Type Or Paste Password Here *

You may use these HTML tags and attributes: <a href="" title=""> <abbr title=""> <acronym title=""> <b> <blockquote cite=""> <cite> <code> <del datetime=""> <em> <i> <q cite=""> <strike> <strong>

Tuesday, May 15, 2012

Three Vegan, Soy Free White Bean Dip Recipes: Plain, Kalamata Olive, and Spinach (with SCD option)

Last month I made Maggie’s omega 3 white bean dip and loved it (I ate the entire batch actually).  So I decided to make a few of my own white bean recipes.  These dips are full of flavor and super creamy – my favorite combo.  If you’re a dip lover like me, then please give these recipes a try.  For SCD, omit coconut aminos.  See notes.  

*
Dip #1 
Classic Style 
Ingredients:
-1 1/2 cups prepared white beans*
-1/4 cup fresh squeezed lemon juice
-3 tablespoons oil (I use grapeseed) 
-2 tablespoons tahini (optional, but worth it)
-1 teaspoon garlic granules (or 1/2 clove garlic)
-3 tablespoons coconut aminos 

How To:
1.  Add beans, lemon juice, tahini, garlic, and coconut aminos to food processor (or blender of choice). Salt is optional here. 
2.  Blend until incorporated.
3.  Drizzle in oil while blending 
4.  Store in glass container in fridge. 

Notes:
*I soak white beans for 48 hours, rinsing 2-3 times.  You certainly don’t need to soak this long, but I think it’s worth it.  After the beans are properly soaked, boil in filtered water until tender. 
*For SCD, omit coconut aminos and add 1/2 – 1 teaspoon salt.
Dip #2 
Karazy Kalamata 
Ingredients:
-1 1/2 cups prepared white beans*
-3 tablespoons fresh squeezed lemon juice
-3 or 4 tablespoons oil (I use grapeseed) 
-2 tablespoons tahini (optional, but worth it)
-1/2 teaspoon garlic granules (or 1/2 clove garlic)
-3 tablespoons coconut aminos 
-1/2 cup pitted kalamata olives 

How To:
1.  Add beans, lemon juice, tahini, garlic, aminos, and olives to food processor (or blender of choice).
2.  Blend until incorporated.
3.  Drizzle in oil while blending 
Notes:
*I soak white beans for 48 hours, rinsing 2-3 times.  You certainly don’t need to soak this long, but I think it’s worth it.  After the beans are properly soaked, boil in filtered water until tender. 
*For SCD, omit coconut aminos and add 1/2 – 1 teaspoon salt.

Dip #3 
Simple Spinach 

Ingredients:
-1 1/2 cups prepared white beans*
-1/4 cup fresh squeezed lemon juice
-3 or 4 tablespoons oil (I use grapeseed) 
-2 tablespoons tahini (optional, but worth it)
-1 teaspoon garlic granules (or 1/2 clove garlic)
-3 tablespoons coconut aminos 
-1/2 to 1 cup fresh spinach (I like one cup in there)

How To:
1.  Add beans, lemon juice, tahini, garlic, aminos, and spinach to food processor (or blender of choice).
2.  Blend until incorporated.
3.  Drizzle in oil while blending 

Notes:
*I soak white beans for 48 hours, rinsing 2-3 times.  You certainly don’t need to soak this long, but I think it’s worth it.  After the beans are properly soaked, boil in filtered water until tender. 
*For SCD, omit coconut aminos and add 1/2 – 1 teaspoon salt.


I made Danielle’s Savory and Sweet Crackers (SCD) with this dip and they were delicious!! Don’t mind if I do.

Looking for some additional homemade cracker recipes?  
Well look no further
THIS should get you started! 
__________________________________________________
Shared on:    Just Another Meatless Monday, Melt in your Mouth Mondays, Monday Mania  Ruth’s Real Food 101 (Mondays),  Traditional Tuesdays Fat Tuesdays,  Real Food Wednesdays, Gluten Free Wednesdays, Pennywise Platter, Simple Lives Thursday, Thriving on Thursday, Wellness Weekend, Fresh Bites Friday, Freaky Friday, Fight Back Friday, Friday Food, Lunchbox Love Friday, Feed Your Soul Friday, Allergy-Friendly Friday, Potluck Party Friday, Super Food Sundays, Slightly Indulgent Tuesdays, Allergy-Free Wednesdays, Whole Food Wednesdays 
Posted by Amber at

Labels: allergy-friendly, dairy free, gluten free, SCD, snacks, soy free, spreads, vegan, vegetarian.

13 Comments

Leave a Reply

Your email address will not be published. Required fields are marked *

* Copy This Password *

* Type Or Paste Password Here *

You may use these HTML tags and attributes: <a href="" title=""> <abbr title=""> <acronym title=""> <b> <blockquote cite=""> <cite> <code> <del datetime=""> <em> <i> <q cite=""> <strike> <strong>

Friday, December 9, 2011

How To Roast Garlic & Why This Delicious Allium is Nature’s #1 Immune Booster

Hello.
My name is Amber.
And I’m a garliholic.  
Okay, got that out there.  I’m a true garlic lover.  I love garlic like my sweet husband loves chocolate, and that’s saying something!  The words crave and satisfy come to mind.
 
Let me give you an example.   
If given the choice between a jar of chocolate covered nuts and a jar of marinated garlic clovesfuggedaboutit!  Pass me the stinking rose please. 
Think I’ve made my point here.  
 
What makes garlic so powerful anyway?  So health-fullso immune boosting?  Well, if you lu-uv garlic like me and eat it all the time, there are a few things you should know.  
 
#1
Garlic’s powerful anti-fungal, anti-viral and anti-biotic properties are found in the sulfur compound: Allicin.
Allicin is released from garlic when cut, chopped, crushed, etc. 
 
#2
Allicin immediately starts to break down after it’s produced.  Heat causes additional breakdown and microwaving garlic completely eliminates allicin.    
 
#3 
To receive the health-full benefits garlic has to offer, add raw chopped garlic to cooked food and mix well.  This method protects the fragile allicin by reducing contact with direct heat, and may even slightly decrease the spiciness.   
 
#4

Garlic also comes with precautions, and these should be considered in full if you’re a frequent garlic user.
Safety First(Ahembody odor and bad breath do not count as cautions in my opinion).

*Garlic may interact with some prescription medications.  For example, take great caution in consuming large amounts of garlic if taking prescription blood thinners. Please consult your doctor or holistic practitioner before taking garlic supplements or eating garlic on a daily basis. 

*Believe it or not, garlic allergies do exist (oh boy, I would take my peanut allergy over a garlic allergy any day).  

Symptoms may include: skin rashes, mild fever, nausea, vomiting and headaches.  Consult your doctor or holistic practitioner if you suspect a garlic allergy.

*Garlic can irritate your digestive tract and cause some disruption in digestive function.  One key symptom is nausea.  Other symptoms may include loose stools or diarrhea, even vomiting if you consume too much.

   
*
I eat raw garlic when I feel a cold coming on and consume in small amounts until I start to feel better.  However, I also eat roasted garlic quite regularly, so feeling sick or not, I usually have some on hand in the fridge.  I smear it on gluten free bread, add it to soup, hummus, eggs.  It’s such an easy way to get that delicious garlic flavor and without the very intense spiciness of garlic. 


How To Roast Garlic

1.  Preheat oven to 400 degrees 
2.  Cut head of garlic in half
3.  Add a bit of oil and salt to your preferred roasting pan and place garlic face down in pan
4.  Roast for 20-30 minutes; check at 20 and if garlic is tender and sizzling then remove.  
*Another popular method is to wrap a cut head of garlic (with salt and oil) with parchment paper.  Secure with oven-proof string or make a little parchment-pouch.  I prefer creating less waste and using a glass pan.  But do whatever works for you.  
This is what you will remove from the ovendeliciousness!  
Allow garlic to cool before handling
It’s pretty fun to pop out those little cloves  
Mash Mash  
Add some oil to support your mashing efforts  
Mash until your desired consistency 
I like mine just like this:
Salud.
Garlic breath and all!

Shared on:
Wellness Weekend over at Diet, Dessert & Dogs
Posted by Amber at

Labels: Holistic healing, how to, spreads.

4 Comments

Leave a Reply

Your email address will not be published. Required fields are marked *

* Copy This Password *

* Type Or Paste Password Here *

You may use these HTML tags and attributes: <a href="" title=""> <abbr title=""> <acronym title=""> <b> <blockquote cite=""> <cite> <code> <del datetime=""> <em> <i> <q cite=""> <strike> <strong>

Sunday, November 27, 2011

The Perfect Base Hummus

We are big fans of hummus in this family so I always have some on hand in the fridge.  Nothing beats homemade!  And it’s so easy.  Making the perfect base hummus allows you to add other ingredients to create a whole new flavor, for example using cilantro.  But you don’t have to rely on beans.  Adding carrots in place of beans, for example, yields a delicious raw hummus.  Pictured above is hummus topped cucumber (served for snack time) – just a little something extra like this can put a fun twist on the everyday dish.  

Ingredients
2 1/2 cups prepared garbanzo beans (soaked overnight or 24 hours and boiled in filtered water)
1/2 cup tahini 
Juice from 2 lemons 
1 1/2 teaspoons garlic granules (or 1/2 clove fresh garlic – fresh garlic will make your hummus very spicy, so take caution when making for children)
1/2 teaspoon salt 
1/2 cup oil of choice (I use grapeseed oil)
Filtered water as needed 

How To
*Add beans & tahini to food processor, pulse a few times
*Add lemon juice, salt, garlic and pulse
*Drizzle in oil while blending 
*At this point you will have a very thick hummus and it will need some water for a creamy consistency, so add in 1/4 cup of filtered water (at a time) until it’s creamy and smooth to your liking
Posted by Amber at

Labels: ACD, dairy free, dips, gluten free, grain free, snacks, spreads, vegan.

9 Comments

Leave a Reply

Your email address will not be published. Required fields are marked *

* Copy This Password *

* Type Or Paste Password Here *

You may use these HTML tags and attributes: <a href="" title=""> <abbr title=""> <acronym title=""> <b> <blockquote cite=""> <cite> <code> <del datetime=""> <em> <i> <q cite=""> <strike> <strong>