 We are big pancake lovers in this house. I mean, come on…pancakes! What’s not to love. For years we made pancakes with teff flour, then I found a few other pancake recipes that used white gluten free flours. Then over Thanksgiving break I found a gluten free mix at a Safeway up in Tahoe, this one. I liked it, but didn’t love the way the cornmeal tasted and the texture. I susepct it was added to give the pancakes some fluff or non-stick. I began to pay more attention to the ingredients in the many, many store bought gluten free pancake mixes (that you can find at just about any grocery store). I noticed they use virtually the same ingredients: a rice flour, one or two other gluten free flours, a starch, baking soda, corn meal or another mealy grain, salt, and a gum. One brand was nearly $8.00! I was like, oh no, I can make my own gluten free mix just fine thank you. So I did, and I loves it. This recipe works great on a regular pancake griddle or with oil in a skillet and they pop up nice and fluffy ya’ll (that’s what I’m talken’bout). Enjoy…and long live breakfast food! Continue reading
Category Archives: gluten free
Gluten Free Pancakes

Date Pecan Pie
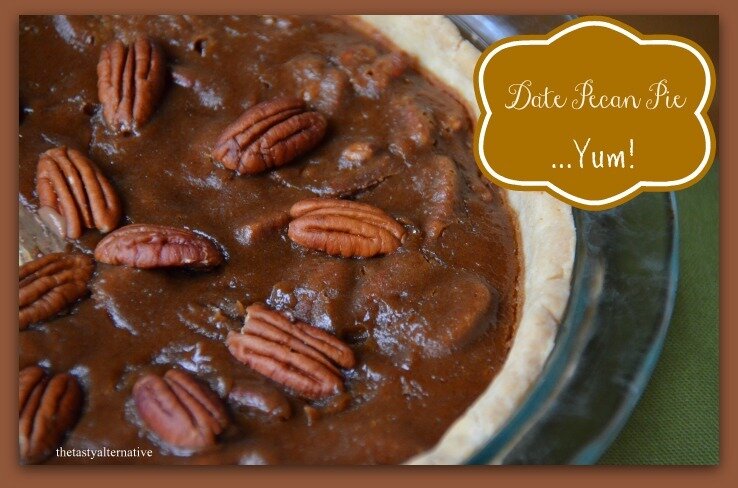 My husband Scott LOVES pecan pie! He loves all dessert really – he doesn’t discriminate when it comes to sweets, but there is something about pecan pie for him…ha ha, let’s be honest, it’s all the sugar…and that yummy pecan flavor of course. Traditional pecan pie is basically sugar, butter, pecans, and eggs. The two main sugars used are corn syrup and brown cane sugar. So it’s not a stretch to modify the recipe and swap out the sugars, for example, instead use honey, maple syrup, coconut sugar, coconut nectar, etc. I wanted to make a pecan pie recipe that was similar to an original recipe but with my own special twist and dates came to mind. I made this pie over the weekend for family visiting. Ah ha! The perfect opportunity to snag some recipe testers. And I’m so happy to report that everyone really liked it! I was afraid it would be too “datey” or too sweet or not “pecany” enough. But everyone genuinely liked it. And Scott LOVED it. He was very excited about it. Yay. I used this original recipe as an inspiration. Continue reading
Labels: dessert, fall treats, gluten free, holidays, thanksgiving desserts.
Leave a Reply
Easy Gluten Free Pumpkin Bread
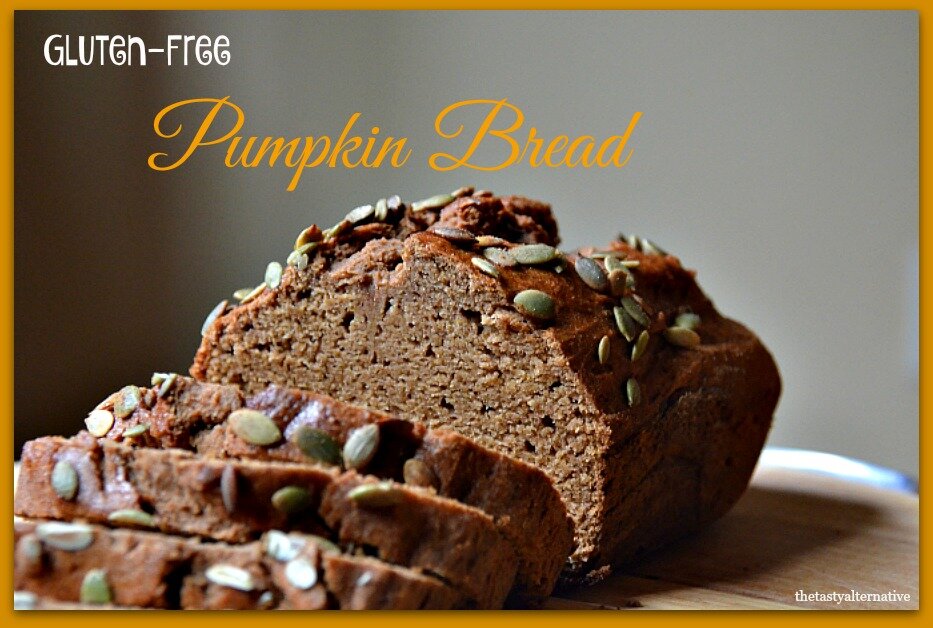
I was so excited to finally make some pumpkin bread last week! It’s been so darn hot here that baking felt quiet unappealing. This year I made my own gluten-free flour mix, and it worked great for this recipe – yay! If any of you fine folks out there have been following me since I started blogging four years ago, you will know that baking has been a journey for me. I have been experimenting for a couple of years now and I’m happy to say that baking no longer feels like a burden or chore, rather, it’s something I enjoy. It goes to show you that practice makes perfect, err, practice makes comfortably okay. Ha ha. Baking is never perfect, right. I hope you enjoy this recipe. I’ve made it several times with both my gluten-free mix and the suggested flours in the notes section of the recipe. It’s been well received by family and friends. So enjoy…and happy fall. Oh and it rained today! So cozy and wonderful. So happy. xo Continue reading
Labels: Breads, fall cuisine, fall treats, gluten free, holidays, Pumpkin, Thanksgiving.
Leave a Reply
All Purpose Gluten-Free Flour Mix

I’m super excited to share The Tasty Alternative’s very first gluten-free flour mix! After 12 years gluten-free, I’m finally making my own mix. This comes primarily due to soooo many mixes out there in the stores nowadays. Some recipes call for using these mixes in their recipes, and some have dairy (like this one). So I have studied many all-purpose mixes and found my own ratios that work great! I understand mixes aren’t for everyone, but it’s fun to put one together and have on hand. You might be wondering why I am using white rice flour. Allow me to explain. We eat a lot of brown rice products flour (crackers, pasta, cookies, bread, etc). Just about everything we have that is gluten-free is made with brown rice flour. I’ve read that arsenic is more concentrated in brown rice and thus even more so in the flour. So given the choice, and in an effort to balance out the rice flours, I use white rice flour when I can. Anyway, I am excited to share some new recipes with you using this mix! Continue reading
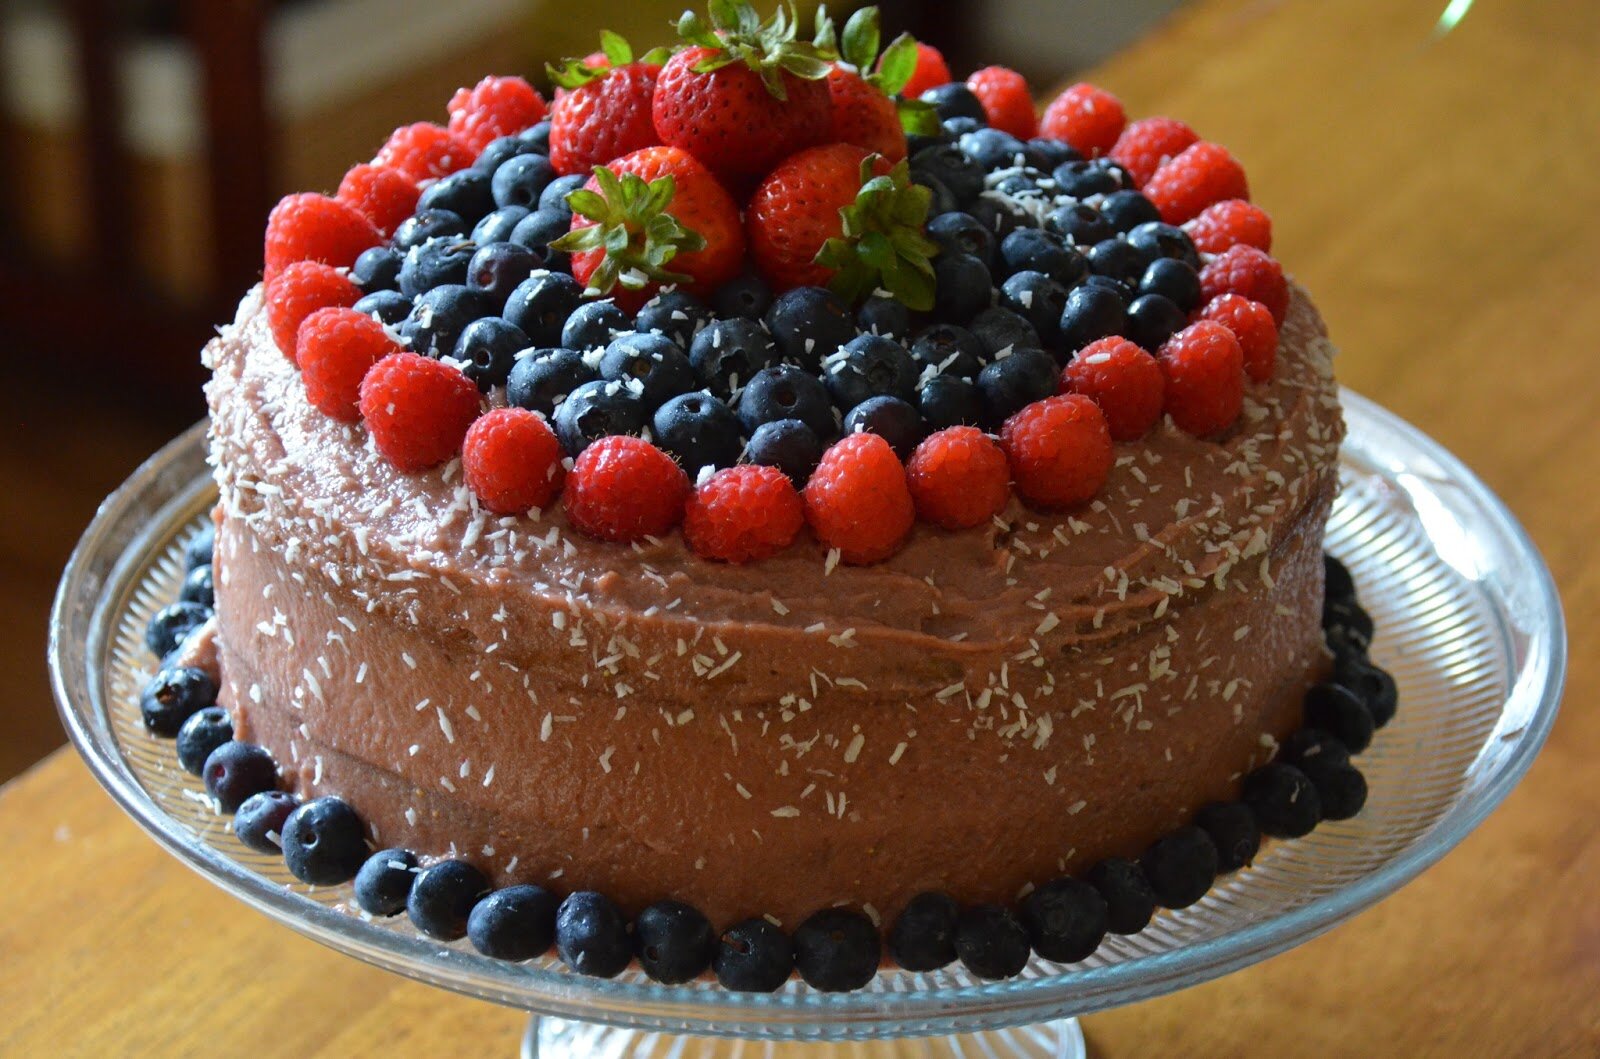
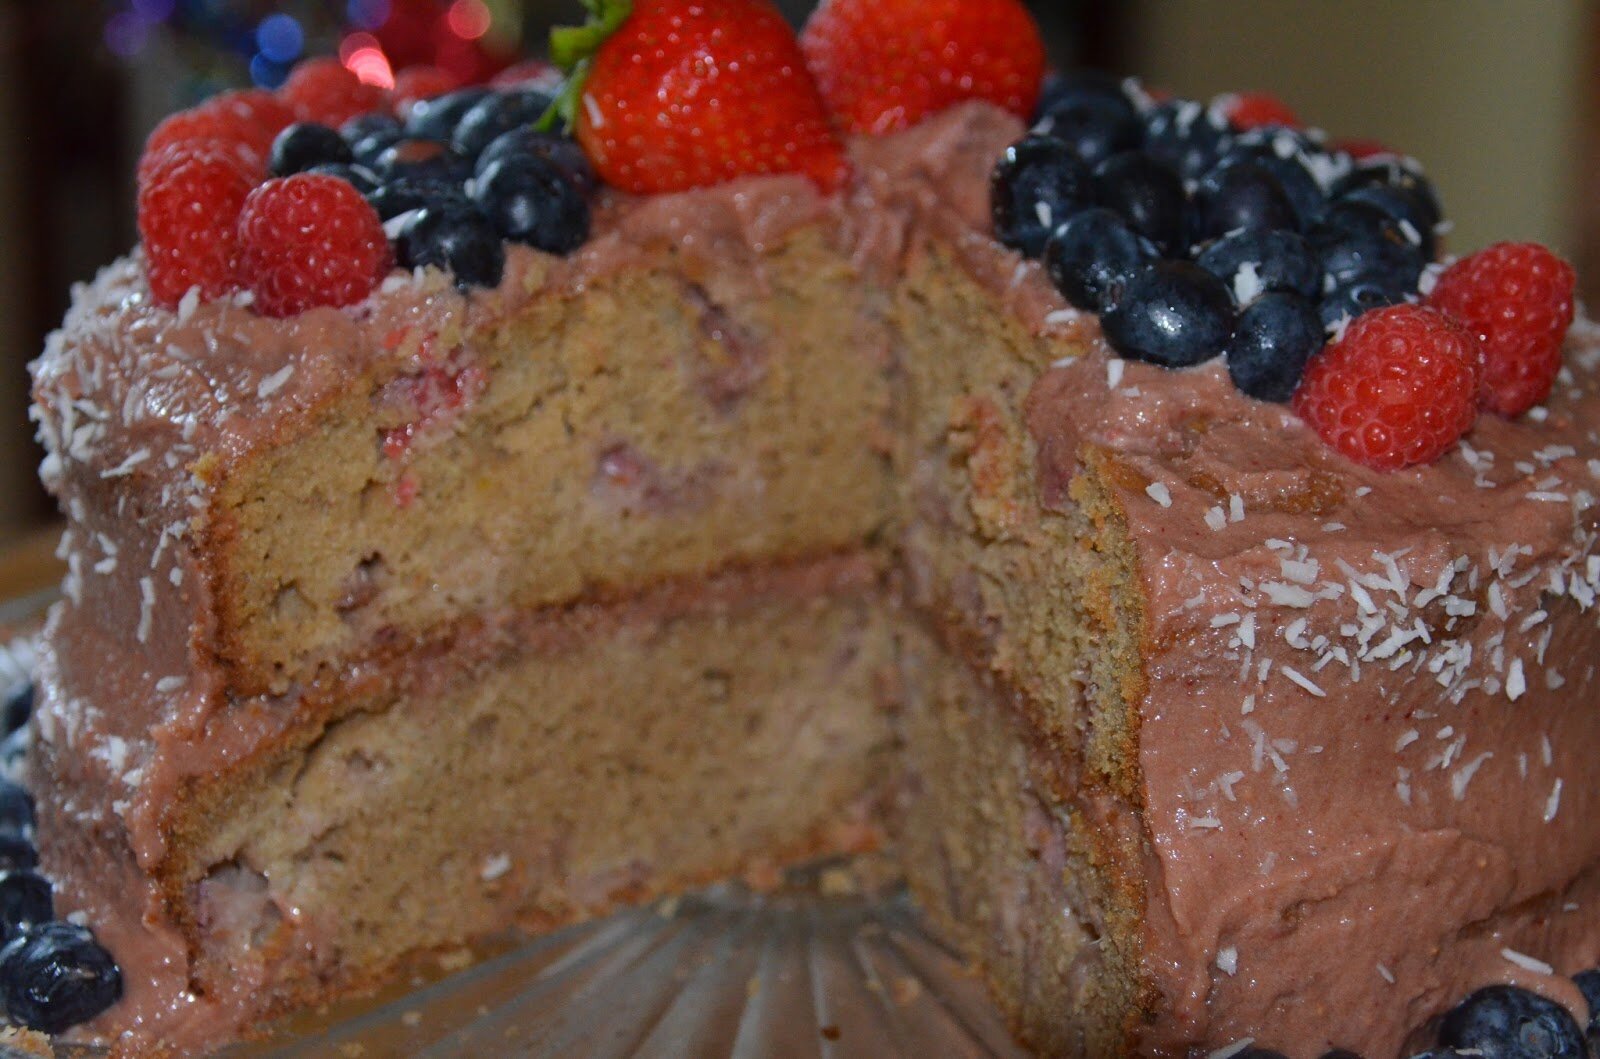
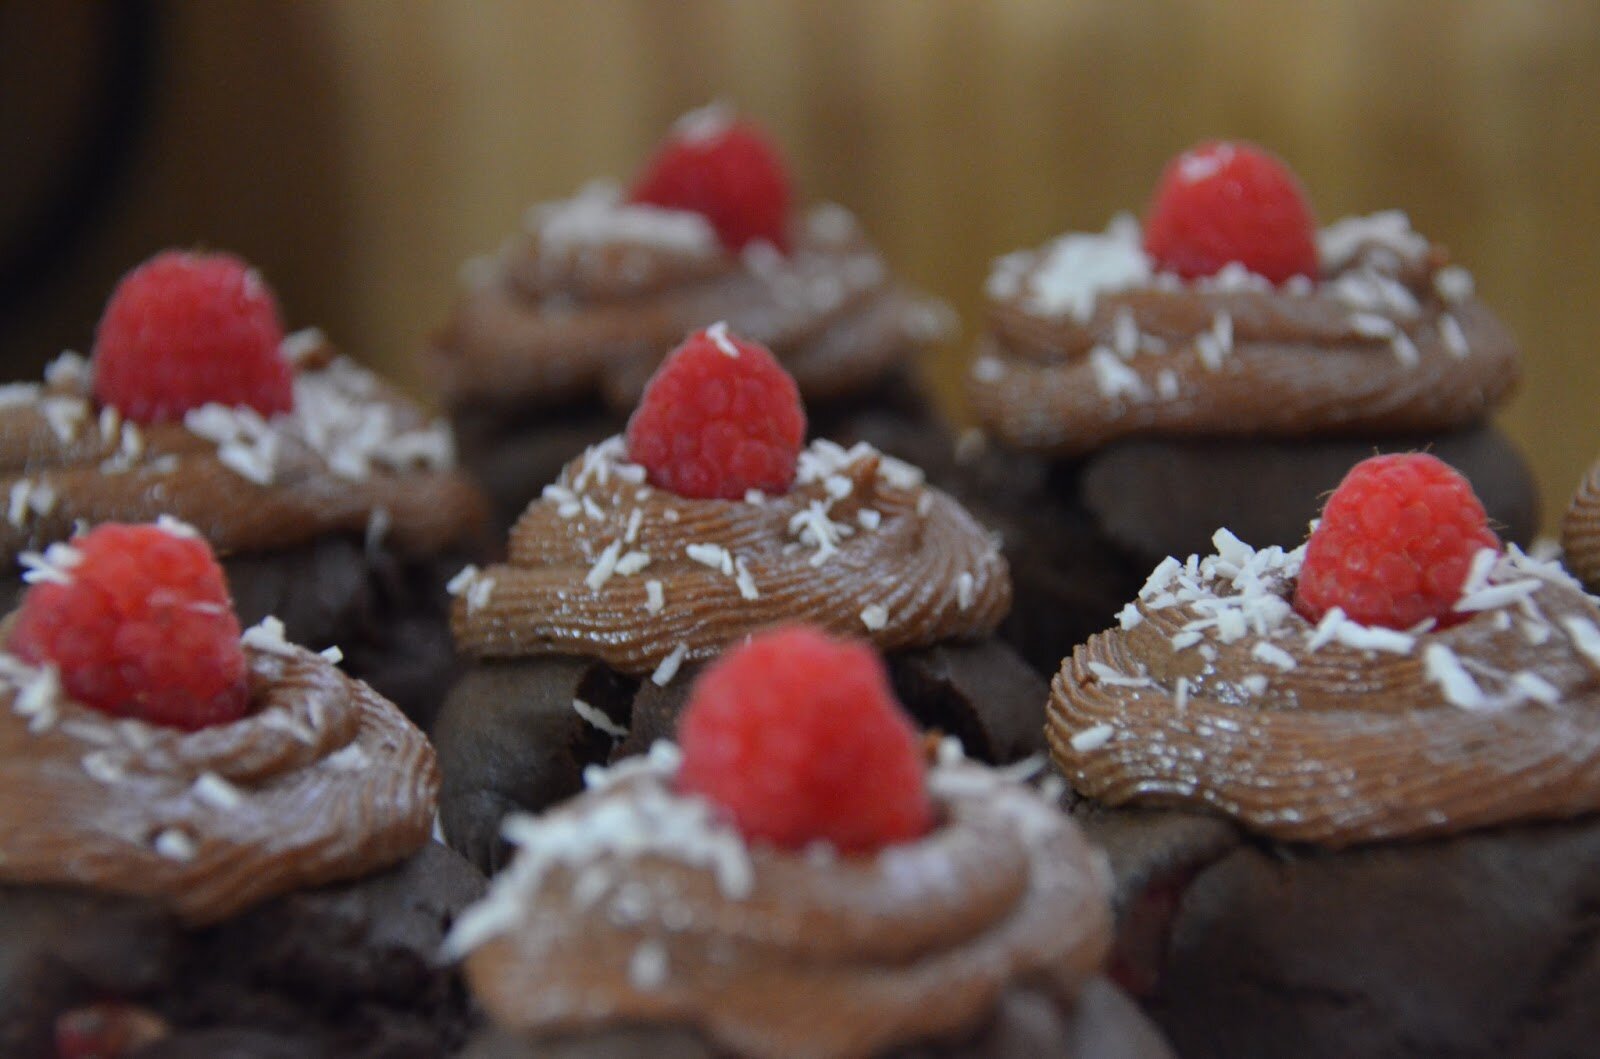
Strawberry Coconut Cake w/ Strawberry Frosting (dairy free, gluten free, cane-sugar free)


My Favorite Chicken Salad ~ With Apples and Fresh Tarragon

Ingredients:
-2 cups shredded chicken*
-1/2 cup dill pickle, small chop
-1/2 cup celery, chopped
-1/2 cup peeled apple, small chop
-1/3 cup diced red onion
-1/3 cup mayo ~ here or here , vegan or homemade vegan
-1 teaspoon Dijon or stone ground mustard (optional)
-1/2 teaspoon garlic granules
-1/4 teaspoon salt (or to taste)
-1 teaspoon fresh chopped tarragon or 1/2 teaspoon dried
How To:
1. To a bowl add in the above ingredients and mix.
2. Best if made 4 – 6 hours before serving.
Notes:
*The best way to “shred” chicken is in a food processor. Simply add in the two cups of chicken and give it a whirl. Personally, I like to cook chicken in the crock-pot, this makes it shred naturally. So I use leftover crock-pot chicken for my chicken salad. You could also used cubed chicken, it’s really up to you.
*There are endless possibilities with chicken salad. Here are some of my other favorite add-ins: sliced grapes, sweet yellow or red peppers, cucumber, hard boiled egg, radish, green onions, fresh dill, cashews, mango, slivered almonds, walnuts, kalamata olives, bacon, curry spice, or dried cranberries. Go crazy folks.

Labels: allergy-friendly, dairy free, gluten free, lunch, snacks, summer cuisine.
Leave a Reply
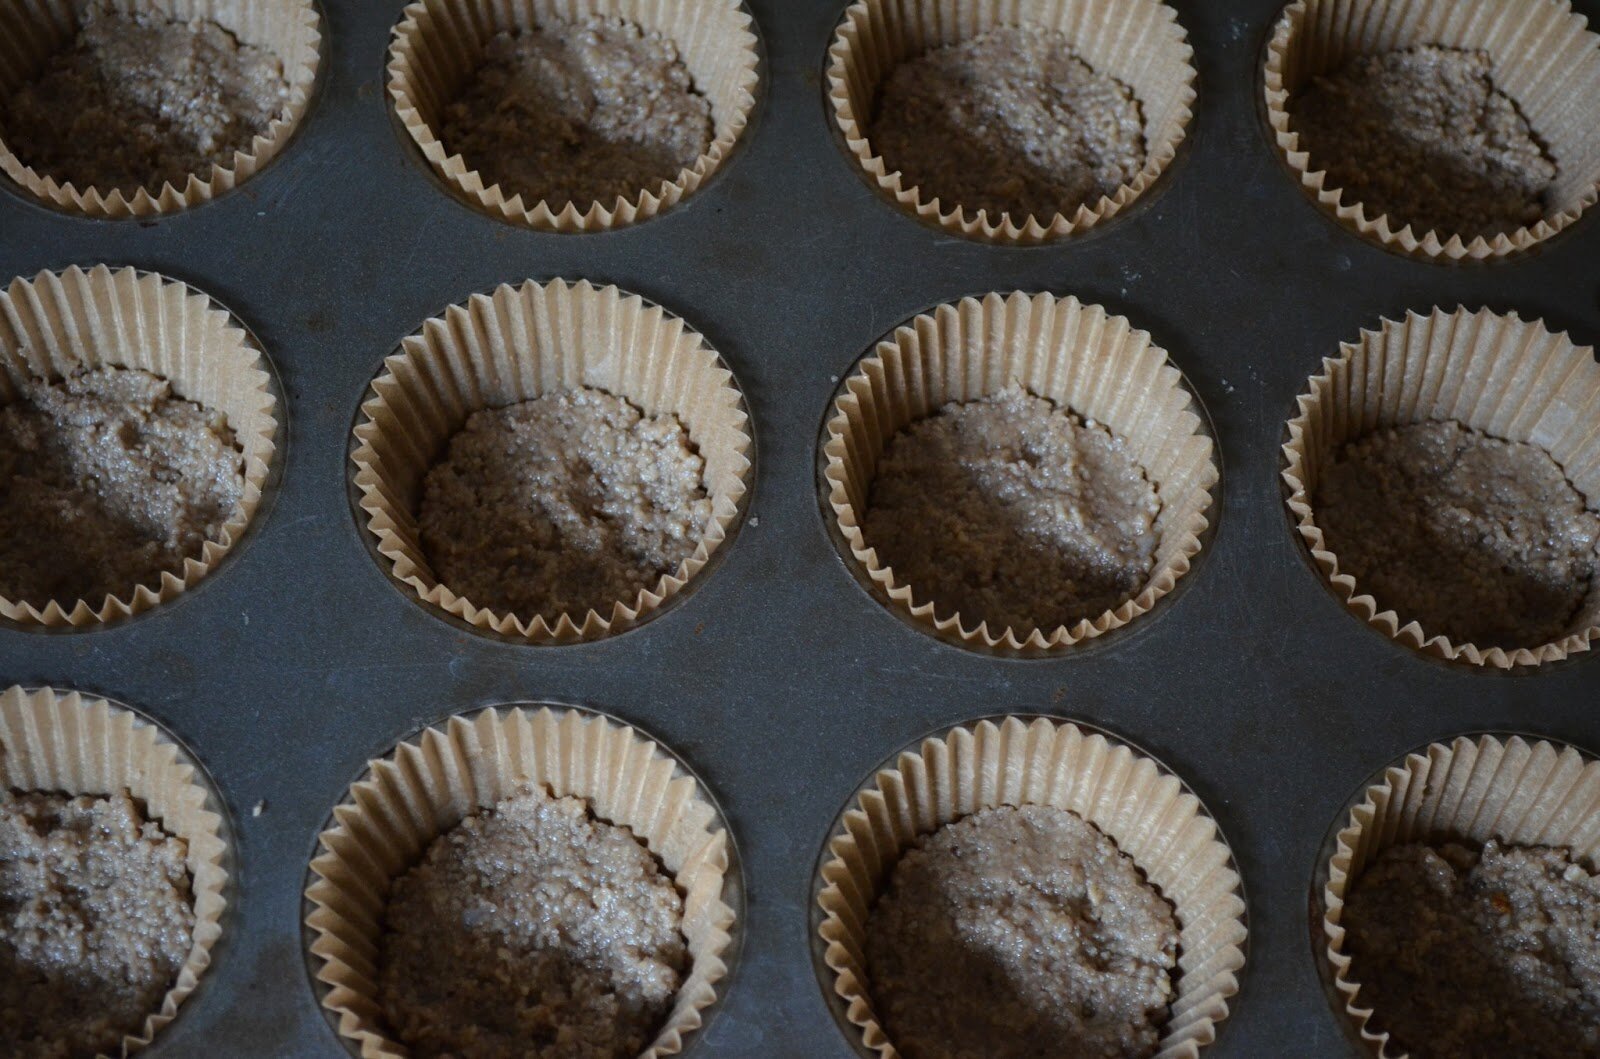
Gluten Free Banana Walnut Bread (dairy free, cane-sugar free)
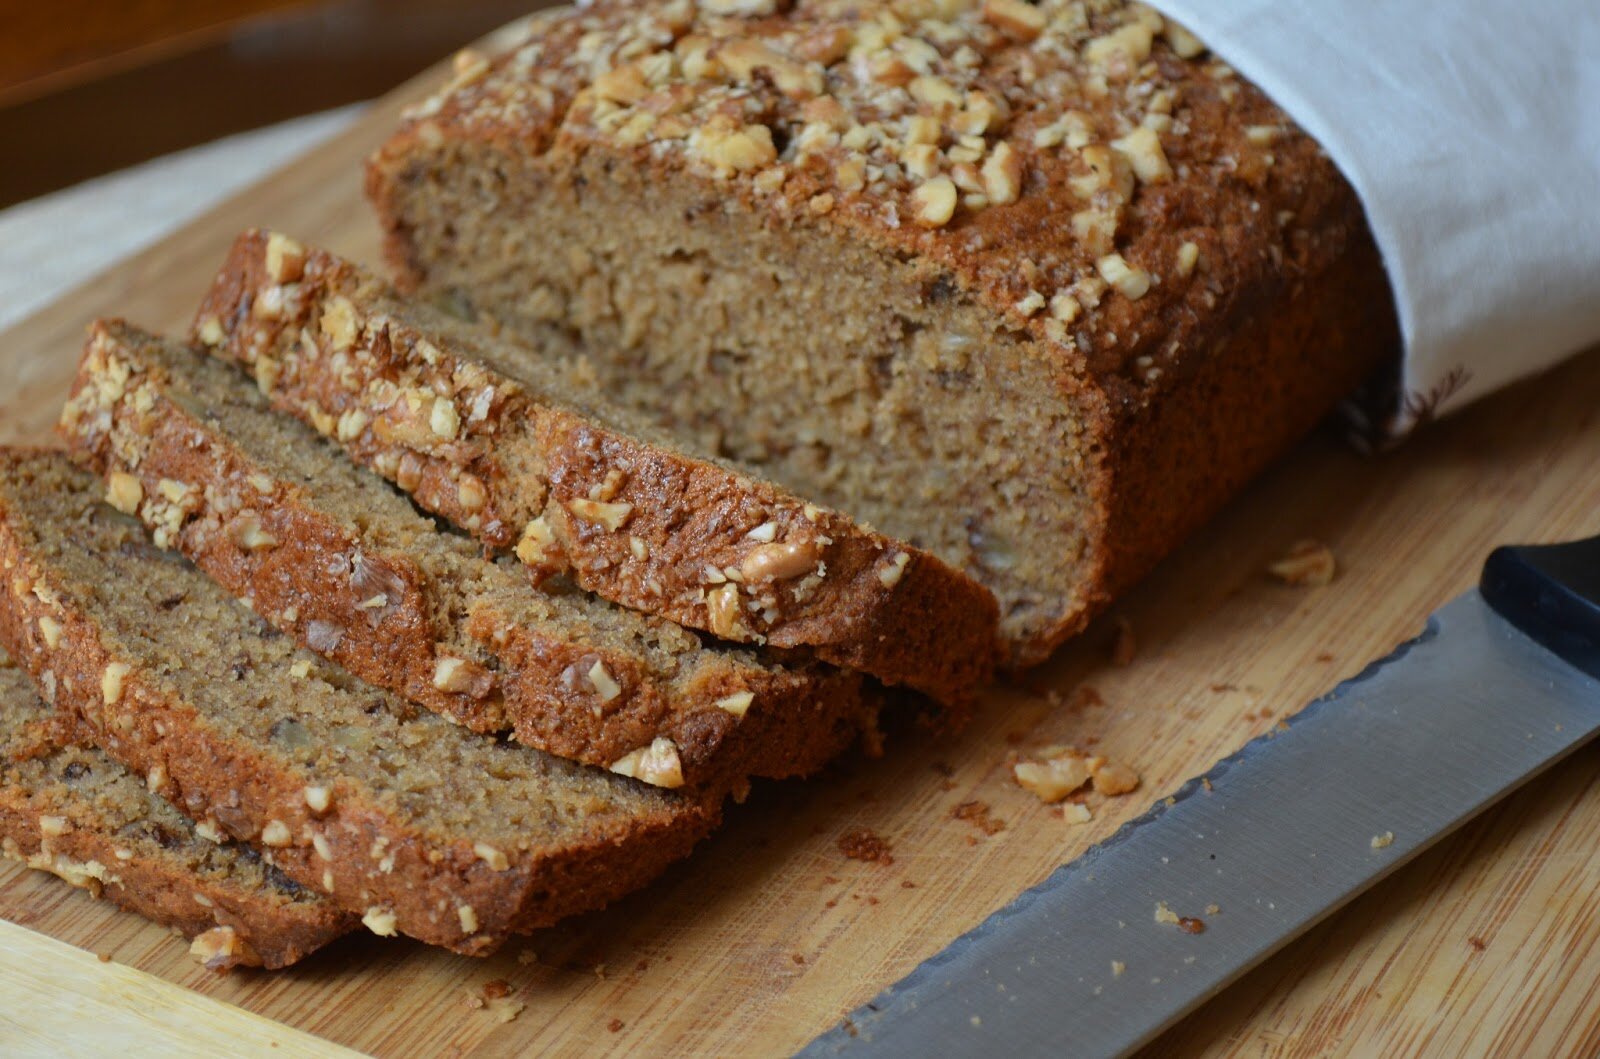

Ingredients:
Wet
-10 ounces of peeled banana (about 3 largish bananas)
-1/2 cup coconut sugar (3.0 ounces)
-2 room temp eggs (weighing 4.5 ounces with shell)
-3 tablespoons full fat canned room temp. coconut milk
-1/2 cup melted coconut oil
-1 teaspoon vanilla
-1/2 teaspoon liquid stevia
Dry
-80 grams sorogum flour (3/4 cup)
-100 grams brown rice flour (3/4 cup)
-60 grams tapioca starch (1/2 cup)
-1 teaspoon baking power
-1/2 teaspoon baking soda
-1/4 teaspoon xanthan gum (if you can’t use xanthan gum, try 1 teaspoon of psyllium husk instead).
-1 tablespoon cinnamon (or more if you like)
-1/4 teaspoon salt
-1 cup chopped walnuts (small pieces)
How To:
Preheat oven to 350 degrees
1. In a bowl add in the banana and mash it around for a bit with a fork until it’s a wet mixture. Then add in all the other wet ingredients and mix everything with a hand mixer (or stand mixer) for 45 seconds on medium speed.
2. In another bowl, add in the dry ingredients (except the walnuts) and whisk everything together until everything is well incorporated.
3. In small batches, add in the dry ingredients to the wet ingredients and continue mixing with the hand mixer. Mix until everything is well incorporated.
4. Add in the walnuts and stir by hand.
5. Fill the bread pan with batter and top with chopped walnuts and coconut sugar
6. Bake for 50 – 55 minutes on the middle rack (use the knife test to check the middle). I baked mine for 55 minutes.
7. Allow the bread to cool for about 15 minutes, then carefully turn it out and allow it to continue to cool on a rack.
-Store in airtight container at room temp for 3 days.
Notes:
*When baking, I suggest following the weight of the ingredients exactly (even the banana). This might mean investing in a small kitchen scale. I cannot guarantee results if the recipe is not followed as specified and measurements are not accurate…just sayin’.
*For wet ingredients use only a 1 cup glass Pyrex for measuring. *For dry, use metal measuring cups. And when measuring flours, spoon the flours into the measuring cup, then level off with a knife. Never pack in the flour.
*I use a 5 x 9 inch glass bread pan. I also line the bottom with some parchment paper.


Labels: breakfast, cane sugar free, dairy free, dessert, gluten free.
Leave a Reply
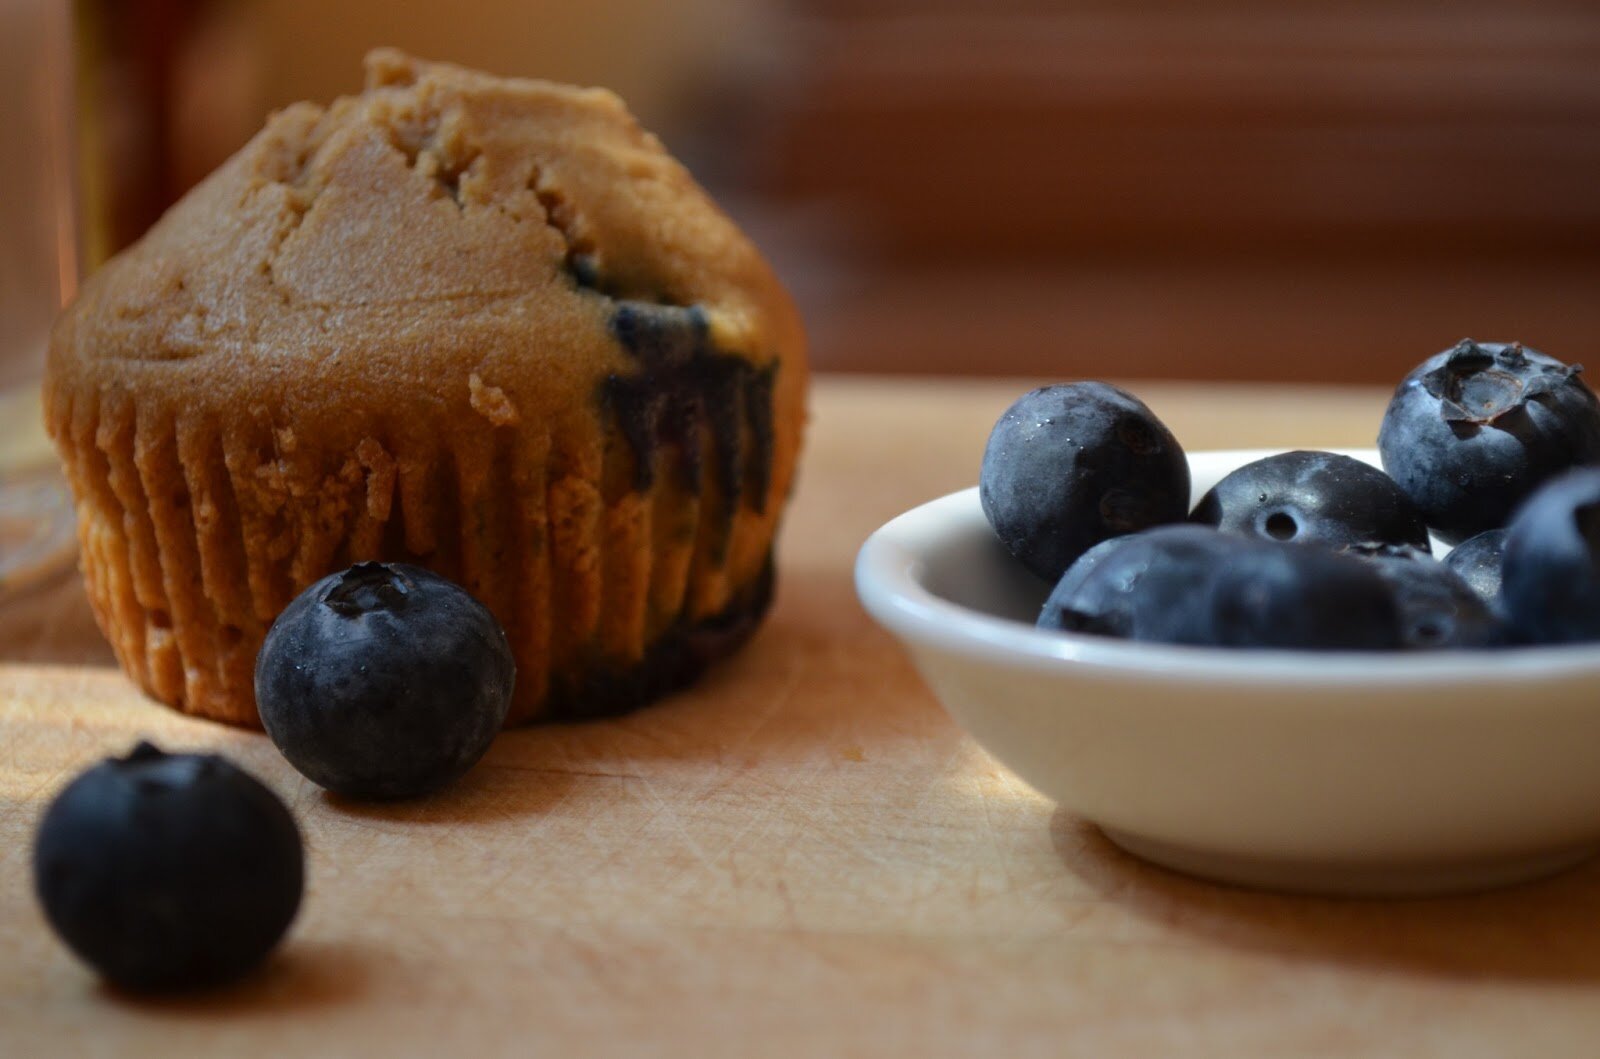
Just Right Coconut Blueberry Muffins (gluten free, dairy free, nut free, cane-sugar free)


Notes:
*Due to the high coconut content in these muffins, they will stay moist at room temperature, but if they get cold, they will become stiff. It’s warm here in my neck of the woods (high 80s to mid-90s).
*When baking, I suggest following the weight of the ingredients exactly. This might mean investing in a small kitchen scale. I cannot guarantee results if the recipe is not followed as specified and measurements are not accurate…just sayin’.
*For wet ingredients use only a 1 cup glass Pyrex for measuring. *For dry, use metal measuring cups. And when measuring flours, spoon the flours into the measuring cup, then level off with a knife. Never pack in the flour.
*The muffins will stay moist for 3 or 4 full days at room temp in a container.
*Oh, and I only use these large baking muffin cups.


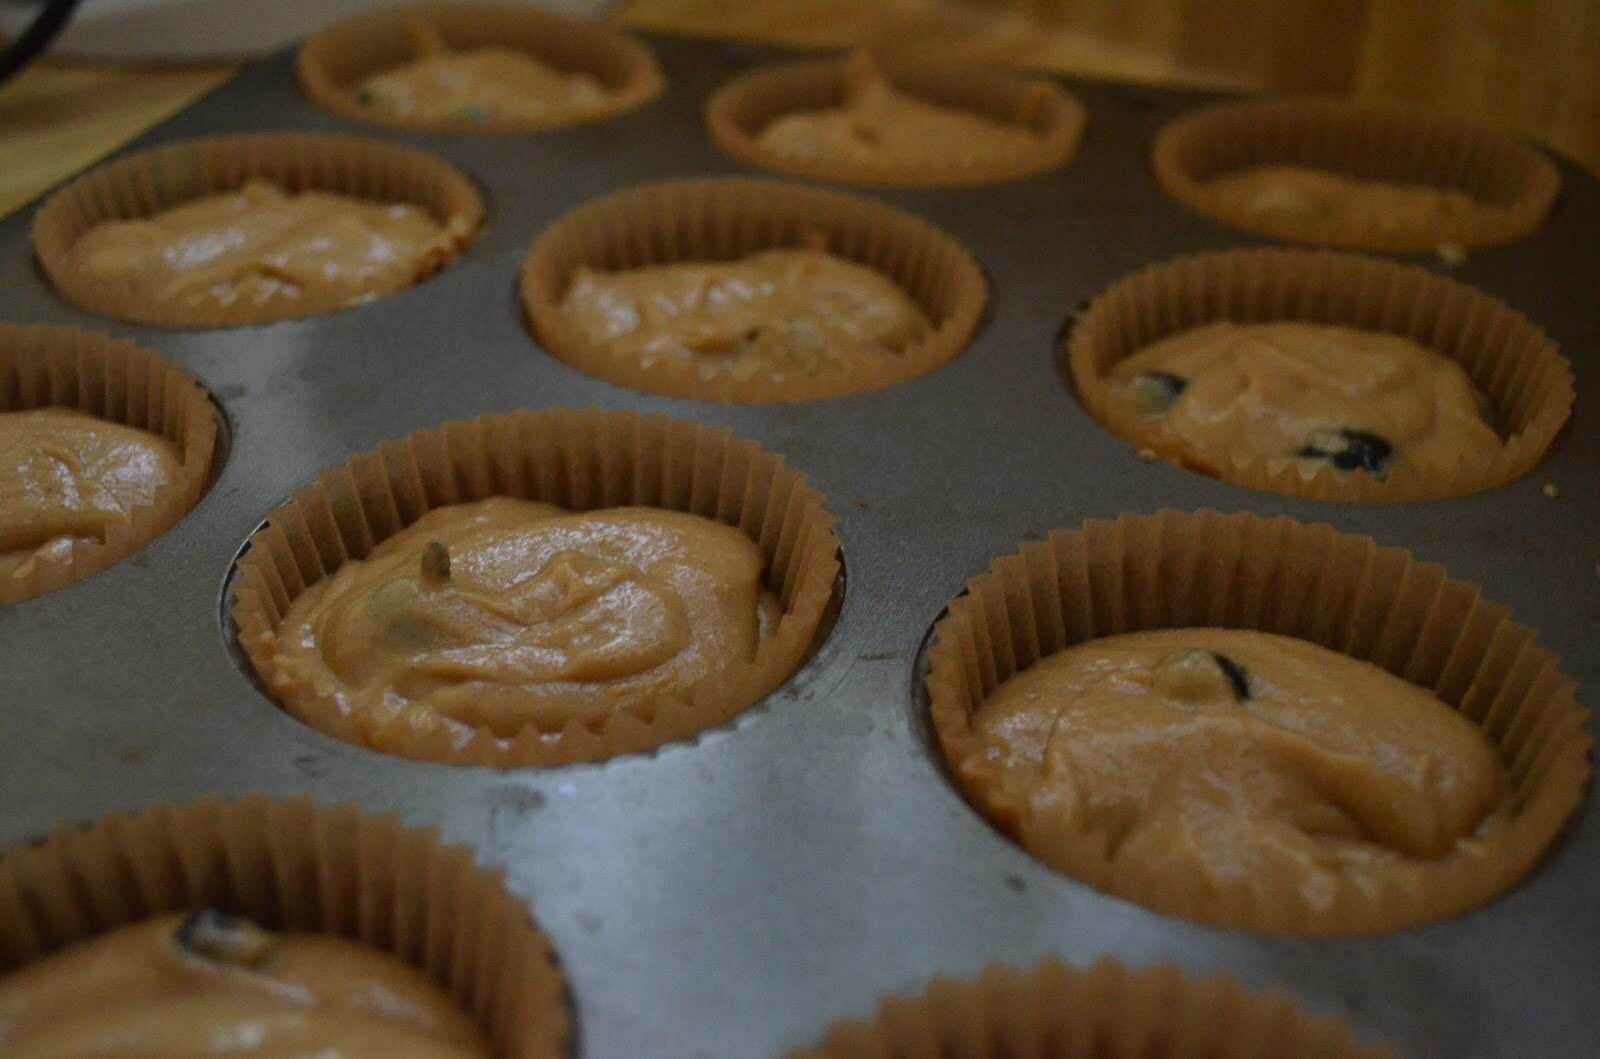


Labels: allergy-friendly, breakfast, cane sugar free, dairy free, dessert, gluten free, nut free, snacks.
Leave a Reply
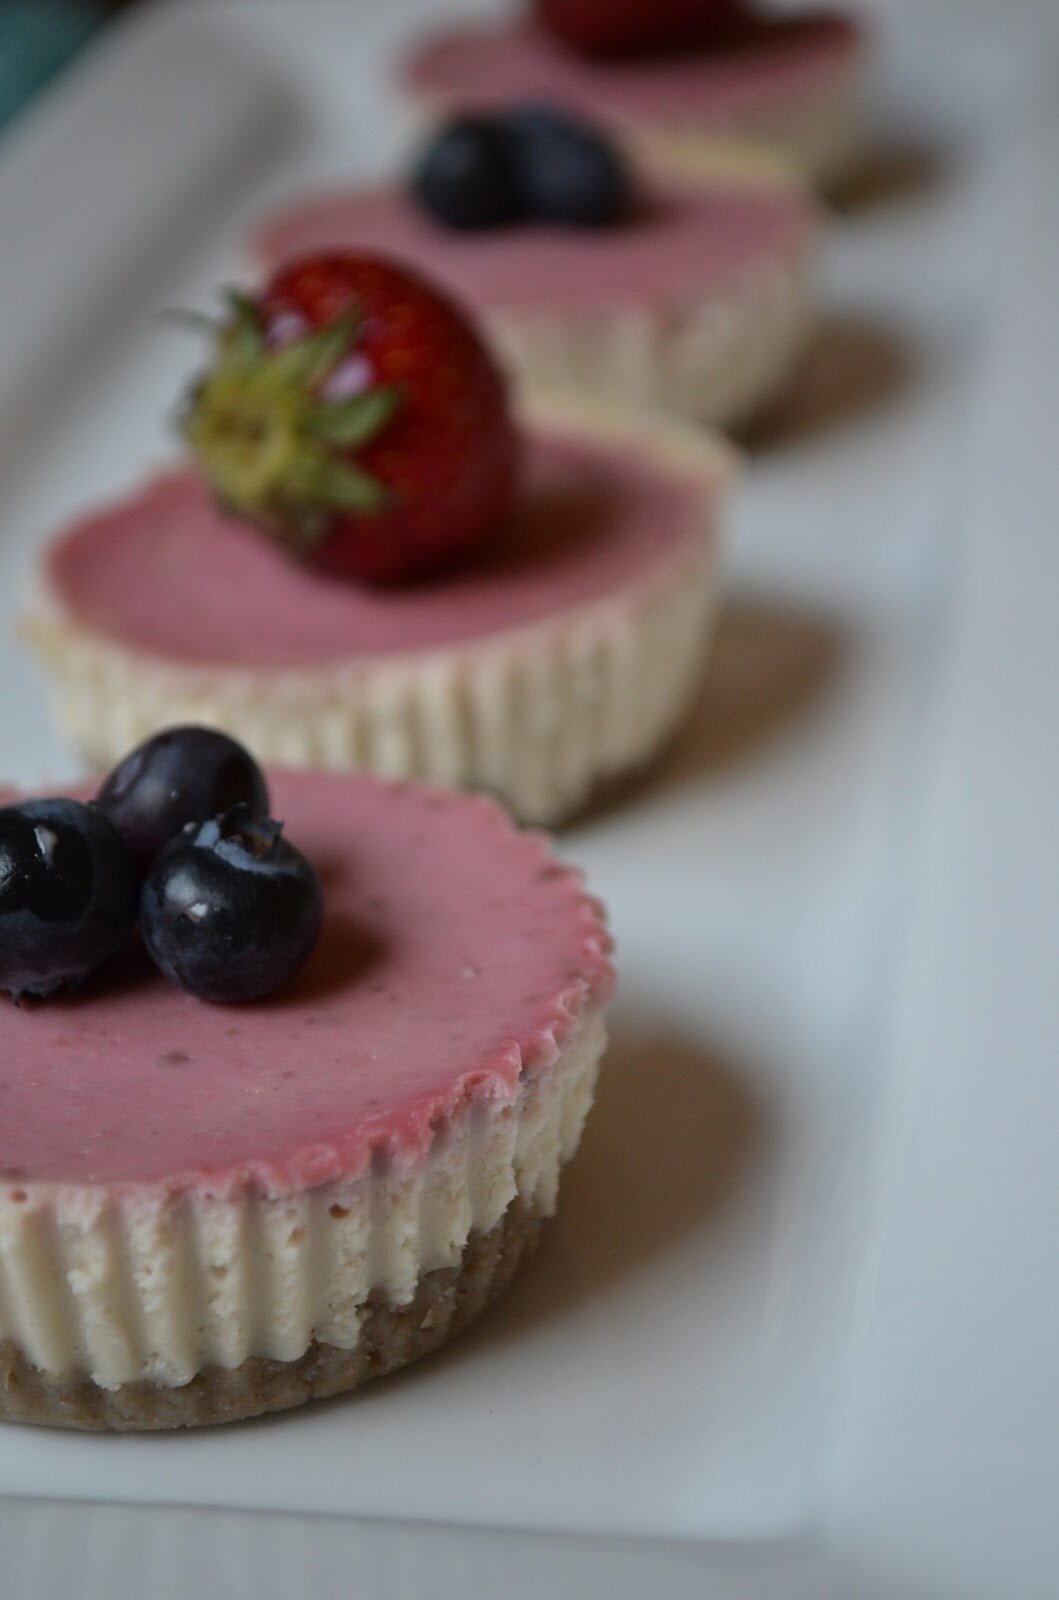
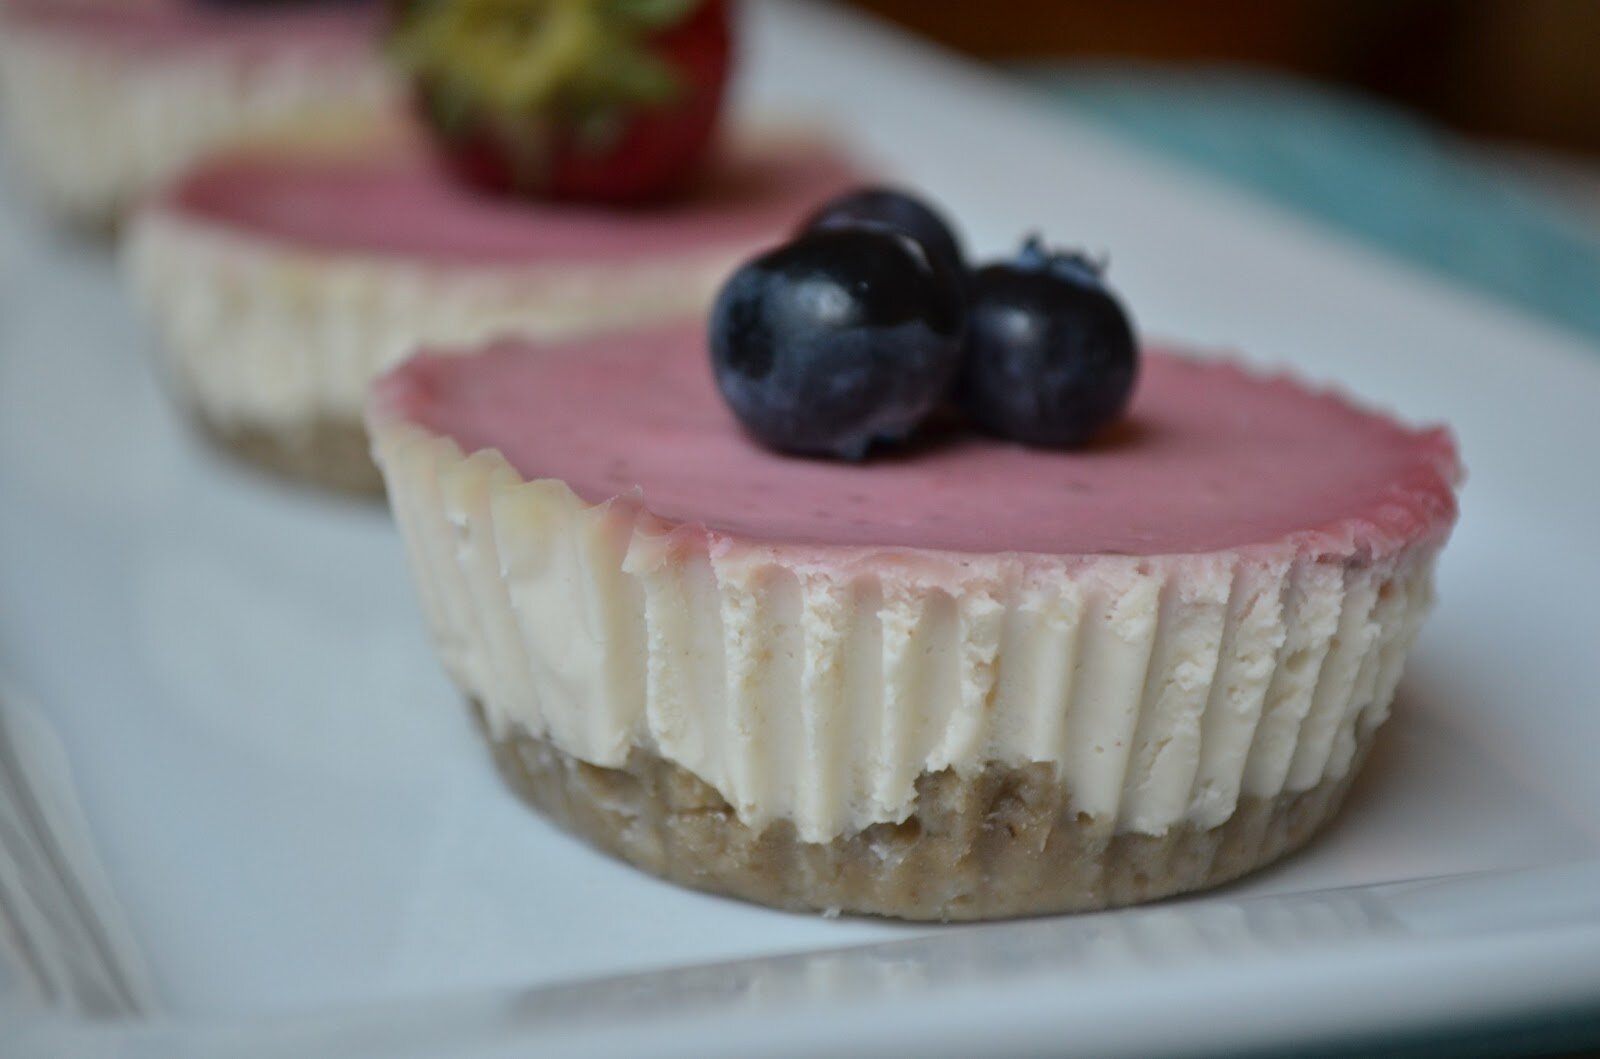
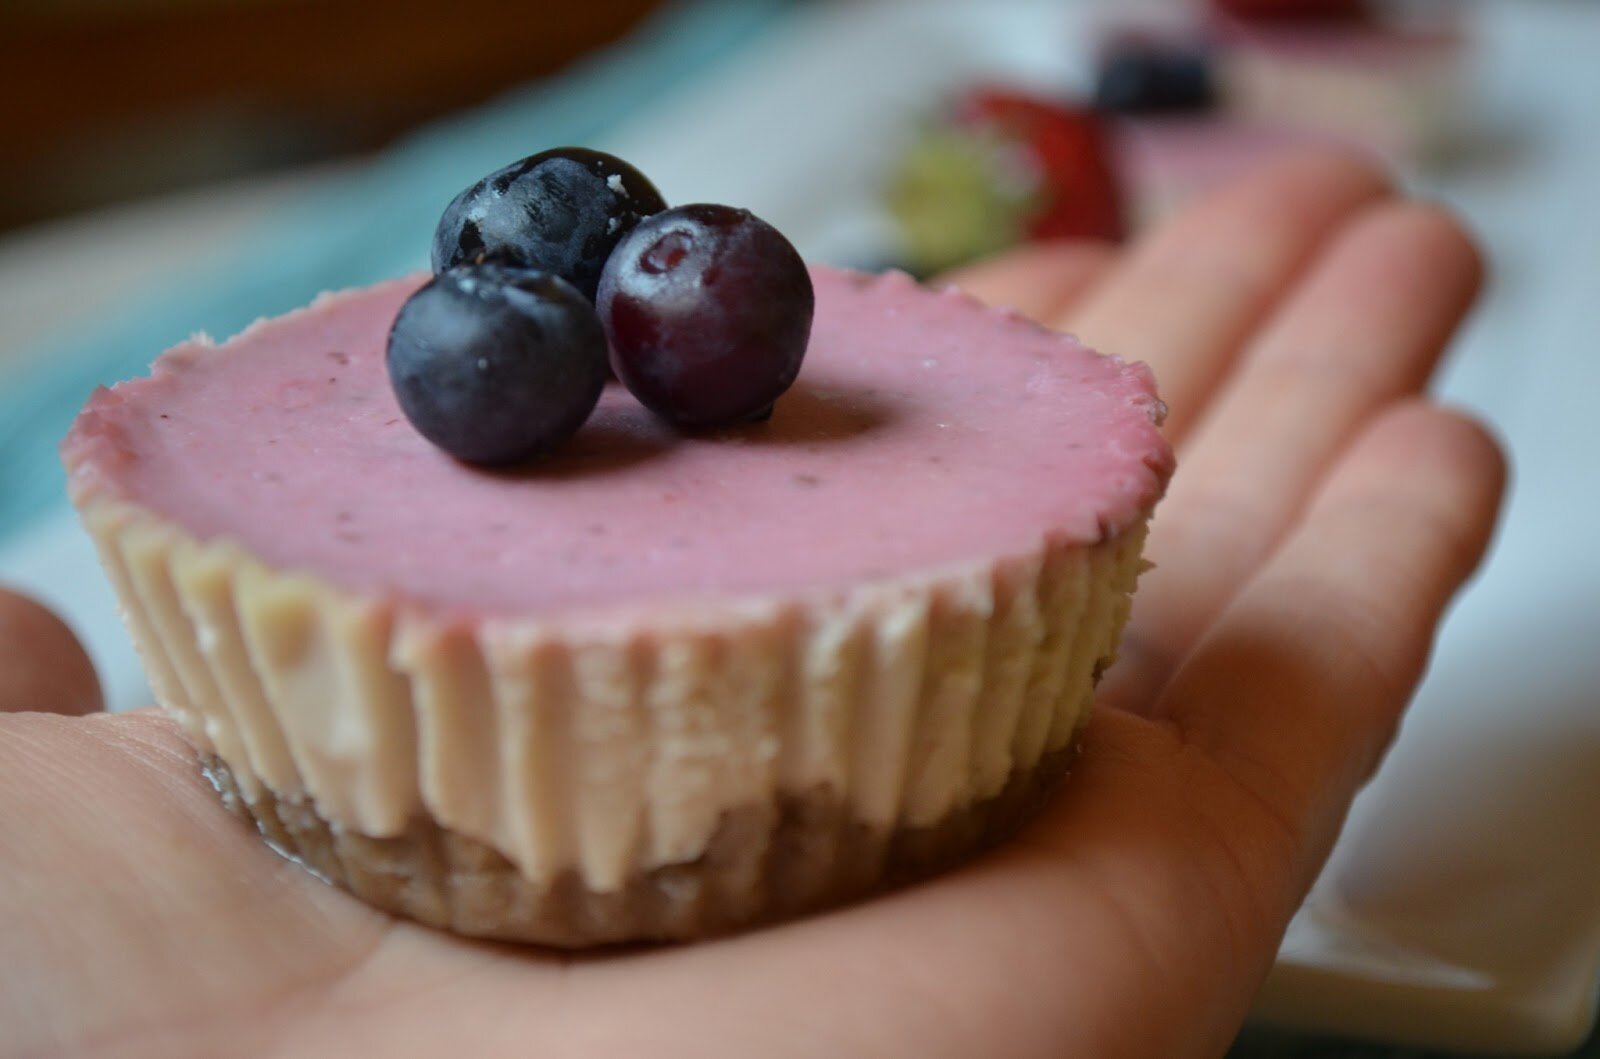
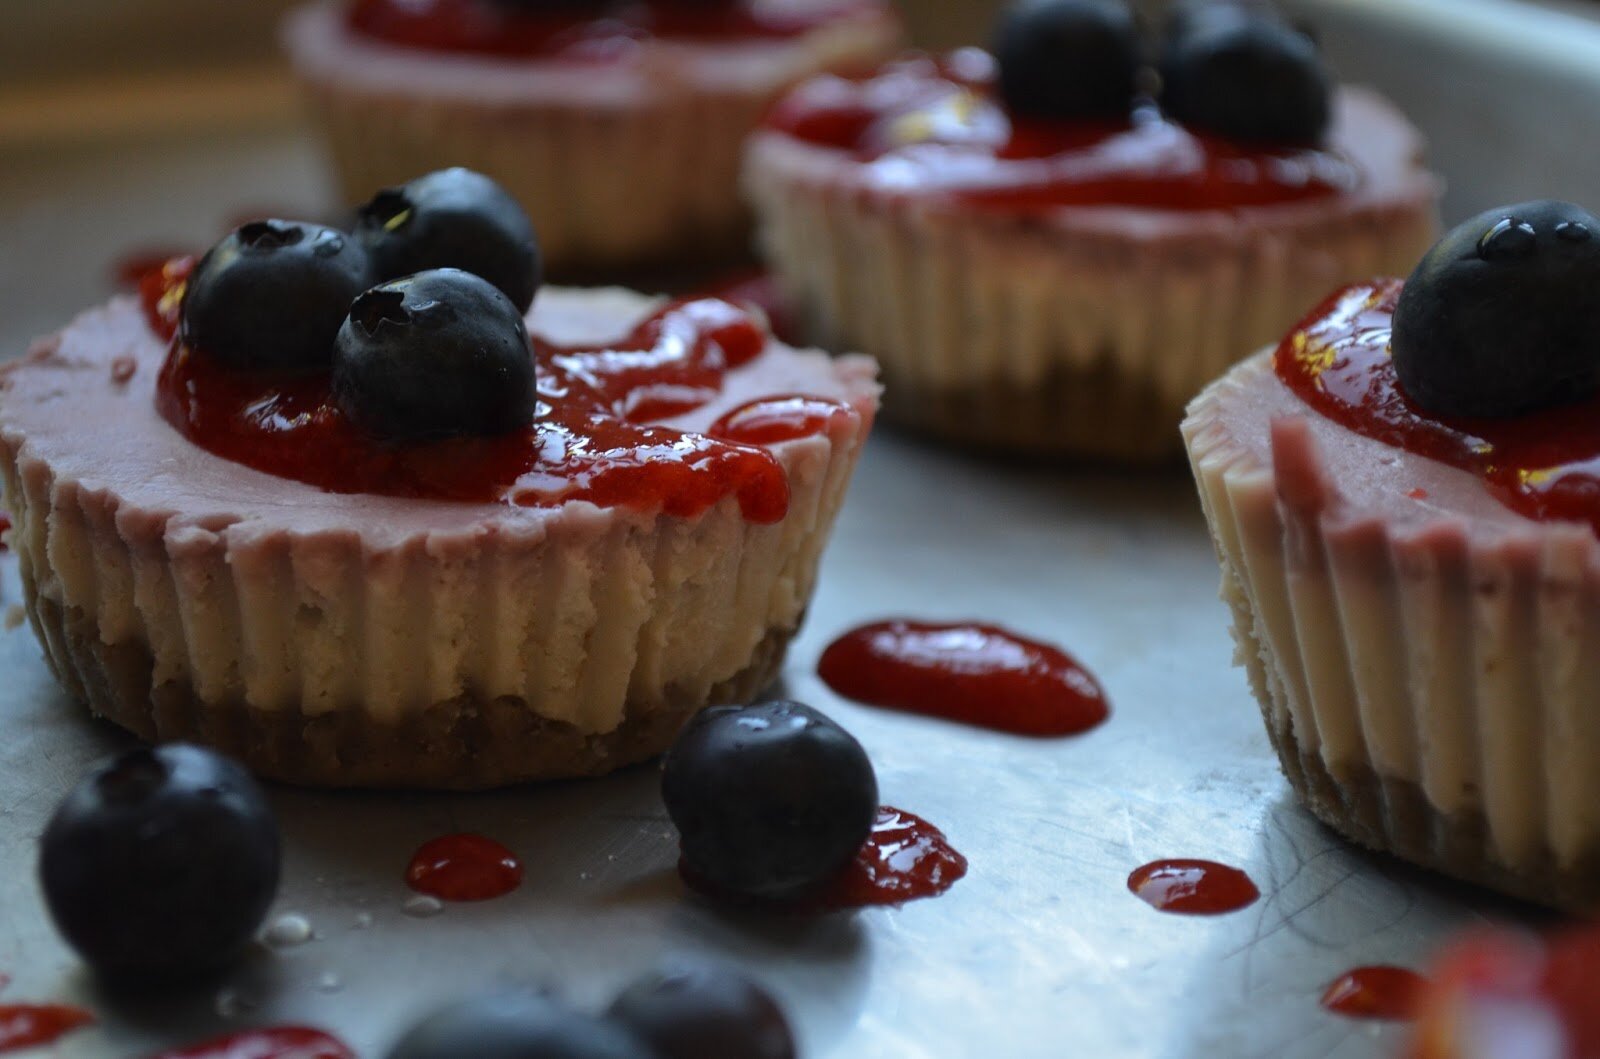
Mini Strawberry "Cheesecakes" ~ Inspired by Chef Amber Shea

Notes:
*To make sunflower seed flour, simply add about 2 cups raw sunflower seeds to a food processor and blend until well ground and BEFORE it turns into sunflower seed butter. I used sunflower seed flour as the base, as almond flour is difficult for me to digest. But I’ve made this recipe with almond flour too, and I actually prefer the taste of the almond flour. So I would go with the almond flour if you can digest it.


Labels: allergy-friendly, cane sugar free, dairy free, dessert, gluten free, raw.
Leave a Reply
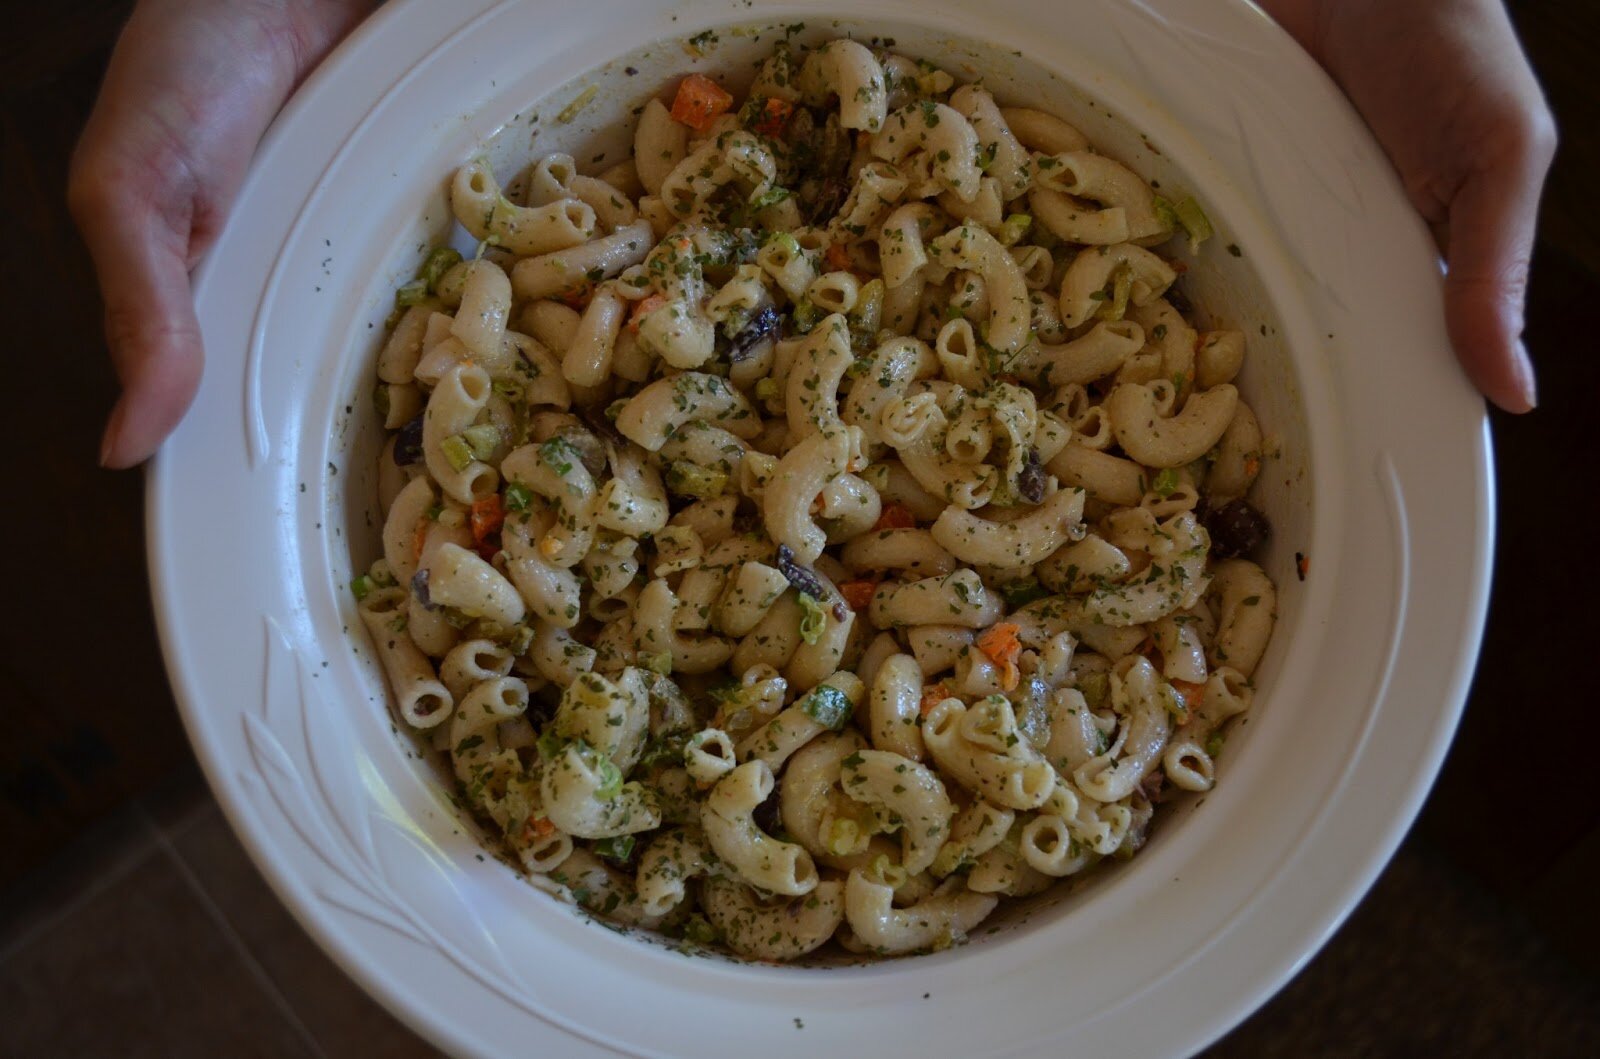
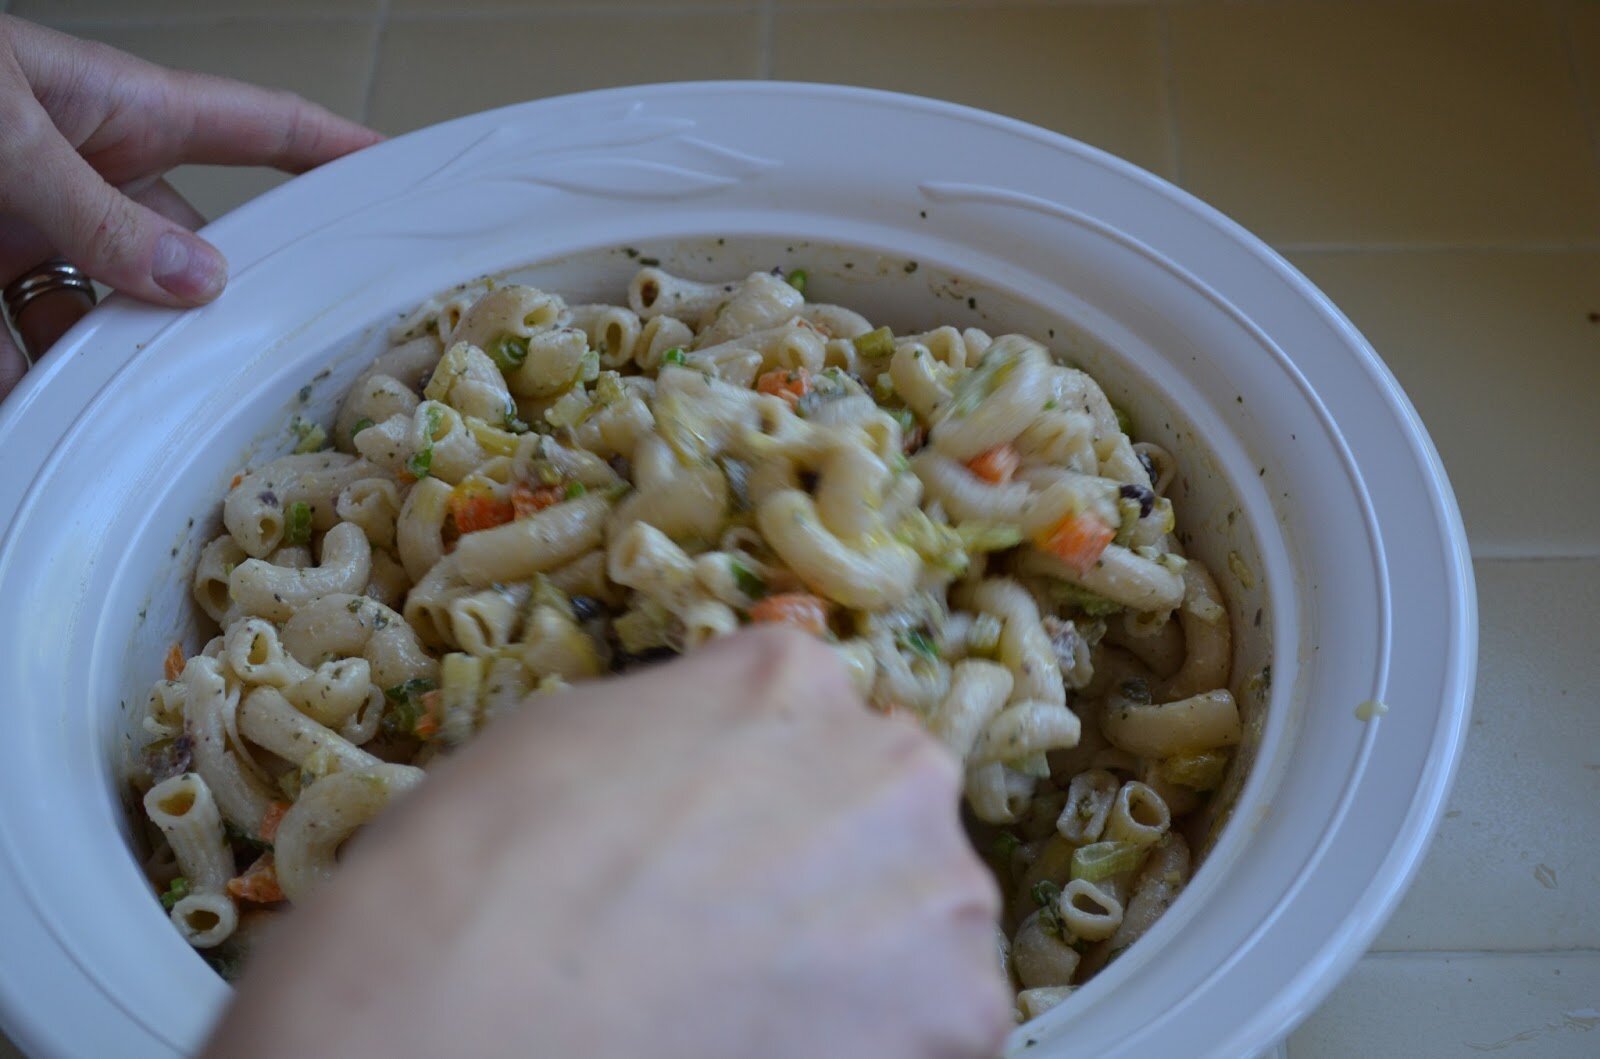
Kalamata Olive and Sweet Pepper Macaroni Salad (gluten free & vegan)


This sounds delicious Amber! Pinned it.
Thanks Emily! I’m so glad it turned out. Next up…pecan date bars! 🙂
This recipe looks incredible, Amber! I can’t wait to try it. I know exactly what you mean about too datey. I’m so glad that this recipe is not too datey or too pecany, but just perfect. 🙂
Shirley
Thanks Shirley! I hope you try it. Please let me know what you think!! 🙂
I have to admit pecan pie is one of my favs too, what a creative idea to use the dates for the caramel-esque flavor and binding!!
Yay! Another pecan pie fan. Thanks Tessa. It turned out really well. Easy and tasty. I have to say, I love dates!