Author Archives: Amber

Saturday, November 19, 2011

Raw Pasta Two Ways (with two delicious raw sauces)

 “The way you cut your meat reflects the way you live.”
–Confucius


“The way you cut your veggies reflects the way you live.” 
— Me, earlier today

I love vegetables, but like most things I get b.o.r.e.d very easily.  So cutting veggies up like pasta is nothing new friends, but what I have dressed them with today, well, hello gorgeous (yes you) and what I am tasting in my mouth.  I’m eating the “pasta” pictured in the top right as we speak. I often eat and blog at the same time.  That’s why my keyboard looks like a barnacle (so gross).  

I’ve been making pesto for years and this is my favorite recipe but I find it gets a bit washed out on pasta, so I added one simple ingredient and bam – love! 
The perfect raw pesto.  I adore pesto in any form.  It brings back lovely memories of my beloved Gramie (who was a die-hard cook).  Growing up I spent the summers with my Grandparents (and lived with them for many years).  Gramie often made fresh pesto and I vividly remember her explaining what it was and how to make it with nothing less than grand enthusiasm over the entire process from leaves to paste. Of course I thought it was awesome, and she allowed me to do the best part of the jobdrizzling in the oil.  Magic.  If my Gramie was alive today I know she would LOVE my heart-healthy version.  This one’s for you Gramie! 
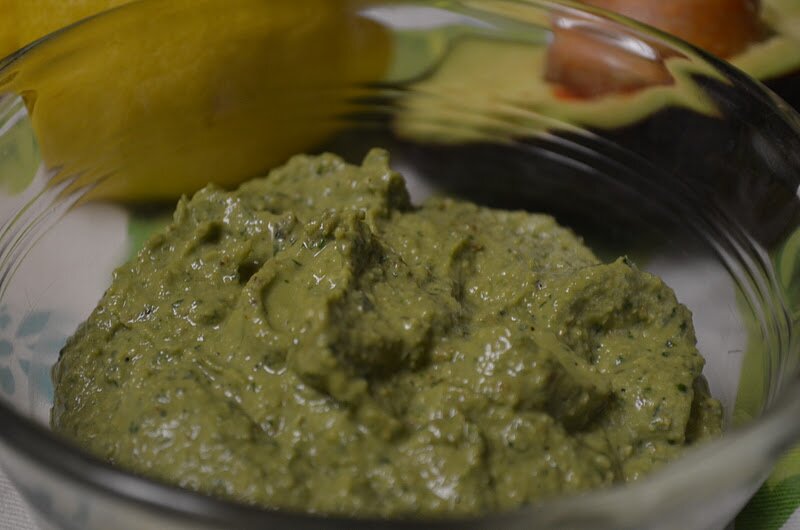
Sauce #1: the perfect raw pesto
Ingredients:
-1 large beautiful organic avocado

How To:
1.  Make pesto recipe as specified above and add in the avocado (cut into chunks and blend in food processor with other ingredients)
2.  The avocado gives it just the right “something” that creates a creamy, substantial sauce 
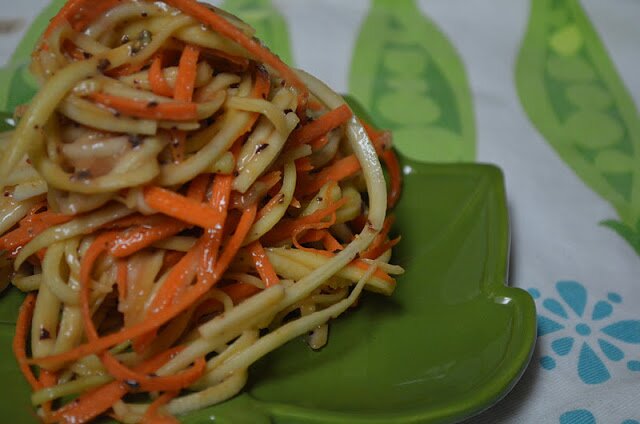
3.  Toss sauce with raw zucchini & carrot “pasta” made with this tool.  You may need to drizzle in some oil to help incorporate the sauce with “pasta”  


Notes
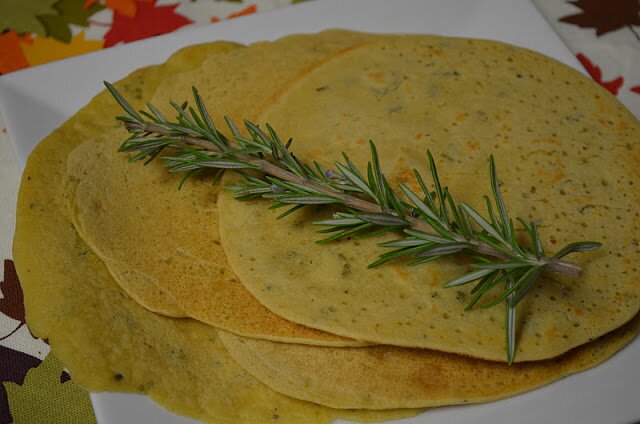
*This sauce also works great with cooked gluten-free pasta (this is how I tested it originally

*Pesto is best served at room temperature (in my opinion)
*I use this gadget to get the zucchini to look like pasta noodles.

*Or this awesome julienne peeler works great too for both the carrots or zucchini.
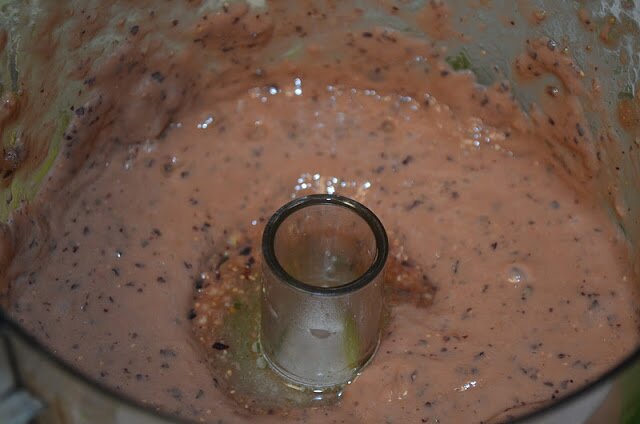
Sauce #2: Fabulous Fig Balsamic Dressing.  This is a sweet/savory sauce from one of my favorite restaurants on the planet, Cafe Gratitude.
The first time I ate at Cafe Gratitude I fell in love; I was smitten like a lovesick teenager, seriously!  Check out their website and I dare you to not feel warm, fuzzy, loved, and excited about their philosophy and their food – my goddess the food!  I’m sure I scared the poor man sitting next to me as I moaned, groaned, and talked to myself through the entire meal (who does that? oh, crazy people like me – okay, I was having a foodgasm if you must know).  I was still chewing my first bite when I spotted their cookbook, ran to it, grabbed it, and proceeded to hold onto it (while I ate) like a miserly mouse clenching the last piece of cheese.  So if you are headed to San Francisco for a visit, call me and I will meet you there and we can be crazy about this place together!  

The fig sauce is located on page 45.  It’s fantastic.  I adapted it slightly with what I had on hand, so the original recipe is different.  My adaption is below. 


Sauce #2: Fabulous Fig Balsamic Dressing
Ingredients:
-7 black mission figs, quartered
-2 tablespoons balsamic vinegar 
-1/4 teaspoon salt
-Juice from 1/2 a lemon
-A few turns of the pepper grinder 
-Oil of choice

How To:
1.  Add figs, balsamic vinegar, salt, pepper, and lemon to food processor, blend until Incorporated

2.  Drizzle in oil until creamy 

Shared on: Wellness Weekend over at Diet, Dessert and Dogs, Real Food 101, Fat Tuesdays, Friday Foodie Fix, Gluten Free Wednesdays, Raw Foods Thursday, 
Posted by Amber at

Labels: dairy free, gluten free, raw, sauces, sides, soy free, vegan.

14 Comments

Leave a Reply

Your email address will not be published. Required fields are marked *

* Copy This Password *

* Type Or Paste Password Here *

You may use these HTML tags and attributes: <a href="" title=""> <abbr title=""> <acronym title=""> <b> <blockquote cite=""> <cite> <code> <del datetime=""> <em> <i> <q cite=""> <s> <strike> <strong>

Thursday, November 17, 2011

The Gift of Tea

I’m a tea girl through and through.  I drink tea like my coffee loving friends drink their beloved coffee.  Tea has been a real life saver for me though in many ways.  When I was pregnant with both my children a cup of chamomile tea would somehow calm my Crohn’s flares.  And if you know what a flare feels like, you know how wonderful it is to find something to decrease that pain.  I have a weakened digestive system so I frequently rely on peppermint and ginger tea as a quick and effective digestive aid.  To calm my nerves I love a cup of chamomile and lavender, for clarity of mind, Rooibos, and for a pick-me-up I adore a smokey green tea or Herba Mate.  

I can’t think of a better gift than the gift of beautiful, healing tea!

The above picture is something I quickly put together.  
Total cost was about $5.  

I went to my local Coop and searched through the loose-leaf teas.  I found a nice middle road green tea and a herb/fruit blend.  I purchased a cup or so of each and mixed together.  I dressed the tea with a beautiful organic lemon and a fun stainless steel mesh tea infuser.  This would be a super fun gift for the tea enthusiast or otherwise.  This would also be a thoughtful gift for Mother’s Day, Father’s Day, or your child’s teacher.

You could certainly expand on this idea and create a more involved tea gift.  Some ideas include: 

*A jar of healing local honey
*An adorable glass tea pot
*Sweet little honey spoons
*Little glass jars for loose teas (I love these)
*Books about tea
*Vintage tea cups 
Shared on: Gluten-Free Holiday over at Tasty Eats at Home
Posted by Amber at

Labels: Uncategorized.

11 Comments

Leave a Reply

Your email address will not be published. Required fields are marked *

* Copy This Password *

* Type Or Paste Password Here *

You may use these HTML tags and attributes: <a href="" title=""> <abbr title=""> <acronym title=""> <b> <blockquote cite=""> <cite> <code> <del datetime=""> <em> <i> <q cite=""> <s> <strike> <strong>

Allergy-Friendly Play Dough (2 ways)

I came across a really fun child-friendly activity/gift idea in the latest issue of Living Free magazine (pg. 10): making your own allergy-friendly play dough! 
I’ve been thinking about the Holidays here and all the gift giving that’s just around the corner.  Between my husband and I we have a pretty big family and we can’t possibly buy everyone a gift.  We find pleasure in simple 1-item gift exchanges, happiness in each other’s company, good food, music, and laughter.  But we do have little children in our immediate and extended family.  When I read this article in Living Free I thought, now there is a super cute idea for a child.  You could make the dough yourself, or provide the ingredients in a little jar with instructions and they could make it at their leisure.  I wanted to share the two recipes with you today.  

#1: Play Clay
Makes about 2 pounds
If not used immediately, store in an airtight container 
or plastic bag in the refrigerator.
Ingredients
1 cup potato starch or cornstarch
2 cups baking soda
1 1/4 cups cold water
1 tablespoon vegetable oil, or oil of choice 
2-3 drops food color (optional) – I only use this natural plant-based food coloring
How To
1.  Mix together potato starch and baking soda and pour into sauce pan.
2.  Mix water and oil in small bowl.  Add food coloring, if using.
3.  Heat saucepan and pour in water and oil, stirring constantly about 3 minutes or until clay holds together in a ball. (Small lumps will appear and then clay will hold together.)
4.  Turn off heat.  Spoon clay onto parchment paper and let cool slightly.


#2: Salt Dough
Makes about 1 pound 
If not used immediately, store in an airtight 
container or plastic bag in the refrigerator. 

Ingredients
1 cup table salt
1 cup rice flour
1/2 cup water, more as needed
2 drops food coloring (see above)
1 teaspoon vegetable oil, if needed

How To
1.  Mix together salt and flour in a saucepan.  Pour in water and add food coloring, if using.
2.  Cook over medium meat until dough forms into a ball.  If dough is too dry to hold together, add more water 1 Tbsp at a time.
3.  Spoon dough onto parchment paper and let cool slightly 
4.  Knead until smooth and shape into a ball.  If dough is too hard, knead in 1 teaspoon oil until well distributed.
Picture from Hippo Flambe
Shard on: Thriving on Thursday, 
Posted by Amber at

Labels: allergy-friendly, how to, kids.

4 Comments

Leave a Reply

Your email address will not be published. Required fields are marked *

* Copy This Password *

* Type Or Paste Password Here *

You may use these HTML tags and attributes: <a href="" title=""> <abbr title=""> <acronym title=""> <b> <blockquote cite=""> <cite> <code> <del datetime=""> <em> <i> <q cite=""> <s> <strike> <strong>

Tuesday, November 15, 2011

Pumpkin-Spiced Chocolate Covered Pear with Toasted Pecans

Here we have #3 idea for combining pumpkin and chocolate.  So there isn’t any actual pumpkin in this one, but we do have pumpkin spice!  This is a super fun twist on your basic dark chocolate.  Husband loved it.  The spiced chocolate works well with the sweet, juicy pear and the toasted pecans provide a nutty crunch.  Really fun and easy dessert.  Also a great idea for a party.
Stayed tuned for the final pumpkin + chocolate recipe next week (just in time for Thanksgiving): 
chocolate pumpkin coconut ice cream!!

Ingredients
2-3 ripe organic pears (soft to touch but not mushy)
1 bar of the best chocolate on the planet
1 teaspoon pumpkin spice mix (or to taste)
1 cup chopped pecans, lightly toasted 

How To
*Wash and dry your beautiful pears 
*Heat chocolate bar on low over double boiler (if you don’t have one, it’s pretty easy to fashion a makeshift version with your everyday pots and saute pans)
*Add pumpkin spice mix to melted chocolate, stir and remove from heat
*Drizzle chocolate over half of pear
*Sprinkle on toasted pecans
*Set on cookie cooling rack 

Notes
*You can certainly add some sweetener to the chocolate.  We happen to like the dark chocolate flavor.  Adding a tablespoon of honey, agave, coconut sugar, etc., will give it a little sweet kick
Shared on: Slightly Indulgent Tuesdays
Posted by Amber at

Labels: cane sugar free, chocolate + pumpkin, dairy free, dessert, gluten free.

Leave a Reply

Your email address will not be published. Required fields are marked *

* Copy This Password *

* Type Or Paste Password Here *

You may use these HTML tags and attributes: <a href="" title=""> <abbr title=""> <acronym title=""> <b> <blockquote cite=""> <cite> <code> <del datetime=""> <em> <i> <q cite=""> <s> <strike> <strong>

Sunday, November 13, 2011

Boots meet Bottles (how glass bottles can organize your closet)

Posted by Amber at

Labels: green living tips organization.

4 Comments

Leave a Reply

Your email address will not be published. Required fields are marked *

* Copy This Password *

* Type Or Paste Password Here *

You may use these HTML tags and attributes: <a href="" title=""> <abbr title=""> <acronym title=""> <b> <blockquote cite=""> <cite> <code> <del datetime=""> <em> <i> <q cite=""> <s> <strike> <strong>

Saturday, November 12, 2011

Smashed Sweet Potatoes with Cauliflower

Smashed Sweet Potatoes with Cauliflower 
(this is really nice substitute for those of you who don’t want white potatoes at your meal; the cauliflower adds a nice texture and balances out the sweetness of the sweet potatoes – and best part, no boiling required!)

Ingredients 
3 large sweet potatoes, chopped
1 head of cauliflower, separated 
Oil of choice
Garlic granules (or 4 cloves fresh garlic)

How To
*Add sweet potatoes and cauliflower to your favorite roasting dish
*Drizzle with oil 
*Add about 1 1/2 tablespoons garlic granules (or smash the fresh garlic cloves and add in)
*Toss ingredients with oil and garlic 
*Roast at 400 degrees for 40 minutes
*Keep ingredients in roasting pan and use a potato masher to smash ingredients together.  Add another drizzle of oil for some additional moisture
*Add 1/4 teaspoon salt 
*Smash everything together well 
*Top with a little cinnamon (optional)
*Serves 4-5

Shared on: A Gluten-Free Holiday Week 2 – Thanksgiving Favorites & Traditional Tuesday

Posted by Amber at

Labels: sides, thanksgiving side dishes.

One Comment

Leave a Reply

Your email address will not be published. Required fields are marked *

* Copy This Password *

* Type Or Paste Password Here *

You may use these HTML tags and attributes: <a href="" title=""> <abbr title=""> <acronym title=""> <b> <blockquote cite=""> <cite> <code> <del datetime=""> <em> <i> <q cite=""> <s> <strike> <strong>

Friday, November 11, 2011

20-Minute Cane-Sugar Free Cranberry Sauce

20-Minute Cane-Sugar Free Cranberry Sauce
(my kids ate this up like candy!)

Ingredients:
-16 ounces fresh cranberries (about 5 cups) 
-1 1/2 cups filtered water (or 1 cup water and 1/2 cup orange juice)
-1/2 cup (3 ounces) Medjool dates, seeded and diced
-3/4 cup sweet red apple, peeled and very small chop
-One large, juicy orange 
-1/4 teaspoon cinnamon  
-1/4 cup honey (vegans use maple syrup, coconut nectar or coconut sugar and adjust to your sweet preference) 
-1/4 teaspoon liquid stevia (SCDers use additional 3 tablespoons honey)
How To: 
1.  In medium sauce pan bring cranberries and water (or water/juice) to a boil, stir and turn down to a rapid simmer (for about 5 minutes)
2.  Add apple, dates, honey, and stir to incorporate, and gentle simmer for about 10 minutes 
3.  Add juice of 1 orange, stevia, and cinnamon, and very gently simmer for an additional 5 minutes
4.  Turn off heat and let cool on the stove top in the pan, uncovered  
5.  When cool, transfer to fridge until ready to serve
6.  Top with orange zest
Serves 6 – 8 (depending on serving size)

Shared on: A Gluten-Free Holiday Week 2 – Thanksgiving Favorites, A Gluten-Free Holiday Week 4 – Favorite Entrees and Sides, Slightly Indulgent Tuesdays, Traditional Tuesday 
Posted by Amber at

Labels: SCD, sides, thanksgiving side dishes.

4 Comments

Leave a Reply

Your email address will not be published. Required fields are marked *

* Copy This Password *

* Type Or Paste Password Here *

You may use these HTML tags and attributes: <a href="" title=""> <abbr title=""> <acronym title=""> <b> <blockquote cite=""> <cite> <code> <del datetime=""> <em> <i> <q cite=""> <s> <strike> <strong>

Grain Free Socca Bread

When I saw this socca bread recipe in Living Without magazine, I knew I had to try it. I love the simplicity of this recipe. I was very pleased with how it turned out, which is why I shared it here on the blog (I usually don’t share recipes from books or magazines).  If you like the flavor of garbanzo bean flour, you’ll dig this recipe.  It’s definitely something fun and different.
Grain Free Socca Bread
 
Author:
Serves: 6 - 8
Ingredients
  • 1½ cups garbanzo bean flour
  • 1½ cups filtered water
  • 2½ tablespoons oil (walnut or olive)
  • 1 tablespoon chopped fresh rosemary (you must use fresh!)
  • ¾ teaspoon salt
  • ¼ teaspoon pepper
  • 1 tablespoon minced dried onion (I used onion powder)
Instructions
  1. Whisk together chickpea flour, water, 2 tablespoons oil, rosemary, salt, pepper, onion (minced or powder). Let sit at room temperature for 30 minutes. This gives the batter a chance to thicken up a bit
  2. Coat a large round nonstick skillet with oil and heat over med until hot (add oil to pan after removing the socca and get it nice and hot for the next one)
  3. Pour ½ cup batter into pan and swirl around a bit (sort of like a crepe). use heat-safe spatula to loosen sides
  4. Cook socca until crispy on one side, flip and brown on the other side
The recipe shared on: A Gluten-Free Holiday Week 2 – Thanksgiving Favorites, Traditional Tuesday, and Wellness Weekend, Whole Food Wednesday 
Posted by Amber at

Labels: allergy-friendly, grain free, sides, vegan.

11 Comments

Leave a Reply

Your email address will not be published. Required fields are marked *

* Copy This Password *

* Type Or Paste Password Here *

You may use these HTML tags and attributes: <a href="" title=""> <abbr title=""> <acronym title=""> <b> <blockquote cite=""> <cite> <code> <del datetime=""> <em> <i> <q cite=""> <s> <strike> <strong>

Rate this recipe:  

Roots and Fruits (Roasted Parsnips, Apples, Pears and Walnuts)

This side dish is a really nice alternative to traditional white potatoes.

Ingredients:
-5 medium parsnips, peeled and chopped
-1 small red onion, chopped
-2 pears, peeled and chopped
-1 Granny Smith apple, peeled and chopped
-1 1/2 cups walnuts
-Oil (of choice)
-2 tablespoons garlic granules (salt is optional, I personally don’t use it when I roast) 

How To:
1.  Add parsnips, onion, pears, & apple to favorite baking dish and drizzle with oil.  Add 2 tablespoons garlic granules
2.  Roast at 400 degrees for about 35-40 minutes (check at 35)
3.  Lightly toast walnuts in saute pan on the stove top.
4.  Add walnuts to roasted roots and fruits 
5.  Mix together
6.  Add salt if desired, I omit.  
Serves 4-5

Shared on: A Gluten-Free Holiday Week 2 – Thanksgiving Favorites (2011), Whole Foods Friday, 
Posted by Amber at

Labels: sides, thanksgiving side dishes.

One Comment

Leave a Reply

Your email address will not be published. Required fields are marked *

* Copy This Password *

* Type Or Paste Password Here *

You may use these HTML tags and attributes: <a href="" title=""> <abbr title=""> <acronym title=""> <b> <blockquote cite=""> <cite> <code> <del datetime=""> <em> <i> <q cite=""> <s> <strike> <strong>

5 Super Easy and Super Tasty Side Dish Ideas For Your Thanksgiving Feast (dairy free, gluten free, white potato free, cane-sugar free, vegan)

Turkey is great, but a side dish can be the star of the Thanksgiving show!  I love to see what people have lined up at their Thanksgiving mealyou know the turkey is going to be there, no big surprise, but let me loose on the buffet table so I can check out how the sweet potatoes are dressed, what’s going to shine in the cranberry sauce, what’s that awesome looking bread?  Creating alternatives to traditional Thanksgiving cuisine is super easy.  Check out my 5 very easy side dishes.  There are endless possibilities for your meal, but my motto is to keep it easy, keep it fun and keep it super tasty!
***************************************************
#1
Roots and Fruits
(Roasted Parsnips, Apples, Pears and Walnuts)

Ingredients
5 medium parsnips, peeled and chopped
1 small red onion, chopped
2 pears, peeled and chopped
1 Granny Smith apple, peeled and chopped
1 1/2 cups of  walnuts
Oil (of choice)
Garlic granules 

How To
*Add parsnips, onion, pears, & apple to favorite baking dish
*Drizzle with oil
*Add 2 tablespoons garlic granules
*Roast at 400 degrees for about 35-40 minutes (check at 35)
*Lightly toast walnuts in saute pan
*Add to roasted roots and fruits 
*Mix together
*Add salt if desired, I omit.  
*Serves 4-5
***************************************************
#2
Socca Bread 
Gluten free, Grain free, Sugar free, Vegan, ACD, Xanthan gum free, Yeast free, Egg free….absolutely AMAZING flatbread!!!
(recipe from December/January issue of Living Without Magazine, pg.41)
Ingredients
1 1/2 cups chickpea flour (garbonzo bean flour)
1 1/2 cups filtered water
2 1/2 tablespoons oil (I used grapeseed)
1 tablespoon chopped fresh rosemary (you must use fresh!
3/4 teaspoon salt
1/4 teaspoon pepper
1 tablespoon minced dried onion (I used onion powder)

How To
*Whisk together chickpea flour, water, 2 tablespoons oil, rosemary, salt, pepper, onion (minced or powder).  Let sit at room temperature for 30 minutes.  This gives the batter a chance to thicken up a bit
*Coat a large round nonstick skillet with oil and heat over med until hot (add oil to pan after removing the socca and get it nice and hot for the next one)
*Pour 1/2 cup batter into pan and swirl around a bit (sort of like a crepe).  use heat-safe spatula to loosen sides
*Cook socca until crispy on one side, flip and brown on the other side
*Serves 4-5
***************************************************
#3
Smashed Sweet Potatoes and Cauliflower 
(this is really nice substitute for those of you who don’t want white potatoes at your meal; the cauliflower adds a nice texture and balances out the sweetness of the sweet potatoes – and best part, no boiling required!)

Ingredients 
3 large sweet potatoes, chopped
1 head of cauliflower, separated 
Oil of choice
Garlic granules (or 4 cloves fresh garlic)

How To
*Add sweet potatoes and cauliflower to your favorite roasting dish
*Drizzle with oil 
*Add about 1 1/2 tablespoons garlic granules (or smash the fresh garlic cloves and add in)
*Toss ingredients with oil and garlic 
*Roast at 400 degrees for 40 minutes
*Keep ingredients in roasting pan and use a potato masher to smash ingredients together.  Add another drizzle of oil for some additional moisture
*Add 1/4 teaspoon salt 
*Smash everything together well 
*Top with a little cinnamon (optional)
*Serves 4-5
***************************************************
#4
20-Minute Cane-Sugar Free Cranberry Sauce
(my kids ate this up like candy!)

Ingredients 
4 cups fresh cranberries
1 cup filtered water
1 sweet red apple, small chop
3 dates, seeded and small chopped 
1/4 teaspoon cinnamon
1/3 cup honey
1 large orange

How To
*In medium sauce pan bring cranberries and water to a boil, stir and turn down to a simmer
*Add apple, honey, dates and briskly stir
*Turn down to low and gently simmer for about 15 minutes 
*Turn off heat and add juice of 1 orange and cinnamon 
*When cool, transfer to fridge until ready to serve
*Top with orange zest
***************************************************
#5
Fig and Walnut Stuffed Acorn Squash 

Ingredients
2 acorn squash
2 cups fresh chopped figs
1 Granny Smith apple, peeled and chopped
1 ripe pear, peeled and chopped
1 1/2 cup walnuts, chopped
Oil of choice
3 tablespoons honey
1/4 teaspoon salt
1/8 teaspoon cinnamon
1/8 teaspoon nutmeg
pinch of ground ginger 

How To
*Cut squash in half and remove seeds, run oil around inside of squash
*Place face down in baking dish, coated with a little oil 
*Bake at 400 for 30 – 40 minutes (check at 30)
*In sauce pan, add oil, apple, pear, & walnuts, saute or a few minutes
*Add figs and salt, saute for a few minutes
*Add in honey and spices, saute together and cook on low until all ingredients are soft and have combined juices and most of the honey and oil has cooked off.  Turn off and allow to cool a bit before adding to baked squash
*Remove squash from oven when finished and turn over.  Allow to cool face up
*Add mixture to squash
*Serves 4 very hungry folks or up to 8 if each squash half is divided 

Wishing You a Health-full and Happy Thanksgiving
Be Well, Amber 
Shared on: A Gluten-Free Holiday Week 2 – Thanksgiving Favorites
Posted by Amber at

Labels: cane sugar free, dairy free, egg free, gluten free, sides, soy free, thanksgiving side dishes, vegan.

Leave a Reply

Your email address will not be published. Required fields are marked *

* Copy This Password *

* Type Or Paste Password Here *

You may use these HTML tags and attributes: <a href="" title=""> <abbr title=""> <acronym title=""> <b> <blockquote cite=""> <cite> <code> <del datetime=""> <em> <i> <q cite=""> <s> <strike> <strong>